Last post, my Trievaulx Blossom II was all outlined and had some felt stitched onto it.

I bought the felt from the fabric store and suspect it's most likely polyester. Not the same quality as the felt Alison put in her kits. Her's is wool and doesn't tear apart when you're cutting small pieces out. The one I got is painful to use but does the job.

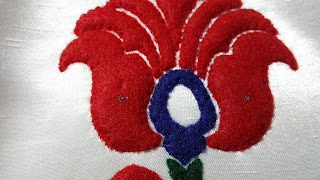
Except for the really small areas, everything has two layers of felt.


Here it is all covered with the felt.


Each dot represents a bead with the black lines going through it representing the thread. I tried to use different techniques in different areas. Doing that will show different sides of the beads, meaning the light will hit it differently giving the piece dimension.

Here is my bead palette. These are 11/0 size beads and I even got some Swarovski bicones and an owlet crystal.

I started with the biggest petals. The bicones are going to be used here, the hard part was finding the center and have them be symmetrical.
The Swarovski bicones are surrounded by a circle of clear silver lined beads. I don't know why, but I kept imagining them there and it wouldn't budge. No one at home, who'd seen them, liked them, but it kept reminding me of the flowers from Alice in Wonderland that could talk ^_^
For the large petals, I wanted to try my hand at couching down strung beads. It's the same technique used in goldwork where you couch down gold pearl purl, but instead of metal threads you have beads. I saw the technique in the Japanese Bead embroidery book I bought last year and wanted to try it out.

The beads are strung on a really long doubled thread that's already been anchored in the piece at the starting point. Once I have all my beads, I used another thread of the same color (single strand this time) and made a stitch every two beads to anchor it down. In some areas, I would stitch in between every bead to get the curve just right.

Once I got to the inner layers, I started stitching from the outside in between two layers. Stabbing at an angle will force the two layers closer to each other leaving no spaces. The hard part was making sure there were no spaces in between the strung beads. I wished I had a pair of komas. I've placed an order for those with the JEC which I'm picking up today since I'm in Atlanta while you are all reading this :) They will be very useful for next time I use this technique.

Here is one petal all stitched up.


I bought the felt from the fabric store and suspect it's most likely polyester. Not the same quality as the felt Alison put in her kits. Her's is wool and doesn't tear apart when you're cutting small pieces out. The one I got is painful to use but does the job.

Except for the really small areas, everything has two layers of felt.


Here it is all covered with the felt.

For this project, I decided to do things properly. I figured I should use all those sketchbooks and markers I've accumulated and actually plan things out before I start stitching. I redrew the motif in pencil and then with markers "colored in" the areas. The key here was figuring out angles and how I wanted the beads to be oriented.


Here is my bead palette. These are 11/0 size beads and I even got some Swarovski bicones and an owlet crystal.

I started with the biggest petals. The bicones are going to be used here, the hard part was finding the center and have them be symmetrical.

The Swarovski bicones are surrounded by a circle of clear silver lined beads. I don't know why, but I kept imagining them there and it wouldn't budge. No one at home, who'd seen them, liked them, but it kept reminding me of the flowers from Alice in Wonderland that could talk ^_^
 |
 |

The beads are strung on a really long doubled thread that's already been anchored in the piece at the starting point. Once I have all my beads, I used another thread of the same color (single strand this time) and made a stitch every two beads to anchor it down. In some areas, I would stitch in between every bead to get the curve just right.

Once I got to the inner layers, I started stitching from the outside in between two layers. Stabbing at an angle will force the two layers closer to each other leaving no spaces. The hard part was making sure there were no spaces in between the strung beads. I wished I had a pair of komas. I've placed an order for those with the JEC which I'm picking up today since I'm in Atlanta while you are all reading this :) They will be very useful for next time I use this technique.

Here is one petal all stitched up.

All that painstaking planning is paying off beautifully!
ReplyDeleteWow, this is beautiful. It'll be a pleasure to read all about your progress. Thank you for sharing.
ReplyDeleteOh my goodness, this is beautiful. I am sure that it is quite time-consuming, but the result is absolutely worth it. I am looking forward to seeing all those beads when this is finished.
ReplyDeleteWow, that's beautiful!
ReplyDeleteI missed your first post on this project some how but I'm now all caught up!
ReplyDeleteThis is a really interesting design, I love it! I've never done any bead embroidery but I always enjoy reading about how you make such beautiful pieces. Your colours look lovely!
And I know what you mean about non wool felt! It feels so different and is a real struggle to use. I went all out and bought a stash of a few different colours in wool felt and I'm so glad I did!
Enjoy your time away!
They really do look like eyes! The beads are stunning around the edges of the jewels. Couching is a great way to get them to lie just nicely. I am so looking forward to seeing your progress on this design.
ReplyDeleteLovely smooth lines and well filled. Enjoy your workshop at the JEC :-)
ReplyDeleteBeautiful! Thanks for showing the step by step.
ReplyDelete