Tuesday, December 31, 2019

Looking Back at 2019

I was still on a goldwork kick. I completed four small pieces, two of which are original pieces: the pineapple and the golden snitch. These have both been given as birthday gifts to friends.

Looking at the image below, I'm realizing that I never shared my blue bee on this blog. This little bug is from a kit by Georgina Bellamy aka That Embroidery Girl.

Clockwise from top left: goldwork bee by ThatEmbroidery Girl, pineapple by Dima, Tree of Life by Natalie Dupuis and golden snitch by Dima
My other finish is Mermaid of the Deep by Mirabilia that I started at the end of 2018. I'm hoping to get it framed next year to give to my sister.


This one is so small I almost forgot it.


Last and definitely not least, is my phase 1 piece Bouquet from the Heart of Japan. I was so happy when I completed this piece.


Travelling meant that Bramble and the Rose received some attention. I'm so close to reaching the bottom corner. I normally stitch on this piece in the last few hours of the year but I'm not sure if I will do that. I think I'd rather prepare the new pieces I plan on starting on January 1st.


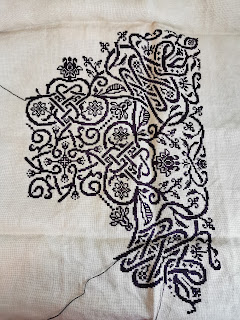
In the last few days, I've been putting in loads of time on two of my WIPs: Hedebo Starburst and Tracery Dragons. There is still a little bit of work to on the weaving in the center of the hedebo piece before I move onto the edge, there is also all the back stitching on tracery dragons left to do. But both pieces are very close to being finished.


December TUSAL Finale


The last TUSAL of the year! I'm ahead of time for once. My jar this month is very colorful because of Tracery Dragons. There are lots of pretty pastel colors in that piece. 


My overall jar is not as full as last year. Work and travel took up so much of my stitching time that I didn't have the energy to get more done. I'll just have to work smarter next year.

Now to write my year in review post and plan out next years goals.

Wednesday, December 18, 2019

Another Making Weekend

Last weekend I didn't do much embroidery as I was getting more acquainted with my sewing machine. This year I was invited to join my friend's family for Christmas and I bought some things for the little ones. I decided that instead of wrapping the gifts, I should make fabric bags to hold them and then the kids can use them as shoe bags. I'll share pictures once they are gifted. I had three to make, which made for good practice. By the time I got to the third one, it was a breeze. I still need more practice on how to properly cut my fabric. I'm still having a hard time with that.


I did do some cross stitching when I took breaks from my sewing machine. Today I'm looking at past pictures of Tracery Dragons and I was surprised by how much the piece has progressed. Before I pulled it out in November, the last time I had touched it was back in 2016. Three years later, I managed to finish the entire lower half within a month. I don't think it will be finished before end of year, but chances are high I will finish it next year.

December 2016
December 2019

Thursday, December 12, 2019

Best Laid Plans

So things didn't go as planned last weekend. I didn't end up going to my Japanese embroidery meeting because of major highway closures. So I ended up staying at home to stitch on Hiogi. I went ahead and worked on the cherry blossom. The padding went much better than they did during class. So I'm happy about that.


However, it didn't go so well once I moved onto stitching the actual petals. The instructions say to use a strand of #1 gold or silver to stitch the cherry blossoms. Since the cloud already has gold twisted into the thread, I'd rather do it in white. I attempted to stitch one petal and was just not happy with it. I've found I needed to put way too many stitches in order to cover all the padding. They're also too close to each other.


I do admit that I gave up after one petal, but in my defense I was tired after putting in all the padding and was ready to pack it all up. A friend suggested trying 1.5 flat to see if I get better coverage.


I did make loads of progress on my hedebo piece, I have the entire left side done. I plan to work on the right side next.


The end of the year is coming fast, I need to start planning what I want to start next year. I already know I won't be starting a new whitework piece as I'm still working on finishing the hedebo piece. I'd love to finally start one of the Hazel Blomkamp kits I have. There are also some kits I bought when I went to Calgary in the summer...

Friday, December 6, 2019

Japanese Embroidery Phase 2-3 - Fuzzy Effect 1

A little update on my Hiogi fan. I made time last Sunday to stitch down the snowflake in the upper right corner. The reason this was such a high priority element, is that it's made up of long flat silk stitches. There is a danger of them shifting or getting snagged. For them to be secure they needed to be stitched down.


This technique is called fuzzy effect. There is a whole phase piece on it (phase 8) and is a really fun stitch but it requires very good light and eyes. The silk can be couched down either diagonally or vertically, using the same silk color or a different color to give a more blended effect. In my snowflake, we are using the same color silk and couching down diagonally.


This Saturday is my monthly Japanese embroidery class. Looking at my to do list, I have the cords up next but I think I want to give the cherry blossoms another go so I can finish the peach cloud. I'll see how I'm feeling then.

  • finish the snow flake in the upper right corner (high priority)
  • continue cords and finish them
  • finish shippo cloud
  • finish peach cloud
  • start and finish the separated single layer paulownia (low priority)

Wednesday, November 27, 2019

I See Traces of Dragon

Tracery Dragons is still holding my attention. I'm almost done stitching the bottom half. Originally I planned on only stitching the stone and leaves but since I need to move my q-snaps, I figured I might as well finish it all before moving onto the top. You can't really tell from the picture but there is a little sparkle in the dragon. The colors are just so pretty against that dark fabric.


The left side of Hedebo Starburst is ready for stitching. I ended up powering through it while watching Disney movies. I'm loving Disney+.


I've started another piece, but it will be a while before I share anything here. If you're curious on what it is, check out my Instagram stories

Monday, November 18, 2019

Blast From the Past

Remember this piece? It's Tracery Dragons by Teresa Wentzler. I had to look it up, but the last time I stitched on it was December of 2016. After I finished Mermaids of the Deep and Miniature Midnight, I didn't have enough time to start something new (I was leaving for Winnipeg) and I didn't feel like working on my other WIPs. So I decided to pull out something that I haven't touched in forever.


Another more practical reason is that the thread box is taking up some space and hogging floss. It would be great if I can finish it and pack everything away.


Once I got back into it, I made some very good progress. There is still some stitching to do on the bottom half (more leaves) but it should be almost done. Except for the dragon, I haven't started putting him in yet. I think I will leave him for last. I really should have been working on my Japanese embroidery but I couldn't stop once I started.


I also worked on Hedebo Starburst. The top side is all done and you can see the entire pattern. I need to clean up the sides (or at least one) in order to continue. I'll try to put in some time tonight.


Saturday, November 9, 2019

October TUSAL


I realized this morning that I forgot to post my ORT jar for the month. I'm looking at what's in there and I couldn't remember where some of the threads came from lol. I had to look at the previous blog posts.

I'm still recovering from my stitching marathon last weekend, so I have no set stitching plans this weekend. I'll see what I feel like doing tomorrow.

Thursday, November 7, 2019

Japanese Embroidery Phase 2-3 - November Class

This weekend we had a 4-day Japanese embroidery class. We were 10 stitchers working on 5 different phases with 7 different designs. Our teacher has the patience of a saint, I don't know how she was able to keep up with all the different people and pieces.

I was working on Hiogi, learning the phase 3 portion of the piece. We did phase 2 last April.


Day 1, we worked on transferring the cherry blossoms back onto the the peach cloud. We did this with tissue paper, putting in little tacking stitches.


Once the tissue paper is removed, we are left with little flowers on the foundation layer. Stitching over a foundation is called superimposed technique. I attempted to stitch a cherry blossom but I got so frustrated with it. My padding string kept sinking into the foundation. I decided to leave it alone and work on something else.


On day 2, I started working on the grommet (I had to learn that word). We realized too late that we should have had this completed before class so we can start stitching the cords. In Japanese embroidery, the rule is you always stitch from front to back. So here I am putting in string padding.


I only had time that day to put in all the padding and stitch over one part of my grommet.


On day 3, we started cords. This particular cord is called a single central braid. I was really nervous about starting cords as getting the angles just right are very hard to do. However, it went much better than I expected. Not to say I'm looking forward to stitching an entire piece of cords (phase 5 is a cord piece), but I'm not dreading it anymore.


On day 4, I continued stitching on the grommet. I needed it to be completed before we can start stitching the fan handle which is covered in goldwork. We really should have done all this before class.

I made one attempt...


...two attempts...


...before I figured out how to get them just right. It was just a matter of using a single strand of flat silk versus two. Once we figured it out, it all worked out on it's own.


I'm really happy with how my angles came out, especially on the left side. I didn't end up starting goldwork on the fan. The teacher did a demonstration in class with phase piece that was much further along. But for those of us still in the middle of our stitching, we decided to hold off starting until we have more done. In normal circumstances, the goldwork is only put in at the very end, which is a hard rule to follow if you are taking classes and need to at least do enough to show the teacher you understand the technique. I made the decision, to finish the cords before I start the goldwork.


On the last day, we also covered a new kind of twisted thread. This is called a katayori. It's kind of like a rickrack thread and very finicky to make. We need to learn to make them for our learning pieces, but apparently once we reach phase 10 they want us to buy the machine made threads which are more perfect. I wasn't particularly crazy about them but I could learn to like them as it means I can create my own color combinations. The one I made is a peach with #1 gold embedded in it.


So here is my piece after four days of stitching. It doesn't look like much, does it? After this class, I can confidently say I can finish this piece on my own. I plan on taking some time off around Christmas so I'll have lots of time to work on it then.


My ultimate goal is to get at least 80% done by April of 2020 for our next class, where I plan on starting the next phase. So here's my to do list, there is more but I think it's enough for now:

  • finish the snow flake in the upper right corner (high priority)
  • continue cords and finish them
  • finish shippo cloud
  • finish peach cloud
  • start and finish the separated single layer paulownia (low priority)

Wednesday, October 30, 2019

Back From Winnipeg

I'm back! And look two posts in one week. As I write this, I'm working my last night shift. Lots of time waiting around for things to go wrong. Luckily things have been going very smoothly.

I took three projects with me to Winnipeg, but only touched two of them. The third one was a really bad choice as it was on a dark fabric, not to mention it took up space in my suitcase. On the plane, I stitched on Bramble and the Rose. I'll probably do the same on the return flight. Trying to complete that bottom right corner.


The rest of my trip was spent working on my Hedebo piece. I've been avoiding it before as I have a lot of really short strands to weave in. To avoid dying of boredom, I'm doing enough at a time so that I can start the dove's eye pattern.

Every time someone sees me stitching this piece, they ask "you don't use a hoop?" Well, here I am finally using one. I always prefer not to use a hoop when working on counted whitework. I only pull it out for the pulled thread portions, as you need an even tension on the fabric.


After few days of working on and off, I can finally see the beginning of the starburst pattern. With the amount of weaving I still need to do, I'm a long way off from the end. But it's going to look so pretty when it's finished.


While I was in Winnipeg I had some free time. I visited Lizzy B's, a cross stitch store where I bought the Thea Gouverneur kit, Teresa Wentzler pattern and the pretty needle threader. It's purple, I couldn't leave it at there! The second shop is called NeedlePoint Place M & N's. The owner Ewa was nice enough to host me for a little stitch-in at her shop, so I would have a place to stitch outside my hotel room. I did buy some threads from her (not pictured) for a project I want to start very soon.

Before leaving for Winnipeg, I also organized a stitch-in with the Winnipeg Embroidery Guild (did you know that EAC was founded in Winnipeg by Leonida Leatherdale?). One of the guild members agreed to host it at her house and it was Kathryn Drummond. I met Kathryn back in 2014 at the Creative Festival in Toronto where I took Punto Antico for the first time. We had a lovely time catching up and I even brought back some goodies from her house: three new Punto Antico books. I also met a fellow embroiderer from Instagram. It's always exciting when I get to meet Instagram stitchers in person. Her name is Cathy Wiebe and she's a couture dress designer. We had a great time exchange information on embroidery, me on Japanese embroidery and her on Lesage where she is learning Luneville embroidery.

All in all I really enjoyed my trip to Winnipeg, despite the snow at the end of it. I could have lived without that.


Monday, October 28, 2019

Midnight Miniature by Hazel Blomkamp

A long time ago, while I was still only doing cross stitch, I purchased many kits from Hazel Blomkamp when she visited Montreal in 2015. I was very ambitious you see.


As the years pass, I will take one out, look at the instructions and pack it away again. I kept putting it off as I didn't feel like I was quite ready for this type of embroidery. I'm just really intimidated by traditional surface embroidery. Despite the fact that by now, I've learned goldwork and Japanese embroidery, which are both, in a sense, also surface embroidery techniques.


When Hazel released her last book, I decided to order it and get one of her smaller kits to dip my toe in so to speak. I ended up getting Midnight Miniature, also known as JAC-20. It's a smaller version of Midinight Meander, which is the first kit I would want to stitch, so it works out. The kit comes with everything to stitch it, including needles. All I needed was a hoop and scissors.


Having just finished a big project, the mermaids, I was itching for a new start. The piece has a lot of beading, which I love, and a tiny bit of surface embroidery. Mainly sating stitch, chain stitch and needle painting. The only part I really dreaded was the needle painting as it's hard for my brain to stitch randomly. But all in all, I think I did very well.

(click on the post to see the animation below)


The piece came out more gray and silver than the purple you see in the kit picture. It still looks lovely. It would make a lovely applique for a black dress or blouse if it was stitched on organza. Something to think about for the future (not that I like to stitch the same thing twice...). In the meantime, I need to decide how to finish it. I'm thinking a box top.


The kit took me 3 days to complete from start to finish, about 11 hours of stitching time. Not bad, considering the kit cost. If you're thinking of stitching one of Hazel's kits and are not sure if you're up to the task, this is an excellent piece to start with. The instructions in the booklet are structured in the exact same way as her books, very easy to follow. And with it's size, it makes a great weekend project to stitch. After finishing it, I felt ready to jump into stitching the real Midnight Meander, so I might just do that when I get back from Winnipeg.