Showing posts with label Original. Show all posts

Friday, July 5, 2019

Framing with a Shadowbox

As my Goldwork Pineapple is so small and I was on a tight schedule, I decided to frame the piece myself. I definitely wanted protection for my piece which meant some sort of glass, but I didn't want to squish my stitching. The nicer solution would have been to use a frame with double mat to lift up the glass, the easy solution was to use a shadow box. I went to my local Michael's and found a size that would work perfectly. It only comes in a pack of four, but I was able to split it with a friend.


First step is measuring the inside of the frame.


Use those measures to cut out a piece of mat board.

To my shock, my measurements came out spot on. This would be amazing in normal circumstances, but in this case I need something a little smaller to make space for my fabric.


I trimmed the edges on the top and on one side to create that space. Just enough wiggle room for the piece to sit comfortably in the box.


I don't want my embroidery to come out flat, so I glued a piece of batting to my mat board.


I laid my piece on the mat and put the shadow-box over it to get an idea of what it will look like once completed.


At the last minute, I decided to do something I normally never do and that's sign my work. I usually keep the pieces I make so I've never thought of signing any of them. So for the first time ever, one of my pieces is sporting a signature. It's nothing fancy, just my initials and the year. The heart was completely accidental. I put in a line that I had to quickly convert to a heart so it wouldn't look weird.


Next step was the stretching. Luckily the piece is really small and the fabric big so I was able to get this done pretty quick.
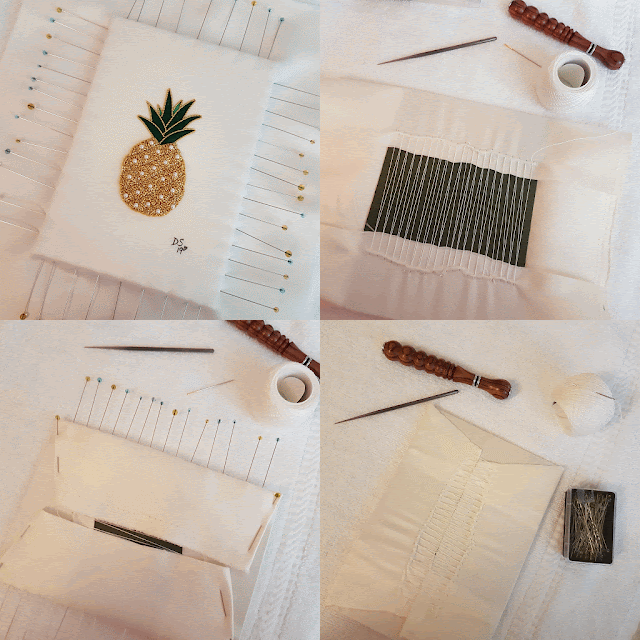

Once it's been stretched, it's ready to be popped into a frame.


In my case, I needed something to stick my piece to the back of the shadow-box. I wanted something with a little height to push my piece forward. I found this double-sided tape by Scotch. It's not archival quality and non-toxic. If my piece was embroidered on silk, I would never use this but in this case it was okay.

My piece is ready to be gifted and I even wrote a little message for her on the back. My friend really liked it, I'm happy to say. I have a video of her opening it and I will always remember the look on her face when she got her first look at it.


Tuesday, June 25, 2019

Goldwork Pineapple

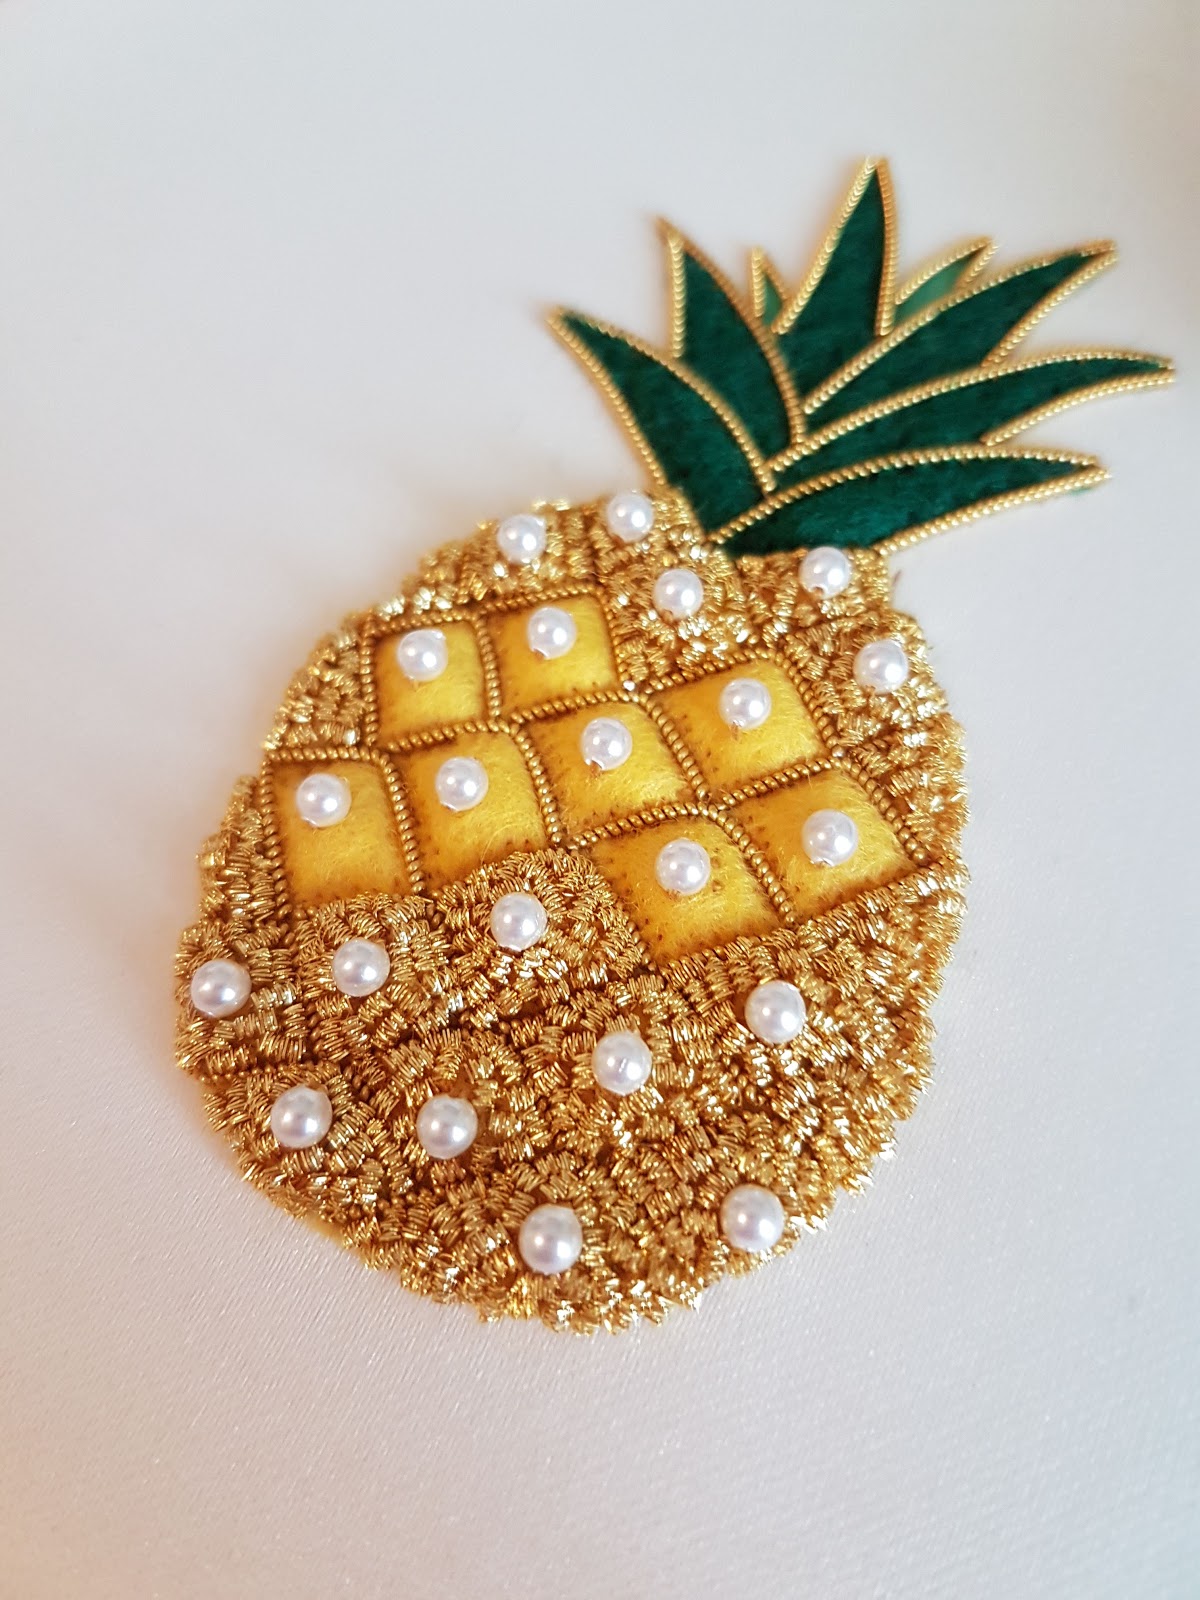
Sorry for being so absent, I do have an excellent reason for it this time. I've been working very diligently on a piece but I couldn't share anything until it had been gifted. See, my friend's daughter really liked the golden snitch I made for her mother's birthday and asked if I would make something with the same gold thread for her birthday, which was coming up. Not a brooch but something she could hang in her room. After thinking about it, I asked if she'd like a pineapple as I noticed she always wore a necklace with a small pineapple charm. It's a great subject to stitch in goldwork and I've never made one, so I figured it would also make an interesting challenge.

I looked around for a stock image of a pineapple that appealed to me and used that as my design outline.


To give you an idea of how small it is, here is a picture with my hand next to it. I'd already put in the felt padding for the leaves.


I wanted the pineapple to have some dimension and had to really think of how I wanted to do the felt padding. I didn't want it to come out flat, so using a single piece of felt wouldn't have worked even if I put in padding underneath.


So I decided to do it the hard way and individually pad every little cell. The cells in the middle had three layers of padding while others had two or even one if they were along the edge.

(click on the post to see the animation below)


I didn't want to pad the little leaves at the back, but I couldn't leave it white as it would look strange. After a quick color test on the edge of the fabric, I filled it in using a green marker.


I really like this picture as it shows the true color of the felt. For the leaves I went with a simple outline in pearl purl.


I did the same for the cells of the pineapple. 


To fill in the cell of the pineapple, I went through my stash of goldwork materials. I narrowed it down to a few things and created an intricate design.


Unfortunately, once I stitched it I really hated it. It was too fussy and not representative of my tastes at all. I prefer much simpler designs.


I scrapped that idea and decided to change direction. The birthday girl is born in June, which means her birthstone is pearls. Luckily, there is a bead shop near me that stocks Swarovski crystal pearls in the right size and color I'd need.


I've seen how beautiful bright check looks against pearls when I stitched Pearl Butterfly. Luckily I had a stash of it leftover from kits. By the way, all materials I used in this project, except for the pearls, are recycled from other project kits. So look through your stash of leftovers! You probably have enough to stitch a small piece.


After making this decision, I was very happy with how it came out.


I originally planned on putting in cutwork on the leaves with some green rough purl I bought from Turkey, but I decided to pass as I really loved how the leaves looked as they were.


This piece was a very quick stitch. From start to finish it took about 25 odd hours over 9 days. Even less if I don't include the time I spent dithering over what to do. In the next post, I will show you how I finished and framed the piece into a shadow box.

Friday, July 20, 2018

Samara - Part 2

All pieces displayed in exhibitions must be finished. For Samara, I didn't want a boxy frame, I wanted something round. I started looking around for a round frame, always keeping in mind plan B: stretching it over a round mat board and covering the back with a fabric. I even had my framer cut a piece for me just in case.

Luckily I found the Sudberry House Crown Plate on 123stitch. The stitching area was a little bigger than I wanted, but everything else was too small.


The frame when it came in was beautiful. I loved the color of the wood. It came with a piece of glass, a mat board and a board to close off the back. It also included instructions on how to frame your piece. The only thing I wish it came with was the plate holder. The site I bought it from didn't stock it, but more on that later.


I used the mat board that came with the frame to cut a piece of quilt batting and then trimmed that piece by about half an inch.


!Warning! Glue was used in the finishing of this project.


The hard part was getting the piece centered over the mat and properly stretched.


I cut the excess fabric and did a running stitch all around. Once that's done, I carefully pulled on the thread so it wouldn't snap. To keep things in place, I put in some lace stitches going both directions.


Here it is all done. Based on the instructions, if you pad the piece with quilt batting you shouldn't use the glass. I didn't want to squish my purls anyways. I will keep the glass safe somewhere in case I want to switch out the piece later.


Back to the plate holder. Since I couldn't get the one by Sudberry House, I need to find a different way to display the piece for exhibition. It's always better to be prepared as the exhibition committee doesn't necessarily have enough easels for all pieces, so I like to provide my own. I went to Michaels and found a lovely bronze stand that went really well with the color of the wood. I made a little tag for it to make sure I get it back at the end of exhibition. I didn't think to take pictures of the two together. I will take them when I bring the piece back.


I'm publishing this article on Friday. They will be announcing the results from challenge at the banquet on Saturday night. Wish me luck!

Tuesday, July 17, 2018

Samara - Part 1

I'm writing this ahead of time. By the time you read this I should have submitted the piece that I stitched for the EAC board challenge I had mentioned in June. The theme this year is "Celebrating Canada". Now whether my piece really makes you think of Canada or not is a different story.

I didn't want to do the typical red and white. I'd found a Japanese emblem in a book with a maple leaf and maple keys. As a kid, we called maple keys helicopters because of the way they spin and we used to love playing with them. We didn't have anything like it in Lebanon or Saudi Arabia where I was born. So for me it was something that was unique to Canada. It's only now I realize these things have an actual name: maple keys or samara.


I decided to stitch this piece entirely from my stash. Last year when Alison Cole started a goldwork subscription box, I signed up but only ended up staying on for two boxes. The first box was gold and greens, which would be perfect for my piece. Before maple keys become dried and yellow they're green.


I spent a lot of time dithering on what I should do exactly, then one day I decided enough! I'll transfer the design and start with the parts I'm 100% sure of. I transferred the design using the paper tissue method. This was practice for when I needed to do it for my seminar class.

(click on the post to see the animation below)


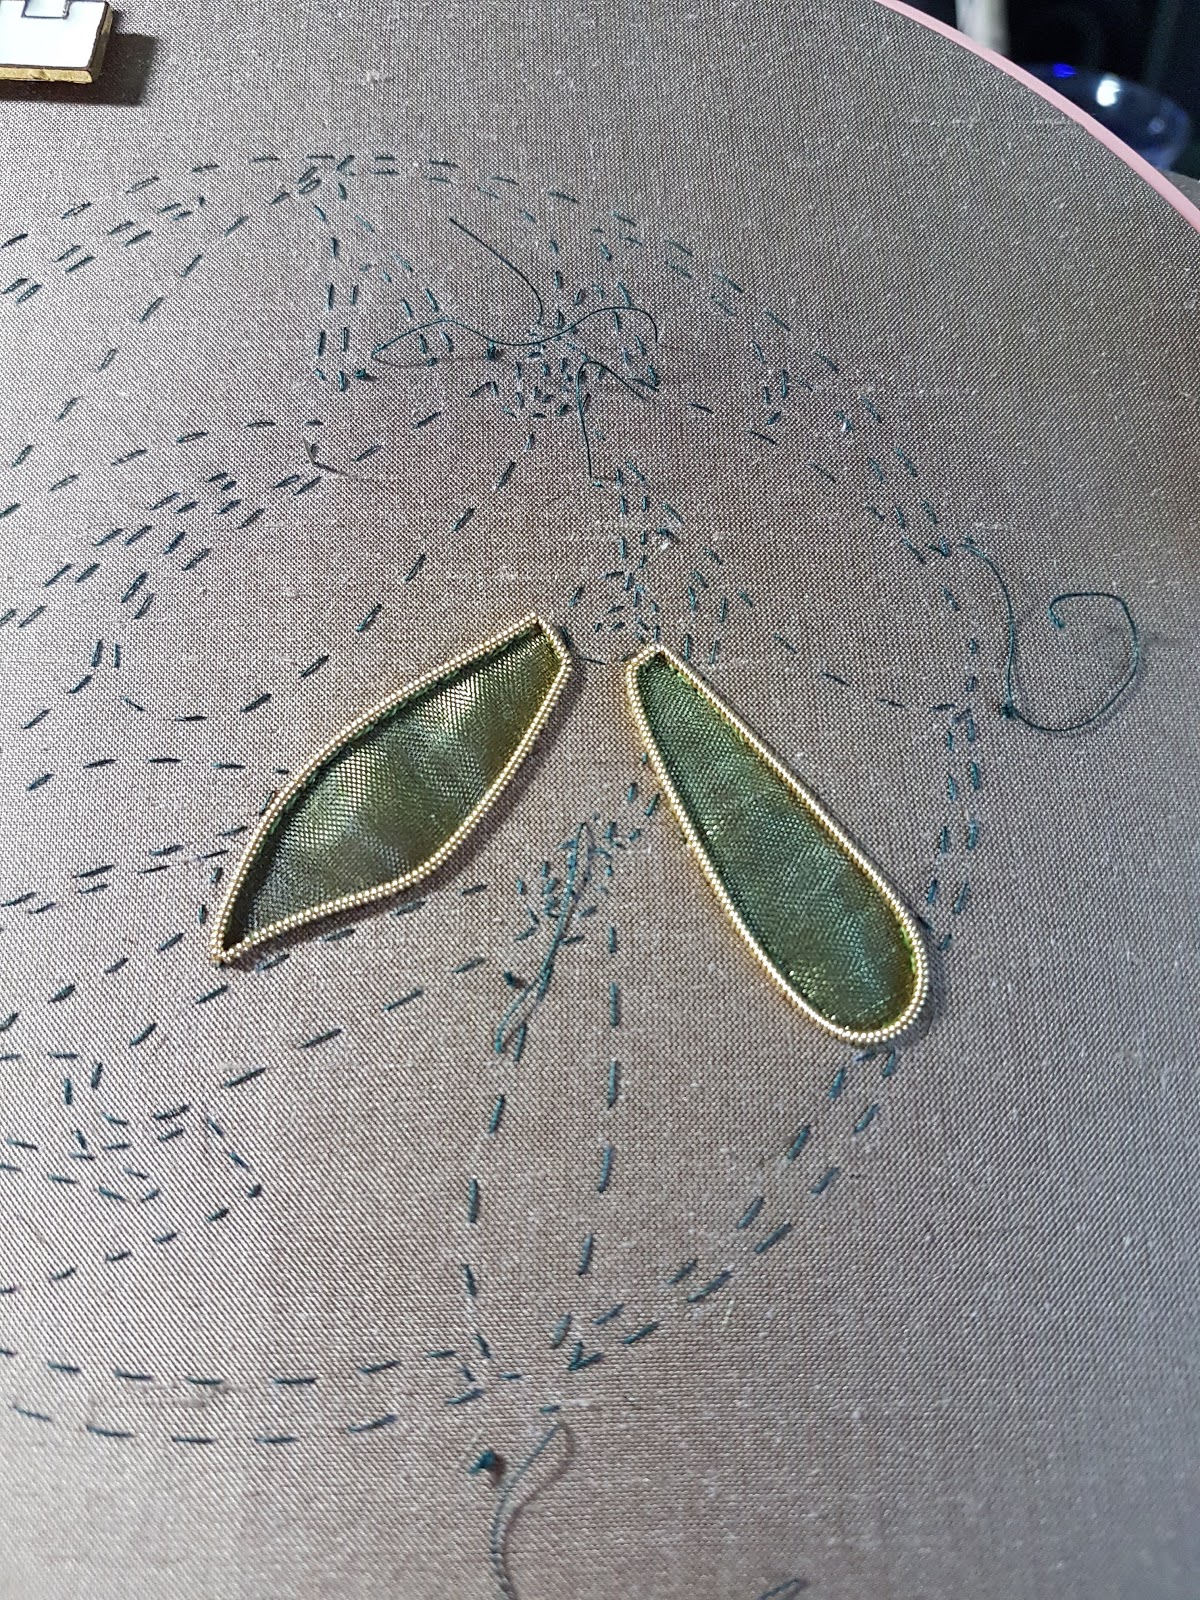
I really loved the piece of green organza that came in the box and really wanted to use it.


I decided to use a technique I learned from Annie Penin. In a class I took with her, she had couched pieces of organza for the leaves and the frayed edges were covered with a line of beads. In my case, I used gilt pearl purl.

(click on the post to see the animation below)


Here is what it looks like once done.


To add a little dimension to the piece, I decided to just outline the smallest maple key with a super pearl purl.


From my initial design sketch, I planned on padding the biggest maple keys and completely cover it in cut smooth purl.

(click on the post to see the animation below)


Then I got an idea of only partially covering the keys with cutwork. The green area would be covered in the green organza. I tried it on one of the keys to see if it would work out and it looked much nicer to what I originally planned.


I first created a template of the shape of the padded area. From there I covered the open area with green organza. I wanted a clean shape so I went well passed the area that is visible, but it will be covered with felt. Next step, is applying the felt which is then covered with smooth purl cutwork. The key is finished with a line of pearl purl to define the bottom edge.

(click on the post to see the animation below)


Around the maple keys is a tree branch. I knew as soon as I saw it I will cover it in couched gilt passing. So this was an easy decision.

(click on the post to see the animation below)


This is where the dithering started. Because of the shape of the maple leaf and it's size, I wasn't sure how I would handle stitching it. I was originally going to "needle paint" it using colored purl and even bought a lot of different leaf colors, but I wasn't convinced.

I was at my Japanese embroidery meeting and discussing ideas with the group when Japanese silk was mentioned. This reminded me that I might have the perfect green flat silk in my stash.


By this point, I'd started learning how to stitch at an angle in Japanese embroidery but I'm no where near proficient. I had a terrible time with outermost edge and had to do it twice. Doing the other edges helped me get some practice in.


Sorry for the terrible picture, I think I finished it late in the evening. I'm quite happy with how the silk came out. This was a great piece to play with flat silk and practice stitching, now I just have to do better on my phase 1 piece. As a reference, the leaf was stitched in 2F (2 strands of flat silk).


Next is some chipping. You might remember this picture. That's gilt bright check and green rough purl. I'm making use of the pretty metal threads I brought back from Turkey.


I used a piece of paper to cover the stitched silk. We don't want the metal thread to snag on it. I started off the chipwork with just green for the smallest key before inject gilt in the second key, with the last one only having gilt.

For the maple leaf, I didn't want to leave the vein uncovered. First, because it doesn't look nice and second, I really wanted to hide my uneven edges. You might not see them, but I do. I love s-ing and I thought it would look lovely against the green.

Everyone who saw the piece, kept asking "are you going to leave that third one empty?". They were talking about the smallest maple key. I decided to scatter tiny little pieces of check purl.

I needed one last thing to tie the entire thing together, a couched edge going all round. I had a piece of mat cut in a circle that was the perfect size and used that to draw an outline all around.


I thought about using passing for the circle but decided to go with a 3-ply twist that came in the subscription box.


Although, I didn't technically use all the materials that came in the box (still no idea what I'd do with the washers) I'm very happy with how it came out. It looks even prettier in the frame I bought for it. I will show how I framed it in the next post.