Tuesday, March 31, 2020

Flowers are Growing

I have a little bit of progress on two of my pieces. I spent a few hours every night on Midnight Meander last week. I also redid that lattice, it looks so much better. This piece contains two DMC threads I can't stand: satin floss and light effects. The light effect thread wears out fast, especially near the eye of the needle, and the satin floss is really slippery. If we weren't in a special situation and everything is in lock down, I would look for a substitute.

In case someone else is interested, you can replace the light effects thread with DMC Diamante in the same color (the number matches). DMC Diamante is an excellent metal thread to stitch with. It doesn't fray like the light effects and it maintains it's twist. As for the satin floss, I had substituted the Anchor Marlitt with their DMC Satin equivalents, but I would go even further and substitute it for Japanese silk if I could.


For a bit of a change, I worked on Elizabeth. It paid off as I finished all the stitching for the skirt.


I've also finished stitching the little purse (pictured below) and all the pieces to make the trunk. I had started stitching them after I came back from Brampton, thinking I would leave the skirt for when I travel. Little did I know that there would be no travelling anytime soon.


The plan for this week is to start gathering all the materials needed to do the finishing for the trunk and doll. I should have most of it, just need to figure out if my piece of green dupion silk will be big enough as I bought it for just the trunk initially.

Tuesday, March 24, 2020

Midnight Meander - New Start

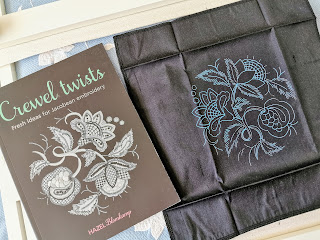
I've been talking about it for a while on this blog, but I finally did it. I finally took out Midnight Meander. There is no going back now.


If you're not familiar with Midnight Meander, it is a design by Hazel Blompkamp from her book Crewel Twists. Her designs use Crewel techniques but all threads used in the pieces are cotton instead of the traditional wool, and they include beads which is also not traditional.


This design is darker than what I normally work on. It's stitched in black, white and shades of gray. Not colors I'm attracted to, but I couldn't resist all those beads.


I decided to use a frame to stretch the piece for stitching as I don't like working with hoops. My French embroidery frame allows me to quickly mount the piece. I could have used my RSN slate frames but that would have taken the entire day to set up and I wanted to quickly jump in to the embroidery.


The instructions in the book are good but they lack progress shots. Back when I first bought this kit, I didn't have the confidence to work on it and get the results I want. But after completing a phase in Japanese embroidery and stitching many kits, I now have the experience to stitch it to my standards. I'm kind of a perfectionist if you didn't learn that by now.


Having experience means that I read the instructions given, but then use my own judgement on whether to follow them or not based on what I've learned. One example of this is the line of beads that surround the calyx. Except for using the thread and bead color noted, I didn't follow the instructions at all and instead used what I learned in Japanese bead embroidery.


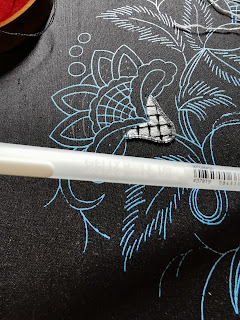
The results came out really quite nice and I have a lovely curve. As I look at it though, I wonder if my lattice needs to be redone. I feel like they are too spaced out, what do you think?


One technique I'm still not confident in is long and short. Nothing I can do about it, except do more of pieces with long and short. I'll have to start looking around for a piece in the many Trish Burr books I have. I do know that putting in guidelines helps and I used a Gelly Roll pen for that. This is a great pen to have in your embroidery etui as it's archival and doesn't smear.


I did see some improvement after the third and fourth petal. Nothing beats repetition when learning a new skill. So I know what the solution is, I just need to implement it.


Except for that lattice, I'm very happy with how it's looking.


Has anyone else stitched this piece? I would love to see your version and hear your experience on stitching this piece.

Tuesday, March 17, 2020

March Trio Exhibition - Peggy Kimble

Before leaving for Brampton, I found about about a special exhibition happening in Blue Mountain, Ontario. It was two hours away from my hotel so a little too far. However, I ended up meeting with a friend who lived 40 minutes from my hotel in the same direction, which made the trip not seem so far when traveling in good company.

I was so happy we could make this happen as the exhibition was showcasing the works of Peggy Kimble, who was one of the first Japanese embroidery teachers in Canada. In fact, she was the teacher of my mentors who guide me today on my own journey.


We unfortunately couldn't make it to the opening reception and meet Peggy in person, but we still enjoyed seeing all the pieces she has stitched over the years. The picture below is a short bio on Peggy's life.


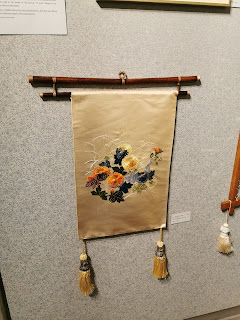
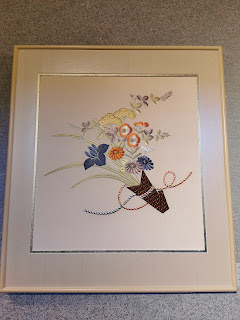
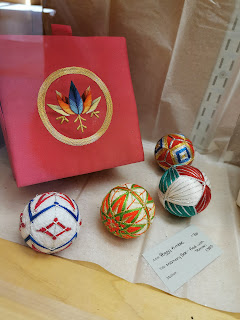
For all those who cannot visit in person, here are pictures of the pieces that were exhibited. They were amazing to see in person as you really can't showcase the shine of the metal thread and silks used in the embroidery. Seeing them all in person has expanded my wishlist by quite a bit...


Monday, March 16, 2020

Say Bye-Bye

Because of all that's going on in the world, I finally found myself with no where to go on a weekend. It's been a while since I've had one of those. I decided that this is a great time to get a move on Hiogi. If you remember in my last post, I decided I want to change the peach cloud at the bottom.


This means ripping it ALL out. I had a lot of shocked messages on Instagram when I did this, but believe me it was worth it.


It took a few hours, but you cannot imagine the relief when it all came out. I'm hoping this is just the incentive I need to start liking this piece again.


As this is the second time I will be stitching this section, there are a few lessons learned and changes that I want to make. The first is in how the thread is twisted with the metal thread. When we met in the fall, our teacher mentioned learning a new tidbit from the JEC. When twisting with #1 metal thread, it was recommended they take the core out. This was news to many of the teachers. I decided to try it out.


It is an extra step and slows me down. Not sure I see a difference visually, I'm too busy admiring that pink with the gold, but I can say that it is much easier to stitch with as there is less friction.

There will be other changes that I will make in this section, I will mention them as I go along. They're not drastic changes that will affect how it looks, just in how it is stitched.


I didn't do much progress in terms of stitching, but I can already tell I will be much happier with this new color pallet. Here's a side by side comparison.

Since I'm sharing an update on Japanese embroidery, I guess this is a good time as any to announce that my trip to Japan is cancelled. I was supposed to leave in 10 days but with all that's going on, we are being told to stay home and not travel internationally or domestically. My company has even implemented a work from home policy to accommodate the announcement. This means no more commutes, which translates to more time for stitching.

Wednesday, March 11, 2020

February TUSAL


I'm back from Brampton. I meant to post last month's ORT before leaving but I completely forgot, so here I am a week late. I can finally share pictures of the mystery item, it's the Child. He is a very hefty boy. My friend was very happy with him, so he was worth all the trouble. That fuzzy thread was a nightmare.