Friday, December 31, 2021

Looking Back at 2021

2021 was another strange year. I switched jobs twice and we're spending a lot of time at home. Because of this I was able to complete two of my longest WIPs. I'm most proud of how I finished Bramble and the Rose. I get to admire it every time I go into the living room.

Tracery Dragons by Teresa Wentzler
Bramble and the Rose by Ink Circles

I bit the bullet and made a doll...

Elizabeth by Giulia Punti Antichi

and an elephant.


I completed two Japanese embroidery pieces and will soon be a phase 5 students.

Karahan - Phase 4
Hiogi - Phase 2/3

Finally managed to find a Japanese bead embroidery teacher. I was so happy to be able to move on with my studies and will have more in future.


One of my favorite pieces from this year is the beautiful blackwork Color Wheel by Jen Goodwin. It was such a joy to stitch and look at all the pretty colors.


Covid opened up a lot of opportunities for us to take classes with teachers both near...

Mariner's Compass by Cynthia Jackson
Armillary Sphere by Cynthia Jackson

And far. The biggest opportunity Covid brought me was the chance to take a class with a professional Japanese embroiderer in Japan. This would never have happened under normal circumstances.

Peach Blossom and Bird by Kurenai-Kai

So even though I was stuck at home with no where to go, I was able to go very far thanks to social media and Zoom. I look forward to more learning opportunities in 2022!


Armillary Sphere - Lesson 5 & 6

It was a close call but I made an effort this week to get Armillary Sphere completed as I did not want to drag this project into the next year.


It's a really simple stitch, just repeat lessons 2 and 3. Unfortunately, I'm the type of person who dislikes doing the same thing twice. Once I started though I was able to get everything done in about two sessions.


Turns out the stitching was the easy part.


The hard part was cutting the piece out and stitch it on. I had a very hard time getting a close trim.


Now that it's done I really like the effect. It's currently sitting on my desk, propped on the wall and I enjoy looking at it.


With this, the second piece in the series is completed. Crossing my fingers the third design, the Astrolabe, gets released next year. So I'm going to hold off on framing this one until I stitched the final piece.

December TUSAL Finale


The last TUSAL of the year is mainly covered in white (like it is outside). I've been busy finishing up a few things like getting Hiogi ready for framing.


My full may not be as crammed as last year but it's still pretty good.


As usual I'm writing my end of year posts at the last minute so expect to see a few posts from me soon.

Monday, December 20, 2021

Japanese Embroidery Phase 2 & 3 - Finished!

Here it is, all done! It's still on the frame though. I was planning on starting the framing process over the weekend but realized on Sunday I didn't have enough white cotton fabric. I'll be passing by the shop this week to get some as I want to complete the framing before end of year.


The pictures on the JEC shop is not very nice, but the colors came out fantastic. It was worth the 338.75 hours it took to stitch.


With this piece completed, I now have 4 phases done. I will be starting phase 5 and 6 next year. For now, I will having only one Japanese embroidery piece on the go. I should enjoy it as it won't be long before I have a slew of pieces on frames.


I've already taken my bird out of hiding and I decided I will attack it in areas. I will start with the isolated branch on the left. It's a good one to start with as I'll be able to stitch leaves, buds and a branch for practice. I will be off work for a week and a half starting Friday, and I'm hoping to have this branch completed by the end of it. If I'm able to get more done, all the better!

Wednesday, December 8, 2021

Hiogi - Finishing up

From my last update, I only had a few elements left. The first one is a little snowflake near the orange cord. This is the second element done with fuzzy effect. That one was done with diagonal held stitches (you can see it here), so now we get to try the second method with vertical holding stitches. 


I felt the piece didn't have enough silver in it, so my snowflake is stitched with #1 and #2 silver thread. I used #2 for the center and #1 for the spokes. 


The metal thread is couched down with a greay silk that I twisted to make couching thread from.


The second element is the outline of gold that goes around the fan to give it's shape. This was really difficult as it started with a straight edge and then curved. When we initially did the pre-work, none of us were aware we needed to leave some space for this outline. I had a little trouble getting a nice curve near the shippo cloud as the cardboard padding kept getting in the way. So for those stitching this in future, leave enough space next to the sayagata and shippo clouds for the 1.5 #1 gold. Still I'm happy with how mine came out.


The very last element are the fan lines. Technically, I should have put these in before the outline, but I wanted to make sure my lines were plunged in the right place. This was very tedious, especially as I was at the very end. It was couch, plunge, stitch down, couch, plunge, stitch down,... 


When plunging very short strands of gold, I would always plunge one end keeping the other side still wound on the koma. Once that's done, I would cut the other end and plunge the threads making sure to hold onto the threads under the fabric. This ensures they're not pulled out accidentally.

The picture above shows the very last stitch plunged on Hiogi and it's officially done! I've already visited the framer and we picked out the mat and frame. This weekend I will be doing the pasting and then I can start lacing. I can take my time with that as my framer will be closing for the holidays. I'm honestly still in shock that it's done and will take me a few days to adjust. Not sure how much stitching will get done...

I will probably pull out the peach blossom and bird piece I started over the summer, but I've already started looking into placing an order for the next phase piece.

Tuesday, December 7, 2021

November TUSAL


This month's TUSAL is pitiful really. The black thread is from unpicking to separate the cotton bands on calm flow. But it doesn't mean there was no stitching.


As you know, I was very busy working on Hiogi all month and I'm happy to say it's done. I've been collecting all my silk ORTs and finally got a jar to display them in. Above you see all the thread ends and threads that didn't end up being used in the 3 years I spent stitching Hiogi. I'll post a quick update soon.

Monday, November 22, 2021

Hiogi - Nearing the End

I didn't post last week but I'm still on my stitching streak. The 2-3 sessions for the cords ended up being one session. Below is my tassel fully stitched except for the couched lines and Japanese knots.


I'm getting so close to the end that I decided I needed a checklist of what's leftover. Doing this helps me plan what threads I need to make. Not the standard twisted threads but the karayori and katayori that need to be dampened and dried.


One full day was spent making threads and putting in the tassel lines. I'm realizing now I have no pictures from that but it's the same thing as the purple tassel. Below are my katayori and karayori. They're both meant to be couched and the katayori is a bumpy thread vs the smooth karayori. It's actually very pretty when twisting it with gold thread.


The clouds all have two rows of pairs of katayori couched. This helps hide the edges.


The same thing is done with the paulownia but this time with one katayori and one #5 gold thread. It's a really pretty way to neaten the edges.


Very pretty but leaves you with quite a mess. All these threads have to be plunged and tied down at the back.


The plunging is done but now I have tie downs to look forward to. My least favorite thing but it needs to be done. I finished quite late yesterday so the lighting is horrible. I'll take a nicer picture when I pull it out again.

Not long now, just a lot of couching left to do as well as that snowflake you can barely see near the orange cord. I'm looking through my notes and I put this piece on the frame December 15, 2018. It would be amazing to get it done before that date. Right on time for it's 3 year anniversary.

Monday, November 8, 2021

Hiogi - Tassel, cords & more

Two weeks ago, I set myself an objective for Hiogi. Well I met them and more!

The first objective was to stitch the second purple cord that had the color change.


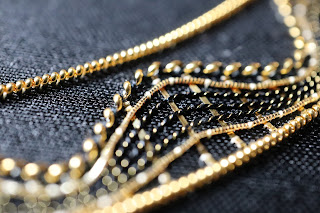
Here you can see the light purple next to a twisted thread that had half light, half dark purple.  The color change is done in steps where you start introducing the mixed color thread slowly, completly replace it and then introduce your second color to finally end with just that one.


The second objective was to put in the veins on the tassel. I had previously transferred the lines using the tissue paper method using black couching silk. These lines could be put in by eye and they don't need to be very precise. At the time when I put in the black lines I thought it may have been overkill, especially as I had spent a whole session just doing that. However, when it came time to put in the karayori it really helped. So I will probably do the same on the other tassel using an orange couching silk.


The last touch comes on the "skirt" of the tassel. There is an outline of Japanese knots in light purple, I added some gold to the twist, and then a few scattered inside. The outline is easy, but how much should there be inside is a tough question. A friend reminded me that in Japanese embroidery, if you have to ask yourself if you put enough, chances are you did and should stop now.


Since I met my objective, I could go back to working inside the fan. I completed the white buds, adding in the stems. We could pick either a green or peach color and I went with the peach as it gave it a delicate look.

I was originally thinking of putting in the lines inside the fan but finally decided to wait for the clouds to be outlined. They're done using a non-stitchable gold thready and waiting will help me better judge where the gold lines should be plunged.


But wait, there's more! Since I'm doing so well, I decided to forgo working on the Armillary sphere on Sunday and spend one more day on Hiogi to start the orange cord.


The day went well, really well. I normally stop stitching around 3-4pm but that didn't happen yesterday. I stitched all day, with a break around 3pm for a nice walk and came right back to stitching. Things were going so well, that the stitches just kept flowing. 

The cord on the left is meant to be stitched with gold and dark orange with a color transition in between. I didn't particularly like the gold as I thought it was too flashy and clashed with the overall design. The kit comes with two shades of orange as the tassel is stitched with two. So I decided to use the light orange twisted with gold before it transitions to the dark orange.


The next session will be to work on the tassel as it is in the foreground while the second cord is in the background. There are a few steps to get through, so it may take 2 or 3 stitching sessions.

I'm really happy with how far I was able to get in two weekeds on this piece, especially on those cords. I'm thinking I should strike while it's hot and get phase 5 which is all about cords. Decisions, decisions...