Back in April, I got this little tin containing the kit for Lucy Barter's goldwork flower that is taught on the Craftsy. I promised to show you the contents of the tin when I started the project in fall. It's not officially fall yet but September and back to school has always marked the beginning of fall for me so here we go.

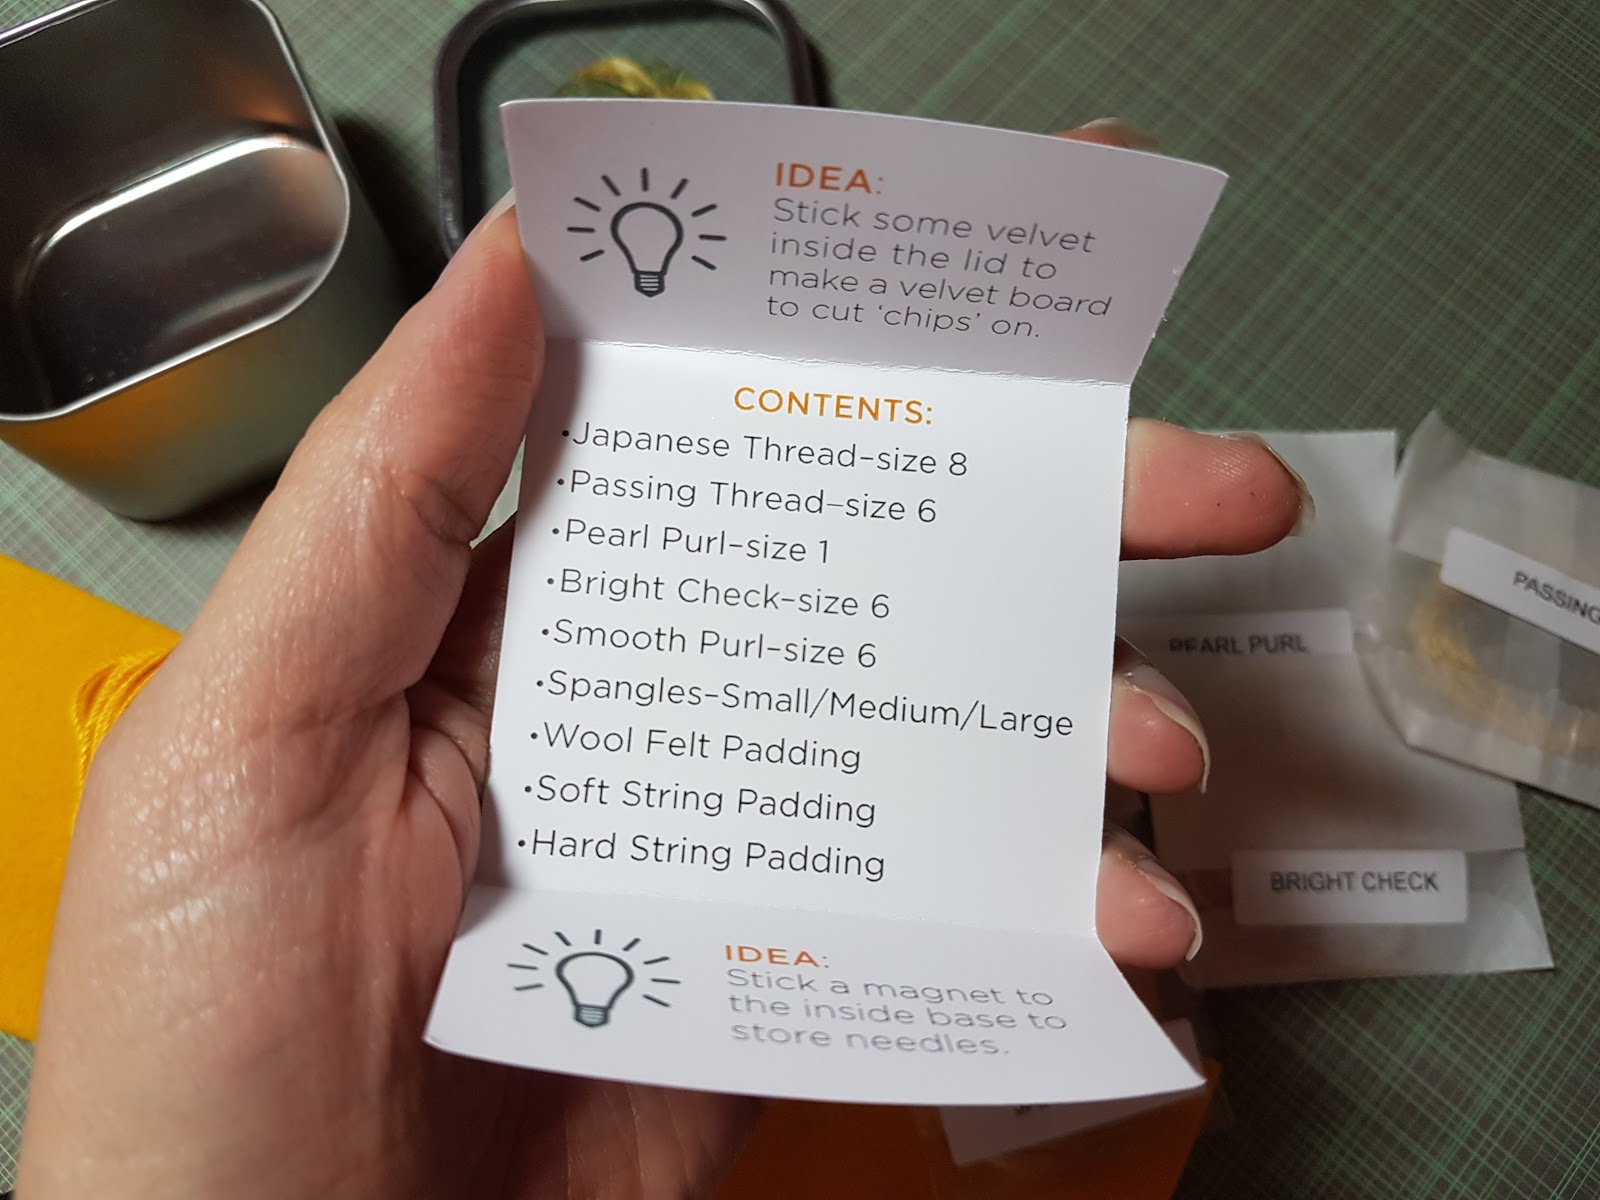
As I had mentioned before, the kit comes with all the goldwork materials to stitch the flower that is featured in the class. The kit was put together to make it easier for students who don't have the resources to get the various metal threads. It also contains the wool felt, soft string and hard string padding. Students still need sewing thread that matches the metal thread, beeswax, special (or old) scissors for cutting metal, hoop/frame... A mellor is nice to have, but a lying tool can be used as a substitute.

Here's a close up of the full contents of the box.

You also need fabric. The fabric I decided to use is an ivory delustered satin polyester that I picked up from Alison Cole at Seminar back in May. Since this piece will be hanging next to my Pearl Butterfly (and another third mystery goldwork piece), I wanted the fabrics to sort of match. I went with ivory as it picks up the white from the butterfly.
The instructions don't say what size fabric to use. I ended up cutting a piece that is about 14" x 14". The fabric is translucent enough I was able to trace the design onto the fabric without a light-box. Maybe I shouldn't have, but I used a sepia micron pen to trace the design. It should all get covered by the stitching anyways. As a note, I did test the pen somewhere on the edge of the fabric to make sure it doesn't spread and my lines are nice and clean.

The design, once traced on fabric fit into a 10" hoop. I backed my fabric with a cotton muslin. This is a definite must as it gives the fabric some weight. Lucy suggested basting the fabrics along the outline of the design in case you need to remove the fabric from the hoop. This prevents the backing fabric from shifting and puckering when you put it back on the hoop. Since I have no plans to do that, I skipped that part.

Last week, I concentrated on getting all the padding stitched. The materials for the class include 3 charts: one for tracing the design, second for tracing the felt padding and a third one that shows what technique is stitched where and with which thread. I love that it's in color, it makes things so much clearer. Instead of making an extra photocopy to cut out the shapes for the padding, I used tracing paper.
The left and right are clearly marked as there is a slight difference between them. The flower is not a 100% symmetrical.

The cutouts were then used to mark out the shapes on the wool felt. I used a black Sharpie pen.

This is the fun part. I don't know why, but I really enjoy stitching felt padding. (click on the post if you're looking at this by email so you can see the animation)

Once the felt padding is applied, it was time for the soft string padding.

Lucy Barter says to estimate the length of the string we need and then just fold the string till you got 10 strings all together. I was a little worried I would not have enough so I decided to first cut the soft string padding in half and go from there.

The string is then (heavily) waxed and couched onto the design.

This next one I've never tried. It's called hard string padding. In the video, I think she called it parcel string or twine if you live in North America. It's normally white but you can use a fabric marker to color it to match your metal threads. In the kit, the string is already colored so we don't have to do it.

I haven't decided if I like hard string padding yet. I'll wait to see what the final result will look like once it's covered. I will say that it is more tedious than the felt padding because you're constantly stopping to cut before you continue with the stitching. By the way, any comments on whether it's a good idea or not to use your embroidery scissors to cut hard string? I used mine but would like to know if it's something that will ruin my good scissors.

To give you an idea, here is what is left from the wool felt and the hard string. I don't have any soft string left as I used it all and even then the extruding strands that I cut off once it was couched were not that long. I have more than half the wool felt to use for another project. Project singular as I've noticed that the yellow felt designers use are not the same shade. It might not make a difference since it gets covered anyways but we're always warned to be careful of dye lots. So for now I'll just leave it in my goldwork box.

I haven't had the chance to look at the next lesson yet, but I suspect it's couching on the large petal areas. I'm currently having a good stitching streak on Hedebo Enchantment, Tuesday evening stitchings with the Lakeshore guild are starting up again this week. This means I'm not a 100% sure if I will be stitching goldwork this week or if it will have to go to next week.
Speaking of the guild, we're holding an exhibition this weekend. So if you live in the area, you should definitely pass by :) I will have a few pieces in there including Foxy and the runner I just finished.
 Update 2017/09/12: Jessica gave an excellent tip I want to try next time

As I had mentioned before, the kit comes with all the goldwork materials to stitch the flower that is featured in the class. The kit was put together to make it easier for students who don't have the resources to get the various metal threads. It also contains the wool felt, soft string and hard string padding. Students still need sewing thread that matches the metal thread, beeswax, special (or old) scissors for cutting metal, hoop/frame... A mellor is nice to have, but a lying tool can be used as a substitute.

Here's a close up of the full contents of the box.
You also need fabric. The fabric I decided to use is an ivory delustered satin polyester that I picked up from Alison Cole at Seminar back in May. Since this piece will be hanging next to my Pearl Butterfly (and another third mystery goldwork piece), I wanted the fabrics to sort of match. I went with ivory as it picks up the white from the butterfly.
The instructions don't say what size fabric to use. I ended up cutting a piece that is about 14" x 14". The fabric is translucent enough I was able to trace the design onto the fabric without a light-box. Maybe I shouldn't have, but I used a sepia micron pen to trace the design. It should all get covered by the stitching anyways. As a note, I did test the pen somewhere on the edge of the fabric to make sure it doesn't spread and my lines are nice and clean.

The design, once traced on fabric fit into a 10" hoop. I backed my fabric with a cotton muslin. This is a definite must as it gives the fabric some weight. Lucy suggested basting the fabrics along the outline of the design in case you need to remove the fabric from the hoop. This prevents the backing fabric from shifting and puckering when you put it back on the hoop. Since I have no plans to do that, I skipped that part.

Last week, I concentrated on getting all the padding stitched. The materials for the class include 3 charts: one for tracing the design, second for tracing the felt padding and a third one that shows what technique is stitched where and with which thread. I love that it's in color, it makes things so much clearer. Instead of making an extra photocopy to cut out the shapes for the padding, I used tracing paper.
 |
| Design chart for padded areas |
The left and right are clearly marked as there is a slight difference between them. The flower is not a 100% symmetrical.

The cutouts were then used to mark out the shapes on the wool felt. I used a black Sharpie pen.

This is the fun part. I don't know why, but I really enjoy stitching felt padding. (click on the post if you're looking at this by email so you can see the animation)

Once the felt padding is applied, it was time for the soft string padding.

Lucy Barter says to estimate the length of the string we need and then just fold the string till you got 10 strings all together. I was a little worried I would not have enough so I decided to first cut the soft string padding in half and go from there.

The string is then (heavily) waxed and couched onto the design.

This next one I've never tried. It's called hard string padding. In the video, I think she called it parcel string or twine if you live in North America. It's normally white but you can use a fabric marker to color it to match your metal threads. In the kit, the string is already colored so we don't have to do it.

I haven't decided if I like hard string padding yet. I'll wait to see what the final result will look like once it's covered. I will say that it is more tedious than the felt padding because you're constantly stopping to cut before you continue with the stitching. By the way, any comments on whether it's a good idea or not to use your embroidery scissors to cut hard string? I used mine but would like to know if it's something that will ruin my good scissors.

To give you an idea, here is what is left from the wool felt and the hard string. I don't have any soft string left as I used it all and even then the extruding strands that I cut off once it was couched were not that long. I have more than half the wool felt to use for another project. Project singular as I've noticed that the yellow felt designers use are not the same shade. It might not make a difference since it gets covered anyways but we're always warned to be careful of dye lots. So for now I'll just leave it in my goldwork box.

I haven't had the chance to look at the next lesson yet, but I suspect it's couching on the large petal areas. I'm currently having a good stitching streak on Hedebo Enchantment, Tuesday evening stitchings with the Lakeshore guild are starting up again this week. This means I'm not a 100% sure if I will be stitching goldwork this week or if it will have to go to next week.
Speaking of the guild, we're holding an exhibition this weekend. So if you live in the area, you should definitely pass by :) I will have a few pieces in there including Foxy and the runner I just finished.

Just a tip: trace your padding pieces on Vliesofix/Bondaweb and iron it onto your felt. It makes cutting out the shapes so much easier. And the 'glue' side of your felt can either be used up, so no hairy bits of the felt poke out between the gold threads. Or down, then they stick a little to the background fabric when couched down.
I will be following this project and can't wait to see it completed.
ReplyDeleteWow! This is looking nice already. It looks like a great kit.
ReplyDeleteYou've made a great start! I'm sure this will be gorgeous.
ReplyDeleteGood work so far. :)
ReplyDeleteI bought that class too and you're beginning to inspire me to tackle it - nearly 2 years after buying it....!!
I'll be using whatever goldwork threads, metallics etc that I have though, and I too would be using the yellow soft embroidery cotton as padding. Just need to feel my embroidery itch again now.
Hi Dima, love to follow you along on this project! Just a tip: trace your padding pieces on Vliesofix/Bondaweb and iron it onto your felt. It makes cutting out the shapes so much easier. And the 'glue' side of your felt can either be used up, so no hairy bits of the felt poke out between the gold threads. Or down, then they stick a little to the background fabric when couched down. Have fun, Jessica
ReplyDeleteI think I might choose to cut the hard string with the metal work scissors, rather than embroidery scissors. It may not matter, but if you have a lovely pair of embroidery scissors, why take the risk?
ReplyDeleteLooks great! I completed this project in the summer and it was a great learning experience. Recommend you read other people's comments in the Craftsy course as there's valuable info there. Still undecided about what to do with the finished piece so look forward to seeing yours.
ReplyDeleteThanks for the advice. I like the fact that there are comments that you can read on the side but I do find them distracting at times. I think what I'll do is wait till I've watched the entire lesson before going through them.
DeleteThank you for such a wonderfully detailed blog post. I've done some craftsy classes with quilting and hadn't thought of embroidery or goldwork, which I've been threatening to try (again, I did it as a kid, but barely remember ;) )
ReplyDeleteThis does look like a very thorough project kit, great instructions. My personal feelings would be to not use my embroidery scissors for anything other then embroidery threads.
ReplyDeleteLooking forward to seeing this grow.
Thanks for such a detailed explanation of what you are doing and the kit! I really love the design (I think I like Art Deco styles for goldwork). I look forward to hearing your thought on the hard string padding. At least you are getting plenty of exposure to different techniques!
ReplyDeleteIs it considered art deco or art nouveau? Yeah I like the fact that it has many different techniques. There's a few metal threads in the kit that I've never tried as well so I'm looking forward to that.
DeleteOh wow, that looks great so far!
ReplyDeleteThat's quite a lovely kit, and I really enjoyed seeing your progress - I've never done Goldwork so it's really interesting to see how it works. I did not know Craftsy had needlework classes, I will have to check that out - not living in the US or UK I haven't had the chance to go to a class in person yet, so online resources are really valuable for me!
ReplyDelete