Wednesday, April 12, 2017

Talliaferro Challenge - Part 2

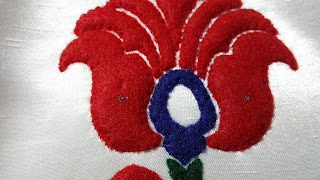
Last post, my Trievaulx Blossom II was all outlined and had some felt stitched onto it.


I bought the felt from the fabric store and suspect it's most likely polyester. Not the same quality as the felt Alison put in her kits. Her's is wool and doesn't tear apart when you're cutting small pieces out. The one I got is painful to use but does the job.


Except for the really small areas, everything  has two layers of felt.


Here it is all covered with the felt.


For this project, I decided to do things properly. I figured I should use all those sketchbooks and markers I've accumulated and actually plan things out before I start stitching. I redrew the motif in pencil and then with markers "colored in" the areas. The key here was figuring out angles and how I wanted the beads to be oriented.


Each dot represents a bead with the black lines going through it representing the thread. I tried to use different techniques in different areas. Doing that will show different sides of the beads, meaning the light will hit it differently giving the piece dimension.


Here is my bead palette. These are 11/0 size beads and I even got some Swarovski bicones and an owlet crystal.


I started with the biggest petals. The bicones are going to be used here, the hard part was finding the center and have them be symmetrical.

The Swarovski bicones are surrounded by a circle of clear silver lined beads. I don't know why, but I kept imagining them there and it wouldn't budge. No one at home, who'd seen them, liked them, but it kept reminding me of the flowers from Alice in Wonderland that could talk ^_^

For the large petals, I wanted to try my hand at couching down strung beads. It's the same technique used in goldwork where you couch down gold pearl purl, but instead of metal threads you have beads. I saw the technique in the Japanese Bead embroidery book I bought last year and wanted to try it out.


The beads are strung on a really long doubled thread that's already been anchored in the piece at the starting point. Once I have all my beads, I used another thread of the same color (single strand this time) and made a stitch every two beads to anchor it down. In some areas, I would stitch in between every bead to get the curve just right.


Once I got to the inner layers, I started stitching from the outside in between two layers. Stabbing at an angle will force the two layers closer to each other leaving no spaces. The hard part was making sure there were no spaces in between the strung beads. I wished I had a pair of komas. I've placed an order for those with the JEC which I'm picking up today since I'm in Atlanta while you are all reading this :) They will be very useful for next time I use this technique.


Here is one petal all stitched up.

Saturday, April 8, 2017

Gone Fishing

Right at this moment I'm on my way for the first leg of my vacation in D.C. I'm meeting up with the ladies from the French Needle tour I went on last year. We have lots of sight seeing planned, it should be fun :)


From there I will fly out to Atlanta with my friend Caroline to take classes at the Japanese Embroidery Center for phase I of bead embroidery. I've been planning this trip since October so I'm super excited it's finally time :)


Part two of the Talliaferro Challenge series has already been written and scheduled to come out Wednesday. If you don't want to wait till I get back home to read about my trip, you can follow along on Instagram. See you in a week!

Wednesday, April 5, 2017

Talliaferro Challenge - Part 1

For those of you who googled SFSND, you might or might not have found something. SFSND stands for San Francisco School of Needlework and Design. The school was founded in 2015 by Lucy Barter (if you've seen Craftsy's Goldwork class, she is the teacher) and Ellice Sperber. Both were students at the Royal School of Needlework and teach all kinds of different embroidery techniques. I'm quite jealous of stitchers in the San Francisco area.

In order to promote embroidery, they started something called the Stitch at Home Challenge. They'll provide the inspiration and the stitcher can then use any needlework technique they want to create a piece. They are currently on their third challenge. This time the inspiration was provided by Talliaferro Classic Needleart who contributed two lovely motifs for us to stitch.


After some thinking I decided to go with Trievaulx Blossom II. I also decided to do it all in beads using some of the things I learned from Alison Cole's class to add some dimension to the piece.

I was limited to what I had in my stash and what I could find at the local fabric shop and bead shop. The fabric I got for the piece is some satin polyester fabric. It has a nice shine to it, but it's such a let down after that gorgeous fabric I was using in Pearl Butterfly. The flower looked a lot like the Turkish tulips on the pottery my parents brought back from their trip to Turkey, so I decided to stick with red, green, blue and white for my color palette.


Since the fabric was very light weight, I decided to back it with some muslin. For transferring the design, I traced it onto the muslin using an archival pen.


I then pinned the muslin to the back of my fabric. From the back, I used tiny stitches to outline the design so it will show up at the front.


I used the colors that each area will be stitched in so that at the end, they will be covered and won't show. Here you can see the shine of the fabric. While stitching, I used a hoop, but I only put the backing muslin in the hoop. That way I could avoid marking the satin fabric. It worked out quite well like that.


Next post I'll share more of what I did with the felt.

Monday, April 3, 2017

Productive Weekend

My weekend turned out to be much more productive than my week. My goals were to finish all the pre-work on Hedebo Enchantment and frame Eidelweiss and both were done!


I'm kind of sad to have to put Hedebo Enchantment aside. I really want to jump in and start stitching inside the boxes. Unfortunately I have to wait till May. Here's a close up of one quarter of the piece. I wonder, do you think the teacher will give me more to stitch if I email her? I don't think it hurts to try.


I was a little less patient with Eidelweiss. It's framed, but I didn't take the time to properly miter the corners. I'm going to check tomorrow with a guild member to confirm it's okay like this. If it needs to be in a proper frame, then I won't be submitting it for the members exhibition.


Here's the back of it. It's framed the same way I framed De Rose Vetues except there is an extra layer: the blue satin fabric.


Since Eidelweiss has some areas that are drawn thread, I decided to have a fabric behind it to really show it off. I really like the effect, not if only those corners weren't so ugly :|

Friday, March 31, 2017

Quiet Week

It's been very quiet on the stitching front this week. I had to work overtime on last Sunday, taking away my one full day of stitching and has been eating up all my evening time this week as well. 7 more days and then I will be on vacation. I can't wait to start packing!

I did manage to put in a few stitches on Hedebo Enchantment. I'm very close to finishing all the pre-work. I'm at the point of going around the four corners now. After that there is only the satin stitch border all around it.


I'm going to try and finish that this weekend. I also need to frame Eidelweiss this weekend as I'm taking it to Seminar for the members exhibition. I should have done that AGES ago, but I kept avoiding it. I can't do that anymore. Forms and pictures need to be submitted before I leave for my vacation next week.

One thing off my chest, I finished "finished" my secret project. I'm waiting for the weekend to take descent pictures so I can submit them and then I can share it on the blog. I will be writing a blog series on how I stitched the piece. It will probably be posted on Wednesdays as I prefer keeping Mondays for updates on weekend stitching. I'm very nervous as it's the first time I stitched a piece with no actual instructions from a teacher or designer. I hope you all like it :)

Monday, March 27, 2017

March TUSAL & WIPocalypse


This month I'm combining both TUSAL and WIPocalypse in one post. The reason being, I stitched A LOT but not on any of my WIPocalypse projects :P I did finish my secret project. It's officially off the hoop.


But I still can't share until it's been properly finished. I'm trying my hand at making my first pouch. I don't have a sewing machine so it's being hand stitched. Here is the inside lining.


Thursday, March 23, 2017

A Bear for Grace

Last month, I found out a co-worker was just about to have a baby. He already had two of each so they decided not to find out what they were having until the birth. This made it very hard to decide on what to make as a gift. I finally settled on a bear with blue, pink, yellow and white stripes. All nicely generic baby colors :)


The baby ended up being a girl named Grace. Her dad has been sharing pictures of her on Instagram and she's already a pro at taking selfies with her daddy.


We finally got the chance to see her today at lunch. She is now about 4 weeks old. Her mom was really happy with the gift and got a kick out of the fact the bear was the same size as Grace lol.

If you are interested in the pattern, here is a link to it.