Wednesday, May 27, 2015

Dima vs Knitting, Round 3

Yes, knitting is back. What happened to it the last time you wonder? It got shoved to the side. I was knitting for a time, getting familiar with the different stitches. But I found, after a time, that I wasn't enjoying myself and would rather be stitching. That was back in December and I haven't touched it since. I didn't really get far, just enough to see the pattern.


On Saturday, I finally convinced my dad to take a trip to Kingston. My mom and I have been wanting to go for years, but my dad kept saying it's too far (it's a three hour drive one way). I mainly wanted to go because of a shop called Gwin Gryffon. Yes, I am willing to drive three hours to visit a shop I've never been to before on the off chance I might find something there lol. The shop mainly specializes in needlepoint canvases and knitting wool. I've been wanting to try needlepoint and quickly found a nice cushion kit.


While I was talking to the shop owner, my family was looking around the shop. My younger sister pointed out a shop model to me saying she really likes it (She's the quiet one among us and rarely asks for anything, so when she speaks out we try to listen). It was a knitted cowl and the thread was so soft, a merino and camel blend. The best part, the thread is chunky so it would be fast to knit.

One thing led to the other and I ended up buying a lot more than I was planning. I think I beat Carla in breaking this month's budget :o


The three camel skeins are going to become three cowls, one for each of us girls. My mom saw a shawl in the shop that she really liked (priced at 400$!!!). The owner said she has the pattern and the wool, but not in the color my mom wanted. I bought the pattern book and some wool for it, as well as a thinner wool that really scares me, but that she really liked. When I saw the total, I was shocked, but figured oh well. I just have to make sure that this third attempt to knit sticks.

I think it will, because all Saturday night I was itching to start on one of the cowls. The very next morning, I took everything out and quickly realized, that I couldn't just start. I needed to turn the skein into a ball.


Thank God for Google. I quickly found this link and started. Here is my ball:


The next stumbling block was how do I use circular knitting needles, and on it went until I got this at the end of the day:


I had to relearn all the stitches I learned in December, it will take some time for my hands to remember them, it's a good thing I had pinned a few useful videos on my Pinterest board.

On Tuesday, I took up my needles again and quickly finished it (sorry for the lighting, it was taken at night). It came out really nice and I haven't noticed any errors. I was worried about size, but it's really stretchy. For those interested, the pattern can be found at this link on Ravelry.


On a side not, I LOVE circular needles. Just the fact the that you don't need to keep switching needles around and then remember to purl instead of knit in certain rounds is amazing. And now that I know how to knit with them, I can finally make those leg and arm warmers I've been eyeing jealously on Ravelry (there aren't enough nice crochet patterns, most are knitting patterns).

Monday, May 25, 2015

Crewel Stash

I meant to put this up last week, but I got busy with work. Since I took two days off to attend Hazel's class, I had a lot of catch up to do.

I went a little crazy, but when will this opportunity ever present itself again. Originally I was supposed to only have 3 new kits, but Hazel had some kits left over from the EAC Seminar so I snagged a few.


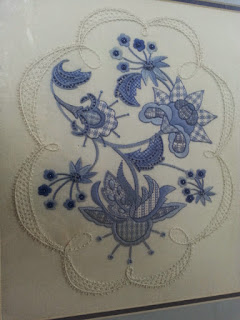
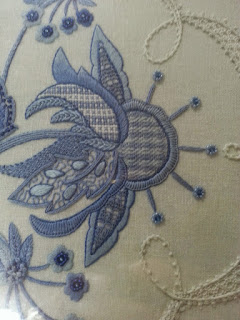
Dancing Threads is the project I picked as my take home kit. It's stitched on Dupion Silk. A fabric I've only read about and never dreamed to see in person. I'm a little worried about stitching on it, Hazel has assured me that it is a very forgiving fabric, as long as I don't pull too hard when frogging (and there will be frogging). The kit comes with the printed fabric, threads (both satin and dentelles), beads, a beading mat and a needle pack. Basically everything you need to stitch it, except for the hoop and scissors.

The First Sip was the second take home kit option. I really loved this pattern, so I bought this one as well. I didn't get the full kit, just the fabric, specialty threads, beads and the needle book. Although I shouldn't have gotten the needle book, as every kit Hazel sells comes with one. Now I have a whole bunch of them. Not necessarily a bad thing as they are good needles, but I didn't really need this one.

Midnight Meander was the first design of Hazel's I wanted to stitch. It's what really pushed me into getting her books. Especially after seeing Aktatva's version. I can't wait to stitch it. For this I only got the fabric and beads as it uses regular DMC thread, which I have.


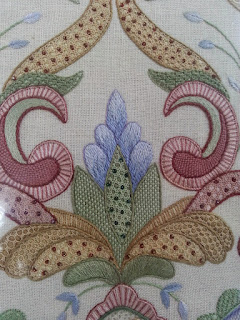
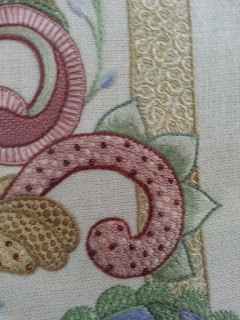
Jacobean Tangle is one of the extra kits I bought. I had shown my mom Hazel's books and she really loved the colors in this. She wants two pillows stitched. I'm thinking that's not going to happen, but I will be happy to stitch one. This is the full kit, so it comes with everything, including the DMC threads and the ever present needle book.

The other extra kit I got is Autumn Lace. I love the textured effect of this one. Although I might like to inject some color into it. Maybe a hint of pink or blue?

Obviously since I was meeting Hazel in person, I had to get my copies of Crewel Twists and Crewel Intentions signed :)


This is not the end of this month shopping spree. I ended up buying more on Saturday :P more on that later.

Sunday, May 24, 2015

The Secret Behind Plastic Hoops

This is probably something a lot of you already know, but I didn't until last Tuesday when I attended Hazel Blomkamp's class. One of the ladies I was sharing a table with, Madeleine, was kind enough to show me how to properly use a Susan Bates plastic hoop.

Look at the picture below. See the "This Side up"? I always thought that means that label should be on top. I.e. when you're done framing your fabric it should be visible. So not what it means.


Notice the lip on the right edge of the ring. That extra lip is the reason why embroiderer's love these hoops.


I'm now going to show you how to use it. Again, many of you will already know how to properly frame their fabric, but I need to write it down so that I would not forget and go back to hating them.

First step, place the ring with the "This side up" label facing up.


Place your fabric facing up on top of it.


Place the second ring with the screws on top of it and "under" the lip of the first ring. You should hear a click. If you're right handed, make sure the screws are at your 11 o'clock (2 o'clock if you're left handed). This will prevent the thread from snagging as you stitch.


When I say "under" the lip, it means the fabric will pass between the lip of the first ring and the edge of the second ring. In effect locking the fabric in place.


Once you've tightened the screws (as tight as possible, use a screw driver if you can), starts gently pulling on your fabric until it's drum tight.


See the slight puckering? That's what happens when you stitch on fabric that's not perfectly taut. Tips like these are the reason why I love taking embroidery classes, you learn so much from the teacher and the ladies taking the classes. I learned how to properly knot a thread at the Creative Festival :)

Friday, May 22, 2015

My Day With Hazel

As you know I attended a two day class with Hazel Blomkamp and the ladies of the Lakeshore Creative Stitchery Guild. It was both amazing and intense. I've never spent an entire day just stitching, but it was worth it. I learned so much from both Hazel and the girls (as Hazel called us). As it is with these things, I didn't take a lot of pictures, preferring to spend it stitching and soaking up as much information as I could.

The main topic of the class was "Using Needle Lace Techniques in your Embroidery". This is a technique Hazel adapted from an old needle lace book she had bought by accident. Using these techniques on top of traditional crewel techniques gives pieces an extra dimension. Pictured below is one of her pieces, you can see she used a cream thread to needle lace over the petals. Afterwards she passed a ribbon through the lace, giving you the illusion that it is a piece of lace that was patched on.


As part of the course, we each got a piece of fabric for us to try out the different stitches. The fabric is a cotton linen backed with voile (or muslin). We got a nice little spiral book that contains all the needle lace techniques that are described in her books Crewel Twists and Crewel Intentions. It also comes with a needle book, a packet of beads, cotton thread and two different weight dentelle lace thread. By the way, she is also working on a spiral book with all the weaving techniques she uses in her books. Let's hope she comes back to Canada for another class so I can get one.


The first day we spent it trying different needle lace patterns with the thicker weight so we would be able to see our stitches. The stitches are not that different from crochet stitches, instead of a hook we are using a needle. Hazel named the stitches to match the ones from Thérèse de Dillmont's Encyclopédie des ouvrages de dames, but a lot of these stitches have names. They are not only used for creating lace but other embroidery techniques such as Elizabethan Stumpwork.

End of Day 1

All these stitches start with us back-stitching the square and then filling them with rows of lace. We didn't want to waste our second day on back-stitching, so we had homework to do at the end of the day.

Homework done!
The next day we got the chance to try out more complicated patterns and Hazel also showed us her buttonhole and weaving technique. I didn't get much done on either (the leaf on the bottom is started with the buttonhole stitch and the circle on the left is the beginning of the weave). I was too busy talking to the ladies and just listening to Hazel.


At the end of the class Hazel walked us through how she stitched each of the take home projects. The take home projects were Dancing ThreadsThe First Sip and Jac 11. I picked Dancing Threads as my take home project, but I also bought Dancing Threads. I love the blue colors and the lace that surrounds the flowers.

Dancing Threads
The First Sip
Jac 11
The rest of the pictures are eye candy. I tried to take really close up pictures of each project as well as the other stitched items she brought with her. The kits for all these projects are available through l'Atelier de Penelope. The owner, a lovely lady named Patricia, was in the class with us and I had a fun time talking to her. I'll have to plan a trip to Quebec City one day to visit her shop. There were other projects she brought with her, but I'll have to wait before I post them. They are for her new book that she will be releasing next year(?) and it is FABULOUS and AMAZING. It's just too bad I can't show you. I am allowed to say that it will be about crazy quilts (but way cooler in my opinion).

By the way, I apologize in advance for the glare. All the pieces are covered in plastic, which is great because it meant we could pick them up and pass our fingers over them to feel the bumps created by the stitches. But it's not so great for taking pictures.


If you've made it to the end of this post, you're seeing the only picture of myself I'll probably ever post on my blog. I'm the one on the right, with Hazel right next to me. The ladies with us are Suzy (in the back) and Helene (on the left). They both belong to the Lakeshore Creative Stitchery Guild.