Friday, November 27, 2015
Thursday, November 26, 2015
WIPocalypse 2015 – November

This month's topic: Which designer has inspired you to stitch the greatest number of designs and why do you think that is? I think at this point the designer I've stitched the most of is Kathryn Drummond aka Gingerbread Girl. I try to take her classes whenever I can and have quite a few of her patterns to stitch (although Teresa Wentzler has her beat, I have more of TW's patterns than any other designer). The reason for that is I love cut work and counted thread combine that with luscious colors and you have me hooked :)
Onto the updates, nothing on Bramble and the Rose. I'm thinking I'll take it out a week before New Years to stitch on it like I did last year.
 | No Update |
Ink Circles - The Bramble and the Rose
| |
Tree of Hope is back on the frame as of yesterday. I did put in a few stitches but not enough for an update. I realized that I've missed doing cross stitch.
Mirabilia - Tree of Hope
| |

 | No Update |
Teresa Wentzler - Tracery Dragons
| |
I did stitch on Fantasy Lace. I worked on it in between sessions on my sampler for a change of pace.
 |  |
Satin Stitches - Donna's Fantasy Lace
| |
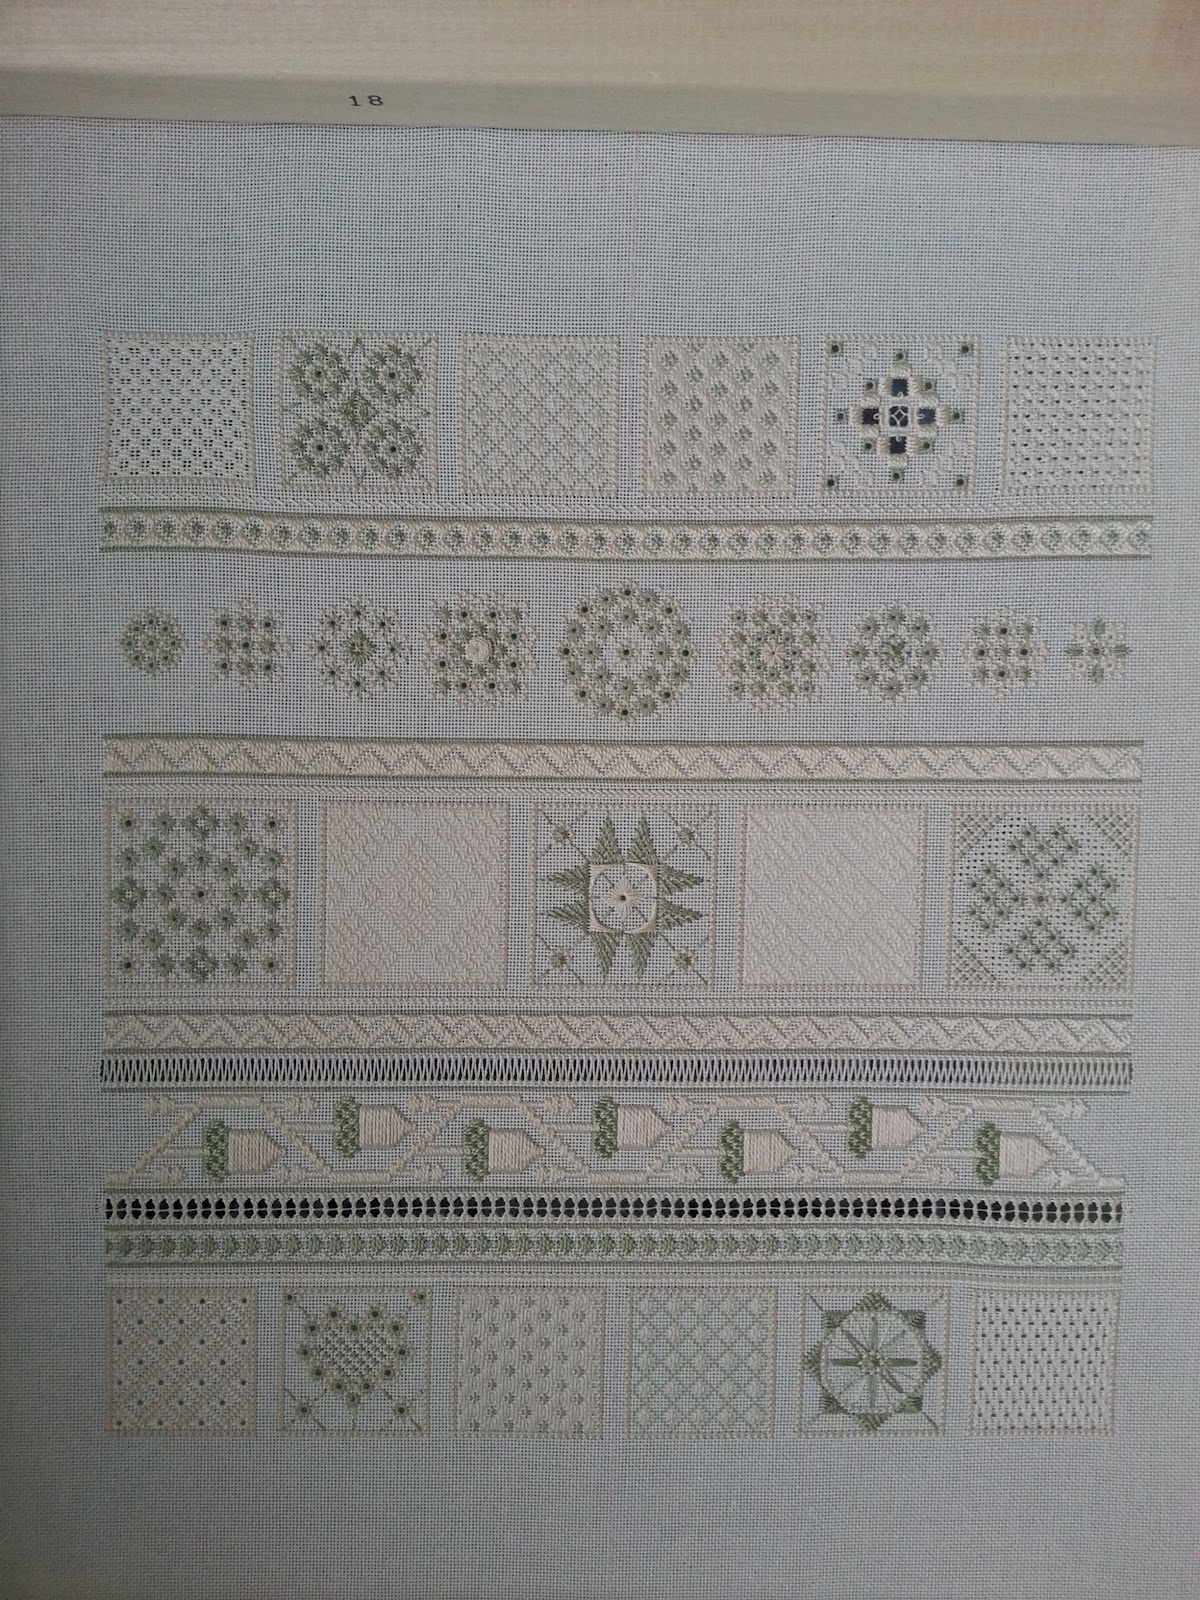
18th Century Sampler is FINISHED! I'm really happy that the piece is finally done. With this piece finally completed I can finally put in a dent into my other WIPs.
 |  |
SJ Designs - 18th Century Sampler
| |
Wednesday, November 25, 2015
18th Century Sampler - Finished!
In my last post I was trying to decide how I wanted to stitch the outer border. Thank you for all of your comments, it really helped me make a decision :)
The outer border is done in a wide Herringbone stitch. I settled on using the green thread for the border and wanted to add beads to anchor the Herringbone stitches.

I tried the beads on one edge and kept looking at it, but in the end I decided to take them out. You couldn't really see them from afar and just this little bit took hours to put in. Once the decision was made to go without, the border was quickly finished.

I'm quite happy with that decision :) but you never know if I'll change my mind. I'm going to wait till the class ends before framing it. Just in case something comes up and I need to make changes.

I made a quick video for my Instagram account of the finished piece.

So my 18th Century Sampler is all done, but it's not too late to join in the fun. The class is still ongoing on Facebook and won't end till February. You can find all the details here.
The outer border is done in a wide Herringbone stitch. I settled on using the green thread for the border and wanted to add beads to anchor the Herringbone stitches.

I tried the beads on one edge and kept looking at it, but in the end I decided to take them out. You couldn't really see them from afar and just this little bit took hours to put in. Once the decision was made to go without, the border was quickly finished.

So my 18th Century Sampler is all done, but it's not too late to join in the fun. The class is still ongoing on Facebook and won't end till February. You can find all the details here.
Tuesday, November 17, 2015
18th Century Sampler - Hemstitch Bands
I spent much of last week prepping the canvas for the hemstitch bands. The bands in the sampler use a drawn thread technique which is different from pulled thread.
In a nutshell, drawn thread involves cutting fabric thread and withdrawing them from the fabric. Afterwards, the remaining fabric thread is either wrapped or grouped to create lacy designs. Pulled thread on the other hand involves no cutting. All the lace-like designs are created using tension by pulling on the working thread and creating gaps between fabric threads. Check out Nordic Needles post for more information.
The first step, figure out which threads are supposed to be cut. In this case, we're cutting 6 horizontal canvas threads (for the sake of simplicity I won't use weft and warp) in the middle of the band. Be careful to only cut the thread that's indicated. It's not the end of the world if the wrong thread is cut (I learned that pretty much anything could be fixed if you ask the right question), but why cause trouble if you can avoid it by counting and triple counting ;)

The next step, withdraw the canvas thread that should be removed completely. I removed these all the way to the edge of the canvas (I did it up to the masking tape).

In this case, we had to remove three and leave three.

The remaining horizontal threads are also going to be withdrawn, but up to a point. These threads are going to be woven in place of the ones that were taken out. I noticed that canvas threads have a tendency to fray, so I had to be careful when pulling out these threads as I didn't want to unwind them.

For this pattern, a diagram shows where we should stop withdrawing the thread, and that's where the weaving will start.

It's important to look at the canvas threads above and below the empty space. This will tell us how the weaving will begin, either above or below the vertical threads. In the band below, I had to go under the first vertical thread.

The thread is woven all the way till the edge of the canvas, making sure not to lose track of the over-under sequence.

I found that weaving was much easier from the back of the canvas. For some reason the thread twisted less when I did it this way and the end result looked more natural.

But if it's a little bumpy, that's okay. That area will get covered with the outer border. Weave the remaining threads the exact same way for a seamless finish. I did the same on the other end and for the second band.

Here you can see all the edges finished. From afar, once the outer boarder is stitched you can't even see the re-weaving that was done. I'm definitely adding this technique to my arsenal.

And here are my two stitched hemstitch bands. If you have eagle eyes, you'll notice that the second band's weaving has an extra vertical thread. That's to make sure we ended up with a pair number of groups so that we can twist them together.

An overview of the piece. That acorn band is growing on me by the way. I don't think I will be unpicking it.

All that's left now is the outer border. I'm still trying to decide if I want to stitch it in green or ecru. I also have some cream beads that I could add to it. Ideas?
In a nutshell, drawn thread involves cutting fabric thread and withdrawing them from the fabric. Afterwards, the remaining fabric thread is either wrapped or grouped to create lacy designs. Pulled thread on the other hand involves no cutting. All the lace-like designs are created using tension by pulling on the working thread and creating gaps between fabric threads. Check out Nordic Needles post for more information.
The first step, figure out which threads are supposed to be cut. In this case, we're cutting 6 horizontal canvas threads (for the sake of simplicity I won't use weft and warp) in the middle of the band. Be careful to only cut the thread that's indicated. It's not the end of the world if the wrong thread is cut (I learned that pretty much anything could be fixed if you ask the right question), but why cause trouble if you can avoid it by counting and triple counting ;)

The next step, withdraw the canvas thread that should be removed completely. I removed these all the way to the edge of the canvas (I did it up to the masking tape).

In this case, we had to remove three and leave three.

The remaining horizontal threads are also going to be withdrawn, but up to a point. These threads are going to be woven in place of the ones that were taken out. I noticed that canvas threads have a tendency to fray, so I had to be careful when pulling out these threads as I didn't want to unwind them.

For this pattern, a diagram shows where we should stop withdrawing the thread, and that's where the weaving will start.

It's important to look at the canvas threads above and below the empty space. This will tell us how the weaving will begin, either above or below the vertical threads. In the band below, I had to go under the first vertical thread.

The thread is woven all the way till the edge of the canvas, making sure not to lose track of the over-under sequence.

I found that weaving was much easier from the back of the canvas. For some reason the thread twisted less when I did it this way and the end result looked more natural.

But if it's a little bumpy, that's okay. That area will get covered with the outer border. Weave the remaining threads the exact same way for a seamless finish. I did the same on the other end and for the second band.

Here you can see all the edges finished. From afar, once the outer boarder is stitched you can't even see the re-weaving that was done. I'm definitely adding this technique to my arsenal.


An overview of the piece. That acorn band is growing on me by the way. I don't think I will be unpicking it.
All that's left now is the outer border. I'm still trying to decide if I want to stitch it in green or ecru. I also have some cream beads that I could add to it. Ideas?
Thursday, November 12, 2015
November TUSAL


Still on my 18th century sampler. So nothing but cream. Are you bored yet?
Thank you for all those who commented on my last post. I've decided to keep it for now and take another look once it's finished. You never know, it could grow on me :)
Wednesday, November 11, 2015
18th Century Sampler - Acorn Band
This weekend passed by really fast. I only got the chance to stitch on Sunday, but luckily was able to spend the entire day stitching. I love days like that :)
This next border is made entirely in satin stitch. The acorns are padded so they have a nice dimension and it all looks really soft and shiny.

Now, I have a question: Do the colors look right? I've been staring at it for two days and can't figure out if I like it or not. Should I have also stitched the leaves in green?
Friday, November 6, 2015
Feeling Lucky
I've been pretty lucky this past few months. I won another giveaway on Melanie's blog. This one was very sneaky, if you didn't read the post you would never have known. As the prize, she offered to send me some fabric from her stash. Now Melanie has an AMAZING fabric stash full of colors and sparkles. She asked me for my color preferences and favorite fabric count. I ended up leaving it up to her to decide but mentioned that I lean towards neutrals with my fabrics. Why did I mention that? Because I didn't want her to send me this fabulous piece and then never use it, thus depriving someone else the pleasure.

I am quite happy with her choice. Melanie sent me two lovely pieces of 32 count fabric in a color called French Lace. And it's perfect because I know exactly what I want to stitch on them:

This is Ajisai Press's new collection called Romantic Winter Blooms. Wouldn't the fabrics be perfect for the two framed designs? As soon as I forget how much money I spent at the Creative Festival I'm going to get them.
18th Century Sampler - Satin Stitch Borders, Blocks #12, 17
The end is very near for this project. Yesterday I was able to complete the last two blocks in the sampler.

I quite like the look of block 12. There's not so much pulling. It's more like opening up the centers with an awl and maintaining an even tension. Much more relaxing.
It goes back to pulling for block 17, but this time I did it with a little less enthusiasm. Which means my square didn't come out as skewed as block 1. Which reminds me, I still have to fix that. I received excellent recommendations on the class's Facebook page. I'll put up a post once I've tried it out.
And full view of my version of SJ Designs 18th Century Sampler. All that's left are three horizontal borders and the outer border that surrounds the piece. I actually bought beads with my kit but still haven't used them. I'll have to figure out where to put in the bling or if it even needs it.


I quite like the look of block 12. There's not so much pulling. It's more like opening up the centers with an awl and maintaining an even tension. Much more relaxing.
 |
| Block #12 |
 |
| Block #17 |

Monday, November 2, 2015
18th Century Sampler - Satin Stitch Borders, Blocks #4, 1, 6
Since my last post on SJ Designs 18th Century Sampler, it's progressed a lot so there will be lots of pictures ahead. (Because the clocks have been set back, I had lovely light this morning to take pictures)

First off I was able to finish all the Satin stitch borders.
I decided to stitch the second satin stitch border in ecru only since I couldn't figure out a nice way to combine the two colors.
And for the sake of symmetry I did the same for the third border...
Going back to the two colors for the last border.
At this point I was fed up with stitching upside down, since it meant constantly flipping the chart as well. So I decided to finish up the blocks in the top row. Block #4 is a Hardanger block and a very fun to stitch. The filling stitch at the center has woven bars with picots and a dove's eye.
I moved onto the first two pulled thread blocks. Now, if anyone ever decides they want to stitch this here's a piece of advice: don't do what I did! DON'T pick a canvas fabric for this piece! Everything is fine and dandy until you have to pull those threads. My fingers hurt from pulling on the pearl cotton, I'm still surprised I didn't snap the pearl thread.
The results are pretty (except for the warped sides on this block), I decided to stick to ecru only for the pulled thread blocks to tie back in with the darning blocks in the middle row.
I actually ended up stitching Block #6 twice. The image on the right is what it looked like on my first attempt. I stitched it on Saturday, but when I got up on Sunday I just hated it. It looked nothing like the image on the cover of the class booklet (it seems that the image of the block within the booklet didn't match the final image of the design). So I snipped it all out and started again.

It looks much better on my second attempt, but let me tell you it was very painful getting it to look that nice. Like they always say: One must suffer for beauty!
Here's a front view of my 18th Century Sampler. All that's left are two pulled thread blocks, three borders and then the final outer boarder that goes all around it. I've already started block #12 and should be able to finish it tonight.


First off I was able to finish all the Satin stitch borders.
 |
| Satin Stitch Border #1 |
 |
| Satin Stitch Border #2 |
 |
| Satin Stitch Border #3 |
 |
| Satin Stitch Border #4 |
 |
| Block #4 |
I moved onto the first two pulled thread blocks. Now, if anyone ever decides they want to stitch this here's a piece of advice: don't do what I did! DON'T pick a canvas fabric for this piece! Everything is fine and dandy until you have to pull those threads. My fingers hurt from pulling on the pearl cotton, I'm still surprised I didn't snap the pearl thread.
The results are pretty (except for the warped sides on this block), I decided to stick to ecru only for the pulled thread blocks to tie back in with the darning blocks in the middle row.
 |
| Block #1 |

It looks much better on my second attempt, but let me tell you it was very painful getting it to look that nice. Like they always say: One must suffer for beauty!
 |
| Block #6 |

Subscribe to:
Posts (Atom)