Showing posts with label Phase 1. Show all posts

Tuesday, April 16, 2019

Japanese Embroidery Phase 1 - Finished!

In my last post, I mentioned I was going to try and join the phase 1 group on Saturday and/or Sunday to stitch on my own piece. I'm happy to say I was able to join both days.


I spent all of Saturday hunched down over my piece doing stitching stems and veins. Taking occasional breaks to watch a demonstration.


On Sunday morning, one of the ladies asked the teacher if she will cover the finishing process in the class. Normally, this is done in a purely verbal fashion as no one has a finished piece available for a demonstration. However, seeing as I was so close to the end, someone jokingly said something along the lines of "well if Dima finishes her piece today, we can have a demo".


As I only had the upper two branches, the valerian stems and some veins left to do, I was game to try and finish it. So I put blinders on and got to it. I was actually quite happy to offer it up for demonstration purposes as I was dreading this part a tiny bit.


The finishing process has many steps like doing a final inspection of the piece to make sure nothing was forgotten and cleaning it of all dusts (it has been on the frame for almost two years). These are normal steps to be expected. What's not is using paste at the back. Below you see wheat paste that our teacher cooked in the microwave.


With a pinkie finger, this paste is applied to the back of the embroidery.


The piece is then wiped at the back with a damp cloth. Now comes the fun (and scary part). You get a very hot iron, place a wet cloth on it and use it to steam the piece from below. It was cool to see the steam rising from the piece.

(click on the post to see the video below)


I had to leave my piece at my friend's to dry overnight and went to pick it up yesterday. I'm hoping to go to the framer this weekend to pick out a frame. It will be a while before I can share final pictures as I'll need to stretch it on foam core and bring it back to the shop for the final framing.

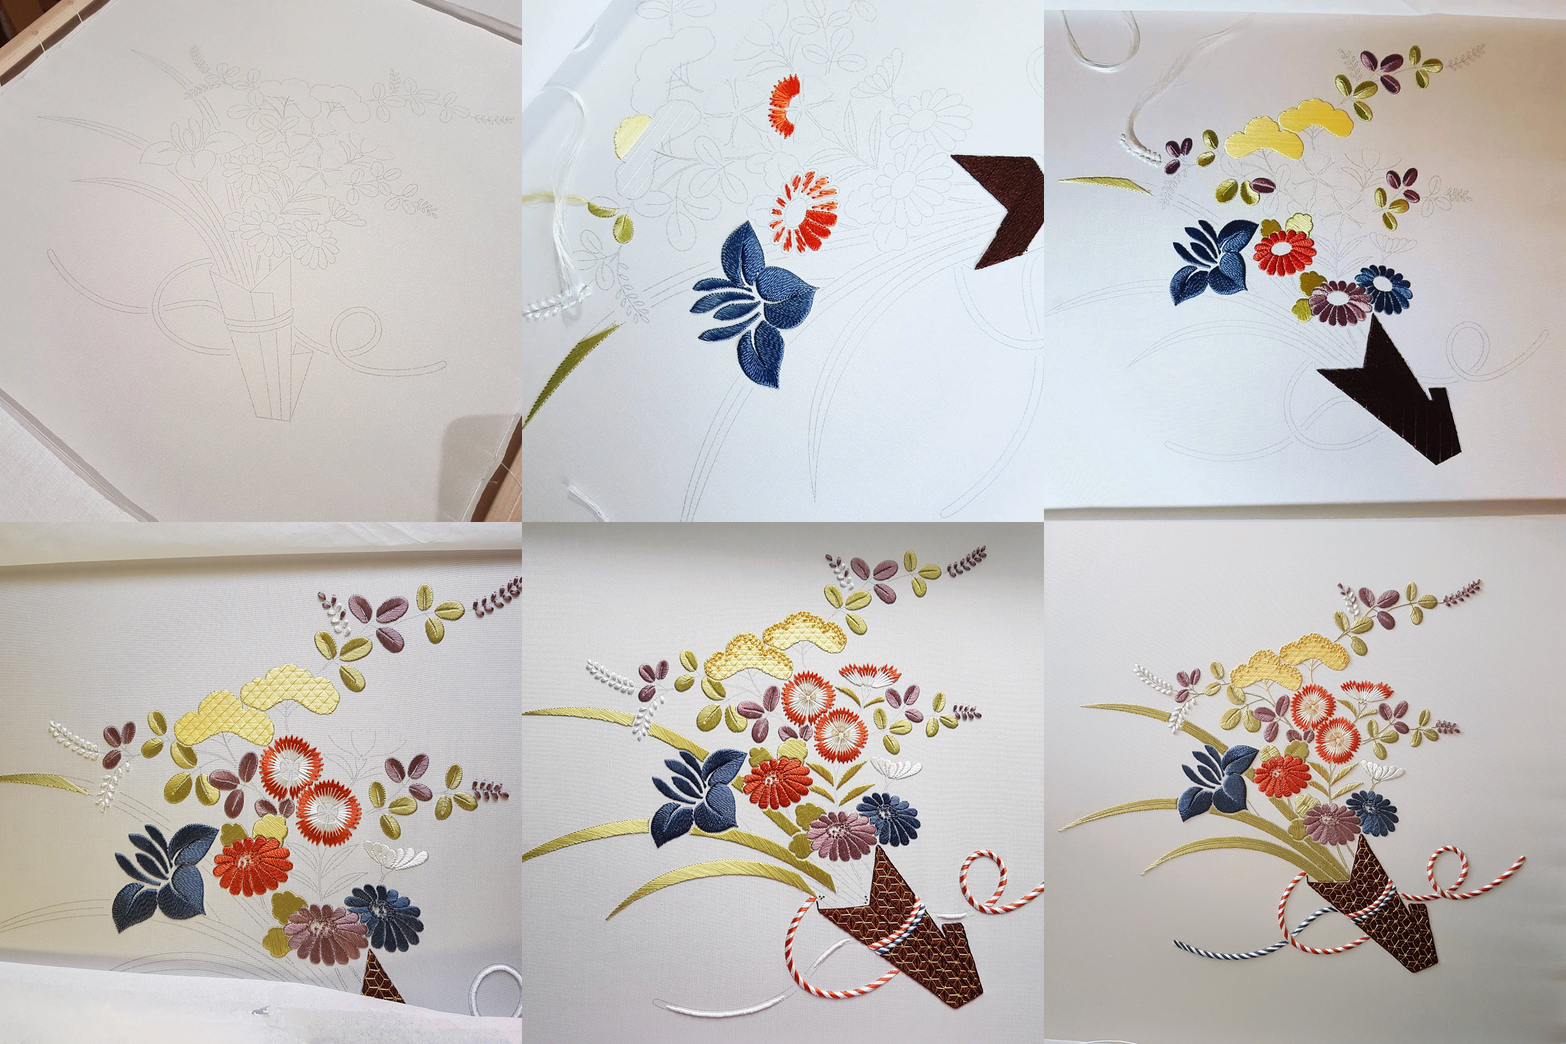
I made an animation of the piece as it progressed. If you're interested in statistics, here is some data: I started on October 26, 2017 and finished April 14, 2019. It took 176.25 hours over a period of 43 days to stitch. This includes unpicking and redoing a few elements like the cords.

(click on the post to see the animation below)

Monday, April 1, 2019

Japanese Embroidery Phase 1 - Cords

I had a very productive weekend. Woke up early on Saturday and spent a full day finishing those cords. Looking at it from afar, there are some areas that could be better, but they came out pretty good and I'm satisfied.


Since I was on a roll, I just kept going and finished the iris leaf blades as well.


At this point, my piece is 90% completed! I just have a ton of veins and stems left to put in.


I went to a concert that night (went to see Muse and they were awesome!), so I pretty much slept in the next day. Around noon, I told myself I really should do something with my day, even if it's just twisting threads.

The stems and veins are basically karayori thread couched down. It's the same thread I used for the outline of the paper. The thread is tightly over twisted, dampened with water and set aside to dry. Which is why in the next picture you see a dampened cloth. If you look closely, you'll see I already have a strand wound around the bars of my frame waiting to dry. It doesn't take long to dry but I figured I'd make a few at a time.


While those threads were drying, I made couching thread in the same color.


Since I had a few good hours of sun left (hurrah for the return of spring), I figured I might as well start the veins on the iris leaves.


Every time I'd finish a section, I'd think "should I stop here?" but then decide I can squeeze a bit more time. Next thing I knew, all the blades were done and I ran out of couching thread. It won't be long now, I just need a few good days of stitching and it will be done. I'll have to start thinking about the finishing process.


I'm really happy I'm so close to finishing my piece. This way when I start class on Friday for the next phase piece I can do it with a clear conscience. I can't wait to get started on Hiogi.

Monday, March 25, 2019

On Cloud Nine

Sunday morning is my usual Japanese embroidery day at home. I bit the bullet and started on those cords. I'd been dreading them for so long, but it went surprisingly well. Since the section I started working on was harder (it's a full loop with lots of adjustments for the angle), I decided to try and stitch the cords on the left side.


It went so well, I decided to try that loop again. It's not 100% perfect, but to me it looks fabulous. I only wish the cords on the wrapping paper were better. But I'm going to let that go.


Crossing my fingers I'll have a full uninterrupted day next Sunday to work on it and I will (hopefully) have the cords all finished. The end is near!


Wednesday, March 20, 2019

Japanese Embroidery Phase 1 - Wrapping Paper

Since my homework is done, I can finally go back to working on my bouquet. Over the weekend we had a group meeting. It was great to see them as our meetings kept getting cancelled because of weather.

I took my phase 1 piece Bouquet from the Heart of Japan. My goal this time is to put in the final touch on my wrapping paper. The paper is outlined with a thick thread called karayori which can only be couched. I've been putting this off for a while now but I couldn't anymore as all the veins and stems in the piece are stitched using the same threads.


After getting a demonstration, I was able to successfully make my threads and couch it. With my wrapping paper complete, I can go back and finish all the leaf blades and start working on the stems. Not to forget the cords. I'm thinking I should tackle the cords first as I don't want it to be the last thing to do on this piece. I could see it dragging as I avoid it.


Monday, December 17, 2018

Japanese Embroidery Phase 2-3 - A new beginning

I can finally share with you my kit for the next phase in Japanese embroidery. I mentioned back in September that I had picked Hiogi as the next piece. We placed a group order at the beginning of October and got it at the end of the month.

I got a little extra something for me, a pair of professional Japanese scissors, called nigiri-basami in Japanese. This will be my gift for finishing phase 1, so it will stay packed until I do. It will be my carrot to finish the piece.

If you're curious to know what a 1000 CAD worth of Japanese embroidery material looks like, here it is. It's basically two kits. Japanese embroidery is not an inexpensive hobby. As you move up the phases, kits get more and more expensive. Most of the cost is from the fabric, since as you do more phases you'll need to buy less silk reels and metal threads. Many colors come back and by the time you get to phase 9 or 10 you will have accumulated stock.


Back to my next piece. I ended up having to buy a second frame. I figured I would need a second one regardless for the future as I want to pursue Japanese bead embroidery, the frame cost is not that expensive and they are can be used for any large project. So it's a good investment. We spent the whole day on Saturday putting it on the frame and double lacing it. It's not often that we need to frame pieces so we had to refresh our memories. It's all ready to go, I'm just waiting on confirmation of what we're expected to have ready for our class in the spring.


Now that I've covered the next phase, I can give an update about the present phase... it hasn't moved forward. In fact it moved backwards. My last progress didn't sit well with me, so after consulting my group I decided to remove the cords on the bouquet. I spent Sunday morning unpicking them. I made a little surgical error snipping the threads at the front, so I flipped the frame and finished unpicking from the back. It wasn't anything major and easily fixed.


I wasn't planning on trying the cords again on Sunday, but I still had the afternoon so I made a second attempt. The second attempt didn't go any better than the first.

I sent a picture of my progress to my friend and she suggested working on a different area of the piece for now. She also suggested doing some counted work as a change. Like me, she finds surface stitching stressful, so maybe a switch would work. It's funny she mentioned that because three weeks ago, when I started getting frustrated with the cords, I had already started a new WIP. I set up the Mirabilia kit I bought for my sister's birthday and have been stitching on it every night for about an hour or two. I forgot how addicting cross stitch could be.


Back to the phase 1 piece, I think the best course of action for now is work on the last pink flower, add in the gold thread for all the pinks and then go back to the cords. Maybe not the cords on the wrapping paper, but the cords on the other side that don't have a curve. It could possibly help me get into the groove.

Monday, December 10, 2018

Disappointing Weekend

Ever have a weekend when you're just not happy with your stitching? Not because your skills are not up to par but the circumstances are stacked against you. This weekend I worked on the same projects, the Bearded Iris and the bouquet.

On Saturday I added the rest of the veins on the petals. The more I work on this woven metallic mesh the less I like it. It looks nothing like the piece Alison Cole stitched, and it's really hard stitching through it. I have what feels like huge holes where my couching stitches are. I'm also working blind since it's not opaque, putting in punctures where I don't want them. I know, I know, it looks fine when you look at it from afar, and no one will be pressing their faces to the piece. I just can't help being disappointed in how it looks. Maybe I will like it more when I put in the outline on the petals.


Sundays have become my day for Japanese embroidery. As planned, I worked on the cords wrapped around the paper. I had to unpick it twice before I got the angle right. Not only do I have to get the right angle for the cords but I also need to stitch through multiple layers of stitching. Not to mention try to avoid the gold thread at the front and back. It seemed like every time I tried to bring my needle up I hit a metal thread. Small blessing, I managed to avoid having to stitch through the center of any of the motifs. Not all of us are so lucky.


While stitching the blue cord, my angle was better but I can't help but feel like something went wrong. Does it seem like my blue cord is smaller than my red? Think I can get away with saying the red cord is going over the blue?


I'm really disgusted with my stitching, it looks so sloppy. At the same time, I'm not sure I can do any better if I redo it. I'm going to wait and see what feedback I get from my group at our next Japanese embroidery meeting, which is this weekend. So all in all, it's progress even if it's progress I'm not happy with.

Tuesday, December 4, 2018

Weekend Update

I'm the type who likes to plan their weekend. With that in mind, I picked two projects and devoted my days to work on them. The first one was Alison Cole's Bearded Iris. I hadn't touched this piece since October and have been feeling terribly guilty about it. Not to mention I need the frame that piece is one right now.


I worked on it on and off last week trying to get those leaves done. I love couching, but the plunging and tying down is so tedious.


And there was a lot of it as you can see from the back of the piece. Most of my Saturday was spent plunging and tying down.


With the leaves finally done, I could go back to working on the iris. I started putting in the veins on the petals.


On Sunday, I devoted the day for Japanese Embroidery. I continued working on the iris leaves. I ended up unpicking the top leaf near the clover flowers and fixing it. It looks better now.

The leaves are almost done, just need to stitch the bottom portion. Before I can do that, I need to put in the outline on the wrapping paper. And before that happens, I need to stitch in the cord wrapped around it. So that will be my main focus this Sunday.


Wednesday, November 28, 2018

Japanese Embroidery Phase 1 - Which Green?

After completing my second valerian, I moved onto the Iris leaves.


I've been holding off on stitching these leaves for a while now as I was debating switching the light green on the iris leaves for a darker shade. I always though this piece should have a second green as there are four different types of leaves all stitched in the same color. Also, aren't iris leaves darker anyways?


I went back and fourth multiple times. Had a poll up on Instagram, a post on Facebook. Many preferred the dark green, but I received comments from Japanese embroiderers not to change colors while others (certified teachers!) thought a color change was acceptable. Lots of conflicting answers. Someone even mentioned that by changing colors, the JEC might not approve my phase 1 piece if I wish to pursue teacher certification. Hearing this, I contacted the JEC to see what they said. Their answer:

The color scheme can be arranged. Please talk to your teacher and decide the best color of your choice!

Unfortunately, I'm in between teachers right now which means I don't have a teacher I could ask. I mentioned this and they never replied back. It's moments like these when I'm happy that social media exists. Stitchers are so nice and are always happy to help. I had a long discussion over Facebook messenger over the pros and cons of switching greens on the blades and came to this conclusion:

  1. Iris leaves in Japan are not dark green, they're a greenish yellow. In fact, bush clover leaves are darker.
  2. The iris leaves are supposed to be at the back of the bouquet, by using a darker green it will bring them "forward" in the bouquet when the flowers are supposed to be the focal points.
  3. If I want to change the color of the iris leaves, I would have to change the color of the other leaves to coordinate and I wasn't prepared to redo all the leaves. No matter how much I enjoyed stitching them.


So in the end, I didn't make any changes in color. It wasn't a total loss thought, it was a good lesson in color choices and how one change can affect a whole piece. Also, if I plan on switching colors it's better to do it at the beginning and not when I'm nearing the end. Now that I had a firm plan I could go ahead and work on the leaves.


I'm not particularly happy with how the top leaf was stitched. I think I need to redo the portion where the leaf is under the clover leaf flowers. I'm going to leave it in for now to stew on it. I'm really happy with my second leaf though.


Monday, November 12, 2018

Japanese Embroidery Phase 1 - Knots

Saturday was my monthly Japanese embroidery meeting. I tried working on the cords to continue what I started at the October retreat, but things just weren't working.


Instead of keeping at it and getting frustrated, I switched gears and decided to work on Japanese knots. There are quite a few in the piece, but I started with the bush clover flowers since those were started. Can I say, I'm not a huge fan of French knots but I love Japanese knots. They come out so cute.


The bush clover flowers are made up Japanese knots and covered with flat silk floss.


Sunday morning, I was still in the mood for Japanese embroidery. I set up my frame and continued doing Japanese knots, this time on the Chrysanthemums.


The knots of the chrysanthemums have a thread of gold mixed in with the silk. This is done for the orange and purple flowers. It makes a super pretty thread.

3 + 1 #1 gold/1 S-twist

Here are my three chrysanthemums all finished.

After lunch, I moved onto the valerians which also had knots along the upper edge. I was hoping to get both done but I underestimated how much time they would take. The valerians are still my favorite in the bouquet. That yellow is so beautiful and it looks even better once you add in the knots with the gold thread.


I though I took a final picture of the overall piece but I guess I forgot. I will take one when I finish the second valerian. Hopefully this weekend.

If you're wondering about Hanabatake, yes I did get my beads. And yes it has been finished. Yesterday evening I started the finishing process. I'll share a post as soon as I complete it.