Wednesday, January 31, 2018

Design For Embroidery

I've mentioned this class before in passing and I thought I would share a little more about it today. The Design for Embroidery class is an intermediate technique study course given by the Embroidery Association of Canada. It's purpose is to teach you how to find inspiration by looking around you and how to translate that on paper into something that can be embroidered.

I took the class because I always wanted to design my own pieces but never knew how to go about it. It just seemed really hard and overly complicated. I don't exactly consider myself a creative person, but sometimes I'll see something and think to myself: Wouldn't that look amazing stitched?

So far I've only completed two lessons, but I've already learned so much. Lesson one was about looking at things in a different way. Instead of looking at a bigger picture, we used viewfinders to narrow our vision.


I just finished lesson two and the theme was lines. In this lesson, we learned how to simplify an object to it's simplest form.


One of the exercises was with toothpicks. I was warned about this one, as many stitchers found it difficult to do. We are to use a minimum of 20 toothpicks, play with them and create a composition. One of the compositions I created was this flower. I never realized how important curves are. To give the impression of curves, I had to learn to play with angles.


From there, we were to pick one composition and create three design sheets using three different techniques. Since I'm on a beading binge, one of the designs had to be beading. As you can see it below, it's very simple to create a design sheet. There were a few days between creating the composition and putting the design down on paper. So by the time I did I had spent time deciding on what I wanted and was able to create this one in minutes.

You need to figure out your technique and what size you want to stitch it at. From there, you can color your design to distinguish the different sections and note down what stitches you want to use. Noting the stitching order is also useful sometimes. As you'll see later, colors and stitches are not set in stone. This is just a draft, we all need to start somewhere.


We needed to stitch one piece from the designs we created and this is the one I went with. Here is where things started to change. I didn't have the yellow beads I wanted in my stash, so I switched my flower to purple.


With my materials selected, I went about stitching my piece using the instructions in the design sheet. I found that as I started stitched, I had to make adjustments. 

(click on the post to see the animation below)


You'll notice that the calyx was changed. I found that once I stitched it, it was too straight and looked unnatural. To fix it I added another line to really define the calyx. The petals had to be adjusted as well. Because of the minimum size requirements, the original stitch I planned on using couldn't be used anymore. I would have been left with too many empty areas. So I took a page out of Georgina Bellamy's book. She does amazing things with colored metal smooth purl. Her technique easily translates into beading. It was like needle painting but with strings of beads instead of thread.


One thing that didn't change was the stem and leaf. I love how it came out.


And there you have it. Despite the changes I had to make along the way, you can still see the essence of the toothpick composition. I'm quite happy with how it came out.


This lesson was actually very fruitful. We had to do this exercise again with string to play with curves and I have a lovely design I'm itching to stitch. I just might do that sometime in the future.

I will admit that not all of the exercises are pleasant to do and are more akin to something you would do in kindergarten or an arts and crafts class, but they do have a purpose. If you take the time and ponder through them you will be very surprised with what you can come up with.

Monday, January 29, 2018

New Fabric Stash

I did some embroidery last week, but nothing that I can share for now as it's part of the design for embroidery course I'm taking with the EAC. I'm almost done with lesson 2, just need to write it up. I also have an article to write for the EAC magazine that needs to be done by end of week. I'm aiming to get all of it done by Wednesday so I can have the rest of the week to stitch on my projects. For now, I thought I'd share some of my latest fabric purchases.

I'm planning on finishing my Hedebo Enchantment into a pillow. I emailed Jette and she recommended that the pillow be finished with linen fabric. Since I can't find that very easily, I asked if she would be willing to sell me a piece big enough for this pillow and for the other Hedebo kit I bought at seminar. It finally came last week from the UK with a lovely handmade heart.


My second stash of fabric came from the Workroom in Toronto. I can't believe I've never been to their shop on my previous trips. I'm not much for buying printed fabric but I follow their Instagram account for the eye candy. That all changed when I started Japanese bead embroidery. Now every fabric I see is a potential canvas for a future project.


What really brought it on was these new fabrics from the Kelmscott collection by Morris & Co. Except for the fabric on the right, the design is really tiny, I'm really happy with my choices. They would look so pretty beaded.


While I was looking at the Kelmscott collection, I found this navy spotted fabric that I liked. I think it would look really nice as the interior of my eye glass case.


As always, I started to browse around the site to see what else I could use and started browsing through their stock of fabric. I spotted this one from Rifle Paper Co. You can't tell from the picture but the color is a lovely blush champagne.


The biggest prize was this Rifle Paper Co. fabric in dark navy printed with peacocks in gold. I liked the look of it on screen but was pleasantly surprised with how it looked in person. It was more expensive than the others so I'm glad it came out so nice. The fabric has a heavier weight to it and was screen printed in Japan. All the other pieces I bought were fat quarters except this one. I got half a meter thinking to make two cushions with it but now I wish I bought an extra fat quarter to practice on. The fabric has since been sold out.


That's it for now. I'm going to have a busy week but I'm crossing my fingers that I will finish all my obligations to free up the weekend to work on other things.

Monday, January 22, 2018

Japanese Landscape - Part D & E Completed

The last time I showed you this piece, I had started the sky but had to stop because I was missing the silver wire check.


I ordered the wire check from Golden Hinde and was expecting to wait a few weeks. To my surprise my package came in 10 days later. Very fast service, I will be ordering more from them again in the future. I also bought a whole bunch of other pretty things, but we'll leave those for later.


Bright check and wire check are stitched the same way, usually in cutwork or chipping. These are both silver. However, you can definitely see that the wire check is much brighter in color while the bright check is more glittery. That's because of the irregular surface. The light hits it in different places


For this part of the design, I'll be using them for chipwork.


The left part of the sky is stitched in a gradient, going from bright check to wire check. I want a nice mix in the middle so I don't end up with a line.


You'll notice that there is a black line on the felt on the left. That's to give me an idea of how far the bright check should be.


Here it is all done! By the way, this is my new wallpaper for my phone, it's so pretty. I will admit that all that careful mixing gave me a headache at the end. I don't do random very well.


The right side of the sky was more straightforward: wire check at the top, bright check at the bottom.


Here is an overall look at the piece. I've already started on the next part which is the flower on the upper left. It's not done yet and I won't be able to work on it again until the weekend. If you don't want to wait and would like a peek at it now, you can check it out on my Instagram account. I have one word to describe it: chocolate truffles. Yum!


Saturday, January 20, 2018

Hanabatake - Part 7

The last of the larger flowers is flower 8. I know it looks like I was randomly jumping around working on all these flowers, but there is a reason behind the madness. By the time I made it through to flower 8 I now understand how to stitch the different flowers and worked out how best to do them.

(click on the post to see the animation below)


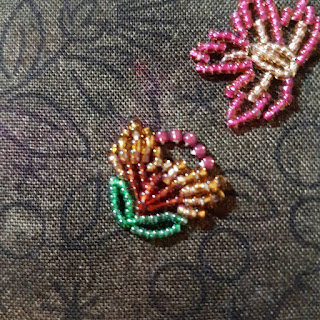
Flower 8 has two variations, the one below requires a koma for the upper line of the leaves. Every single bead needs to be couched so as to get a nice curve. The petals are stitched like flower 7.

Flower 8 variation 1

I'm not sure if this second flower is a variation of flower 8. The centers looked very similar but the petals are more fanned out instead of being grouped.

(click on the post to see the animation below)


I think I prefer the petals in this one than the first, but I do like the leaves in the other. Adds more color.

Flower 8 variation 2

Now that I have all the larger flowers done, I can stand back and look at the piece. I'm noticing large empty spaces in the middle on the left and the top right. Makes me think maybe there should have been another big flower there. I'll see how that will change once I start adding the leaves and stems.


This concludes my marathon of posts. It took me two weeks, but now that I'm caught up (sort of) I can go back to my regular posting schedule. If you follow me on Instagram you'll understand what I mean. I really need to rethink my strategy for next year but it's not often I get a full weeks worth of stitching.

Friday, January 19, 2018

Hanabatake - Part 6

I ended up taking a break from Hanabatake, finally breaking my stitching marathon. It was hard getting back to work and I was tired when I got home. This next flower required a lot of concentration so I decided to put it off for one day.


Flower 6 (it looks like a cherry blossom to me) is worked in three steps. We start with a calyx stitched over beads that act as padding. Next, petals are stitching using the same technique as the other petals in flowers 4 and 5 except we use a koma to manage the tension in the longer lines. You don't need komas to do this, an eraser will work just as well. After this the petals are filled in with stamens and seed stitched to add detail.

(click on the post to see the animation below)


This flower is stitched in reds and gold. While reading the instructions and closely looking at the finished piece, I noticed that there might be an error in the instructions. 'Might be' because it's really up to how you want to stitch it. Instructions say to stitch the stamens using a combination of the red seed beads with the red cut beads. After closely examining the pictures, it seems likely that this was done only on the gold flowers, because the red flowers look like they've been stitched with red seed beads and red 3-cut beads.

Flower 6
Out of all the flowers so far, this was the most complex and took the longest time. I have one of the larger flowers left to stitch and then I think I will move onto the vines and leaves, leaving the smaller flowers for last.


Thursday, January 18, 2018

January TUSAL


It's the first TUSAL of the year. This month's jar contains felt and sewing threads from my goldwork and beading. So lots of yellow and white. Hopefully I'll have more color in the next one.

Wednesday, January 17, 2018

Hanabatake - Part 5

This post will be very short today. Day five on Hanabatake with a new flower. Flower 7 is stitched with techniques from flower 6 (which will come in a later post) and flower 9.

(click on the post to see the animation below)


Flower 7
Seven flowers out of twelve have been finished.


Tuesday, January 16, 2018

Hanabatake - Part 4

Day four of Hanabatake and we're starting to see more colors. There are a lot of instances where two gold beads are combined. They have different sizes as well as different finishes. This gives the flowers dimensions.

Flower 9
To give further dimension, you can also add on extra beads on a line forcing it curve upwards. nestling it between several lines ensures it doesn't move around. This makes the flower look like it's padded without actually putting in any.

Flower 12
There is something that is never explicitly mentioned in the instructions. Once the calyx is stitched, petals need to be added from the outside towards the center. This ensures you have a smooth line. It also helps judge how many beads you want on the line and helps hide the thread better.

Flower 10
A look on the piece so far. I'm noticing that the bulk of the bigger flowers are at the top. Notice the three flowers near the upper left corner are in the same configuration as the bottom right corner?


Note: I had a commentator named eyestitch on the last post. If you are reading this one, I wanted to reply back but you are showing as noreply-comment@blogger.com. As this is someone else's design I can't really show my solutions since it will giveaway the pattern. We all have to be careful with copyright infringement. The closest I can do on the blog is post good pictures that others can use as a guide to help them stitch their own kit. As I mentioned in the previous post I did make short hand notes on each flower for my friend Carolyn. I will eventually type it all out once the piece is finished as another friend had bought the kit and expressed interest in them. You are welcome to the notes as long as you can show me that you own a copy of the actual magazine. If you'll send me an email, there is a link under my profile, I will send them to you when they are done. If you have any questions please don't hesitate :)

Monday, January 15, 2018

Hanabatake - Part 3

Day three saw me working on a new flower on Hanabatake. I'm going to complain again about the instructions. In between the instructions for each flower, there are little boxes that describe the techniques used. That's fine, but sometimes textual instructions are no good. A diagram would be better. Which is something this pattern really lacks. To understand the steps for flower 11, I referred to Margaret Lee's book which contained diagrams. The names of the techniques match those in the book. It would seem that the lack of detail in the instructions was on purpose to sell the book, which doesn't seem very fair to those who don't own it when they work on this design.

(click on the post to see the animation below)


Flower 11
Three flowers out of twelve have been completed so far.


At this point in the project, I found myself not really enjoying the piece as much as I was expecting to. The instructions are not up to the standards I am expecting from Inspirations. My friend Carolyn is also stitching this piece with me and is just as confused. I'm a little ahead of her, so to help out I've been writing notes on each flower with tips and diagrams as I stitch them. Anyone else working on this piece? I'd love to hear from other people who are either stitching it or have stitched Hanabatake.

Sunday, January 14, 2018

Hanabatake - Part 2

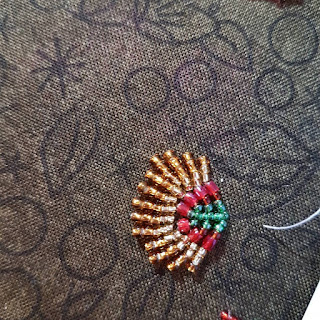
On day two of Hanabatake, I moved onto flower 4. This one was a little easier to stitch. It is very similar to flower 5 and the center of the flower is stitched in a technique that I learned in Hana and my phase 1 Japanese bead embroidery piece.

(click on the post to see the animation below)


There are three of these flowers and they're stitched in the same manner, except for the one in the animation above. Instead of a half circle, it has a full one. I noticed as well that the proportions of the drawn lines didn't match what the flower should look like once it was beaded. So I ended up adjusting the petal outline.

Flower 4
An overview of the piece.


Saturday, January 13, 2018

Hanabatake - Part 1

Note: All this stitching happened during the holiday period. I'm publishing a post a day in order to catch up. Afterwards, updates will go back to my regular posting schedule.

The second project I started over the holidays was Hanabatake by Margaret Lee. This piece was featured in Inspirations magazine issue 95. I'm working this design from the kit that is put together by Inspirations which I showed you in September.


Like in all my projects, I like to be prepared. I had my colored sketch ready to use as a reference. When I made this sketch, I noticed that the design outline didn't match Margaret's final stitched piece. There are some places where she had switched the smaller flowers around. While stitching it, she probably decided it looked nicer that way. I made note of these changes in my drawing.


The beads came in baggies which I transferred into these little containers. I found this setup much more efficient as I can easily grab the beads I want.


My fabric came with the design already printed on the fabric, which is great as it would have taken some time to transfer all the lines. Unfortunately, the design is not quite centered on the piece of fabric I received. I only realized after I stretched the fabric on the stretcher bars. Something to look out for next time.

Before I can start beading, I had to put in an outline using the Japanese running stitch all around the piece. This is to delimit the stitching area.


With the preparations done, I could start. The instructions start off with the smallest flowers, which doesn't make sense if we are stitching this in the Japanese way. The Japanese way dictates that the foreground be stitched before the background. Since the smaller flowers are filling the background, I decided to start with the bigger flowers first.


I had a very hard time understanding the instructions. I had to re-read the instructions many times and I unpicked my flower a few times before I was happy. Luckily the fabric is very forgiving.

(click on the post to see the animation below)


Once I had that first flower done, the others were very easy to stitch. Compared to the few hours it took me to stitch the first one, the rest were a breeze.

Flower 5
At the end of day one, I had the first flowers stitched. My first attempt is the one in the upper left corner. I did notice that my attempts got better as I went along.