Wednesday, July 25, 2018

Home Again

I'm home! We left straight after class on Sunday and got home on Monday evening. I was back at work the very next day. I have loads to share but it will take me some time to unpack. Not sure I'll do any stitching this week, but I do have my Japanese embroidery meeting on Saturday. Just a quick update on Samara. Some of you probably already know this from Instagram or Facebook but my piece won second place in the EAC board challenge.


There I am accepting my prize from Dianna Thorne. I thought they would announce the results at the banquet on Saturday, but instead it was announced at the AGM luncheon on Wednesday and I wasn't even there. I was off visiting Green Gables. I found out the results when I got back and was visiting the exhibition. I was very pleasantly surprised as I didn't even think it would place at all. The other pieces fit the theme more than mine. The piece that won first prize was amazing, embroidered in white and red with different stitches to depict many Canadian symbols. Every time you looked at it you discovered something new. I'll post a link when pictures will be shared by the EAC.

As for new stash, I won't leave you hanging. Here is a sneak peek.


Friday, July 20, 2018

Samara - Part 2

All pieces displayed in exhibitions must be finished. For Samara, I didn't want a boxy frame, I wanted something round. I started looking around for a round frame, always keeping in mind plan B: stretching it over a round mat board and covering the back with a fabric. I even had my framer cut a piece for me just in case.

Luckily I found the Sudberry House Crown Plate on 123stitch. The stitching area was a little bigger than I wanted, but everything else was too small.


The frame when it came in was beautiful. I loved the color of the wood. It came with a piece of glass, a mat board and a board to close off the back. It also included instructions on how to frame your piece. The only thing I wish it came with was the plate holder. The site I bought it from didn't stock it, but more on that later.


I used the mat board that came with the frame to cut a piece of quilt batting and then trimmed that piece by about half an inch.


!Warning! Glue was used in the finishing of this project.


The hard part was getting the piece centered over the mat and properly stretched.


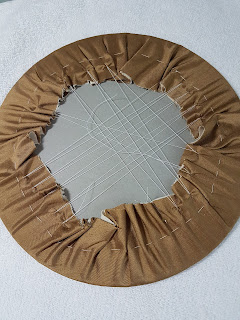
I cut the excess fabric and did a running stitch all around. Once that's done, I carefully pulled on the thread so it wouldn't snap. To keep things in place, I put in some lace stitches going both directions.


Here it is all done. Based on the instructions, if you pad the piece with quilt batting you shouldn't use the glass. I didn't want to squish my purls anyways. I will keep the glass safe somewhere in case I want to switch out the piece later.


Back to the plate holder. Since I couldn't get the one by Sudberry House, I need to find a different way to display the piece for exhibition. It's always better to be prepared as the exhibition committee doesn't necessarily have enough easels for all pieces, so I like to provide my own. I went to Michaels and found a lovely bronze stand that went really well with the color of the wood. I made a little tag for it to make sure I get it back at the end of exhibition. I didn't think to take pictures of the two together. I will take them when I bring the piece back.


I'm publishing this article on Friday. They will be announcing the results from challenge at the banquet on Saturday night. Wish me luck!

Tuesday, July 17, 2018

Samara - Part 1

I'm writing this ahead of time. By the time you read this I should have submitted the piece that I stitched for the EAC board challenge I had mentioned in June. The theme this year is "Celebrating Canada". Now whether my piece really makes you think of Canada or not is a different story.

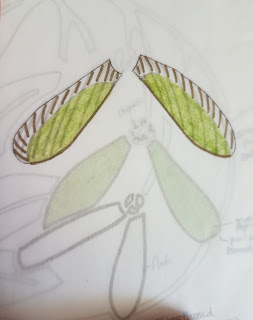
I didn't want to do the typical red and white. I'd found a Japanese emblem in a book with a maple leaf and maple keys. As a kid, we called maple keys helicopters because of the way they spin and we used to love playing with them. We didn't have anything like it in Lebanon or Saudi Arabia where I was born. So for me it was something that was unique to Canada. It's only now I realize these things have an actual name: maple keys or samara.


I decided to stitch this piece entirely from my stash. Last year when Alison Cole started a goldwork subscription box, I signed up but only ended up staying on for two boxes. The first box was gold and greens, which would be perfect for my piece. Before maple keys become dried and yellow they're green.


I spent a lot of time dithering on what I should do exactly, then one day I decided enough! I'll transfer the design and start with the parts I'm 100% sure of. I transferred the design using the paper tissue method. This was practice for when I needed to do it for my seminar class.

(click on the post to see the animation below)


I really loved the piece of green organza that came in the box and really wanted to use it.


I decided to use a technique I learned from Annie Penin. In a class I took with her, she had couched pieces of organza for the leaves and the frayed edges were covered with a line of beads. In my case, I used gilt pearl purl.

(click on the post to see the animation below)


Here is what it looks like once done.


To add a little dimension to the piece, I decided to just outline the smallest maple key with a super pearl purl.


From my initial design sketch, I planned on padding the biggest maple keys and completely cover it in cut smooth purl.

(click on the post to see the animation below)


Then I got an idea of only partially covering the keys with cutwork. The green area would be covered in the green organza. I tried it on one of the keys to see if it would work out and it looked much nicer to what I originally planned.


I first created a template of the shape of the padded area. From there I covered the open area with green organza. I wanted a clean shape so I went well passed the area that is visible, but it will be covered with felt. Next step, is applying the felt which is then covered with smooth purl cutwork. The key is finished with a line of pearl purl to define the bottom edge.

(click on the post to see the animation below)


Around the maple keys is a tree branch. I knew as soon as I saw it I will cover it in couched gilt passing. So this was an easy decision.

(click on the post to see the animation below)


This is where the dithering started. Because of the shape of the maple leaf and it's size, I wasn't sure how I would handle stitching it. I was originally going to "needle paint" it using colored purl and even bought a lot of different leaf colors, but I wasn't convinced.

I was at my Japanese embroidery meeting and discussing ideas with the group when Japanese silk was mentioned. This reminded me that I might have the perfect green flat silk in my stash.


By this point, I'd started learning how to stitch at an angle in Japanese embroidery but I'm no where near proficient. I had a terrible time with outermost edge and had to do it twice. Doing the other edges helped me get some practice in.


Sorry for the terrible picture, I think I finished it late in the evening. I'm quite happy with how the silk came out. This was a great piece to play with flat silk and practice stitching, now I just have to do better on my phase 1 piece. As a reference, the leaf was stitched in 2F (2 strands of flat silk).


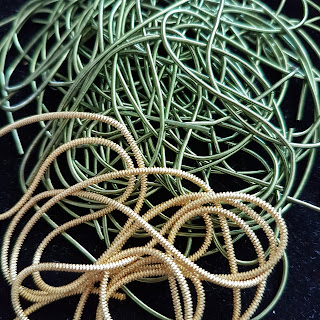
Next is some chipping. You might remember this picture. That's gilt bright check and green rough purl. I'm making use of the pretty metal threads I brought back from Turkey.


I used a piece of paper to cover the stitched silk. We don't want the metal thread to snag on it. I started off the chipwork with just green for the smallest key before inject gilt in the second key, with the last one only having gilt.

For the maple leaf, I didn't want to leave the vein uncovered. First, because it doesn't look nice and second, I really wanted to hide my uneven edges. You might not see them, but I do. I love s-ing and I thought it would look lovely against the green.

Everyone who saw the piece, kept asking "are you going to leave that third one empty?". They were talking about the smallest maple key. I decided to scatter tiny little pieces of check purl.

I needed one last thing to tie the entire thing together, a couched edge going all round. I had a piece of mat cut in a circle that was the perfect size and used that to draw an outline all around.


I thought about using passing for the circle but decided to go with a 3-ply twist that came in the subscription box.


Although, I didn't technically use all the materials that came in the box (still no idea what I'd do with the washers) I'm very happy with how it came out. It looks even prettier in the frame I bought for it. I will show how I framed it in the next post.

Friday, July 13, 2018

July TUSAL


I wasn't planning on posting anything else but I looked at my calendar and realized it's time to post for TUSAL. This month the jar is filled with more cut fabric from the framing process. The white threads at the top is from beading Hanabatake.

Now it's really my last post before my trip. I will leave you with these two images of my preparations for seminar.

Ready to travel
Ready for class

Thursday, July 12, 2018

Hanabatake - More Leaves

Things are still progressing steadily on Hanabatake. I've been working on a small section every night. I'm still a long way off from finishing, but things are progressing much better. I'm not falling in love with the piece again, but I am liking it more than I have in the past few months.

(click on the post to see the animation below)


Here is what it looks like now after three evenings of stitching. I have maybe one more opportunity tonight if I don't get caught up with anything. I have to make brownies for an office BBQ we're having tomorrow.


Tomorrow night I pack my bags as we're leaving early Saturday morning. Seminar doesn't start till Tuesday but we decided to take our time getting there so we can make a few stops along the way. We're visiting Quebec City, Rivière-du-Loup and Moncton before arriving at our final destination on Monday evening.

I scheduled some posts to auto-publish next week. I will finally unveil my EAC board challenge piece I embroidered. If you want to follow along on what I'll be up to next week, as always, you can do so on Instagram.

Monday, July 9, 2018

Hanabatake Came Out

For those who had been wondering: What happened to Hanabatake? The last time I showed a picture of it on the blog, I had finished all the bigger flowers and decided to start on the stem. Things started to go wrong when I was trying to decide whether I should do all stems first (this would involve lots of starts and stops which I hate) or do stems and leaves as I went. The technique itself is fine, I know what I need to do, the problem was in the bead combinations.


The instructions in Inspirations are pretty vague. There are two combinations for the larger leaves and each one uses three or four different bead colors. There is no mention how many of each bead to use for each line and the pictures are not good enough to make out what beads are used. So after stitching that lone green leaf on Wednesday, I decided to do stems and go back to leaves later. I had also made a commitment to stitch at least an hour a day on Hanabatake until it's time to leave for Seminar.


Easier said. I kept my word for one day and skipped the next two. On Sunday morning, I realized that doing only stems was not going to work. I needed to make a decision on those leaves. I set up my desk for beading and laid out the beads to be used for the two leaves deciding to simplify them to just two or three bead colors each.


That worked, I was able to get more of them done in a few hours. I more than made up for the two days I skipped. I've also decided to ignore how the leaves on the model were stitched as they completely disregard the actual line drawings on the fabric in the kit. I think things will go much smoother (I hope) from now on.


I really wish I had more space in my room. One of the reasons why I didn't touch Hanabatake for so long is that I'd put it away to clean up my workspace to do goldwork and never took it out again. If I had the space to keep it out, I could just sit when I have time and put in a few stitches. Instead, I have to spend a few minutes taking out everything and setting up my desk for beading. There are days when I can't be bothered. I still don't have a dedicated space, but it's no longer sitting in a drawer. Right now, it's on my desk, in plain sight, waiting for me to come home and work on it.

Tuesday, July 3, 2018

Tying Loose Ends

It was Canada day on Sunday, so we had a long weekend. I was away Saturday and Sunday for a cousin's wedding. It was a small thing, we were there for the family pictures and the reception. The place they picked for the pictures is a beautiful building. It's the Guardian Building in Detroit built in 1928-1929 and is a lovely example of Art Deco design. It was a bank before but now it's used as municipal court. I spent most of my time looking up at the ceiling.


On Monday I had no work, so I spent the day finishing up a few things for Seminar. There's one more weekend left before we leave so I wanted to take advantage as much as I can of the time left. I finished my EAC challenge piece and it has been framed. I'll share more of it in a post I'll publish while I'm at seminar, but for now here is a picture of the back.


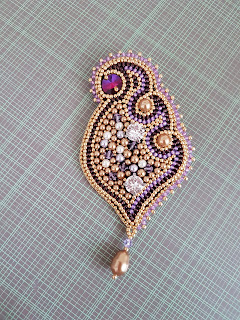
The next thing I needed to do is for the seminar banquet. We were asked to wear something that we had embroidered. I was originally planning on making a sash but I'm still trying to figure out the logistics and decided on a brooch instead. Last year, I found instructions for a lovely purple brooch on a Russian website and had gathered all the materials for it. It seemed like a good time as any to stitch it and I was itching to bead.


It also gave me an excuse to try out the new Tulip beading needles I bought last month.


I have to admit I'd been stitching on it when I should have been working on my EAC challenge piece. Beading is addicting.

(click on the post to see the animation below)


Now I just need to pick a nice dress to match it.


Stitching this piece has awakened my love of beading and I want to do more of it. I just need to decide if I should start a new one or go back to working on Hanabatake. It's been almost 5 months since I last touched it, I really should take it out again.