Monday, February 19, 2018

Japanese Landscape - Part I

I feel like my stitching has really slowed down over the past few weeks. Winter is so tiring. On Sunday, I managed to put in about five hours of stitching on Japanese Landscape.


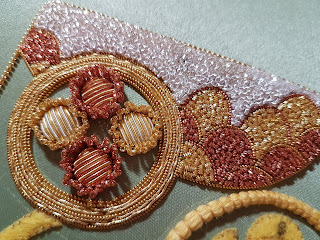
The petals that surround the leather kid involves cutwork. There is a bit of couching around the felt outline but the bulk of the work is filling in with cut bright check and smooth purl.

(click on the post to see the animation below)


The smooth purl in my first petal were a bit fractured but not too noticeably. By the time I got to the last one I was getting better. Can you guess which petal was my first and which one my last?


The next section is really small, the four triangles between the petals. So if it doesn't take me too long I might do that and the next section which is the stem of the left flower.


Friday, February 16, 2018

February TUSAL


My TUSAL jar this month looks very sad even thought I did a lot of work this month. It's all those sewing threads I've been using.

My teacher emailed me saying she mailed back my lesson 2. It should be coming in today. I can't wait to get it and read her feedback.

Wednesday, February 14, 2018

Japanese Landscape - Part H

Part H on Japanese Landscape involves a new material: kid leather. I've never used it before so I was a little worried about getting it right. By the way, the instructions asks for matte gold kid leather but the small square I received from Alison doesn't look like the image in the book. So either Alison made a mistake, there is a typo in the book or there are different matte gold kid leather available on the market. Not sure which one. I didn't notice the difference until after I'd stitched it down and it looked so nice I didn't want to take it out.


The kid leather is only used for the circle in the center flower. The instructions said to transfer the circle onto the kid leather using the prick and pounce method. I have a pricker but no pounce. Instead I used a pen to go over the lines again, letting the ink bleed through the holes.

(click on the post to see the animation below)


Including the Craftsy class, I have quite a few books on goldwork. I took a look at what I had and the one with the best technical tips of using kid leather was Hazel Everett's. I had a discussion with Jen Goodwin over Facebook and all of her recommendations matched what was in this book. The other's were a little too brief.


I started by placing holding stitches using white thread just to make sure the kid leather is exactly where I want it to be. From there, I started placing little stitches in the same way you would when applying felt padding. A thimble is

(click on the post to see the animation below)


One of the things she said we shouldn't have is a shape that looks like a pie crust. It's those frills on the edges.


It will look like an excessive amount of stitches, but even what you see below isn't enough. I needed to add more stitches at the top where there was still a little bit of frill.


Once the kid leather is couched, the little dome is surrounded with pearl purl.


My piece so far. The next step is to fill in the petals surrounding the dome. I think I will be okay even if the kid leather isn't the same one as in the design. It will bring out more of the copper tones in the piece. I guess we'll see once I start filling in the petals.


Monday, February 12, 2018

Japanese Landscape - Part G

We were snowed in over the weekend and my Japanese embroidery meet up Saturday was cancelled. I was originally only going to work on Japanese Landscape Sunday but with the cancellation, I was able to start a day earlier. 


(click on the post to see the animation below)


This piece contained couching, chipwork and cutwork. I'm getting better at the cutwork but it still needs a little work. Some of my rough purls are a little chipped. If you look closely on the right portion of the flower, you'll notice the purls are chipped going down on the left. Not noticeable from afar but still something to improve on.


Things are moving much faster on this piece. The upper portion is all done. I've already started on the flower at the center and will share progress photos of it Wednesday. I felt it needed it's own post.


Friday, February 9, 2018

Japanese Landscape - Part F

It's been three weeks since I last showed you my Japanese Landscape. In the last post, I hinted on having started the flower on the left but needed a little more time to complete it. Within the circle of the flower, there are 4 smaller circles that are covered in cutwork using rough purl and surrounded by bright check loops. Just to give you an idea, below are all the different metal threads used in that tiny space.


(click on the post to see the animation below)


The gilt were easy to use but the copper and silver were a little strange. Every time I would measure and cut a length, I would thread it and stitch it down only to find that I'm a little short. I had a discussion with a few goldwork stitchers and they mentioned the same thing happening to them. It has to do with how the rough purls are made. The copper and silver had a tiny bit of space between the coils, so when it is stitched down the coils get compressed and the length gets shortened.


It took some getting used to, but the results are so pretty. I think I would have been happy just leaving it like that.


The final step is to surround each circle with bright check loops in copper and gilt. The instructions don't say how long the cut lengths should be so it was a little guesswork on my part.


When I finished the first circle, I was not particularly happy with it. It felt like the loops were too high but at the same time I didn't want to unpick it. My mom liked the length and since it would be hanging in her living room I decided to let her have the final say. I still wasn't happy, which is why I avoided the project for so long.


I had enough with the procrastination, so I had a talk with Natalie. She recommended trying a smaller length, see how it comes out or consider having two different heights for the loops if I didn't want to unpick the copper. I decided to give it a go and made the gilt bright check a tiny bit shorter than the copper.


After finishing the first one, I could see that it could look nice. There isn't a noticeable difference between the copper and gilt in terms of height.


I'm so glad I finished this section. It's been bothering me for weeks so I'm relieved to finally be able to move on.


An overview over the piece so far. The upper left corner is now done. I'll be moving onto the upper right corner on Sunday. I've already started pulling out all the packets and there are just as many in this one as there was in the other.


Monday, February 5, 2018

Hanabatake - Part 8

I finally got my copy of Inspirations. It's really funny because I had the whole family looking out for it for me as well. There were so many beautiful pieces in this issue. Jane Nicholas' piece is from her tiles book that I own. I want to stitch one of those one day. The bird piece by Catherine Laurençon is lovely as well. I really want to improve my long and short skills. One day! The project that is most likely to get stitched (many of you have already guessed) is the beaded brooch. If you'll remember the red flower brooch I made last year, this one is very similar to it. So I was very curious to compare techniques. I has a quick look at the instructions and the padding technique looked very interesting. I probably have all the beads to make it so I might do that when I have time.


Onto more beading. The last time I shared an update on Hanabatake I had decided to start working on stems next. I did start doing that, but then after a closer look at the design I noticed that some of the stems go all the way up to the base of flower type 3. The rule in Japanese bead embroidery is to stitch the foreground before the background. So I put aside the stems to work on the flowers.

(click on the post to see the animation below)

Flower 3 - Color combination 1
The flowers are all stitched in the same way, some have longer petals than others. The instructions name three color variations. When I examined the finished piece closely, I noticed that there was only one flower stitched in the third variation. So I decided to not include it and just stitched using one of the other variations.

Flower 3 - Color combination 2
Remember that flower that I had to redraw the lines for? Because I readjusted the lines, the flower that was stitched next to it had to be adjusted as well.


Here is Hanabatake from the top. I think I can safely go back to the stems. There are a lot of them.


Now that I've made some progress on my bead embroidery piece, I think it's time for me to take out my goldwork piece. I want to finish that flower so I can share it with you here.