Thursday, June 28, 2018

They're Home

On Tuesday, I went to pick up my pieces from the framer. They were really fast, I wasn't expecting these till next week. In order to share my excitement, I decided to do an "unboxing" video.

(click on the post to play the video below)


I'm quite happy with the frame we picked. Reg is a genius! I've never had to tell him what I need. Just walk in, show the piece and wait for him to make his choice. His first choice is always spot on.


I can't believe it's only been a little over a year and a half since I started my first goldwork piece. I always though to wait a few years before starting to take classes. I had bought the Craftsy class but had no plans on learning it yet. However, as soon as I saw Pearl Butterfly I was hooked. It helped that my sister offered it to me as an early birthday gift.

Pearl Butterfly by Alison Cole
From there, the projects just grew larger. I moved onto completing the Craftsy class I bought.

Goldwork Flower by Lucy Barter
Between Alison Cole and Lucy Barter, I learned enough to eventually stitch this more complex piece from Mary Brown's book Goldwork Embroidery: Designs and Projects.

Japanese Landscape by Mary Brown
If you're wondering if your eyes are deceiving you, they're not. That is puckering you see. As I'd mentioned in my previous post, I tried stretching the piece myself but had a hard time getting it straight and centered. I had also noticed that the fabric was puckering within the stitched rectangle. They got the piece centered but couldn't get all the puckering out. It's not noticeable when you look at it from afar, but it is when you get close up or look at it from an angle. Good thing this piece is not being submitted for judging as it would fail miserably.

I'm wondering if my fabric was too tight on the slate frames. Because that is the only difference really between this piece and the other two. I had stitched the other two in a hoop. If anyone has any comments that will help me improve, please do send me a comment.

Thursday, June 21, 2018

Comment Notifications are Back

Re-posting this from Jo's blog. Comment notifications are back! Thank you Jo for sharing.

We received notification this afternoon that the problems have now been resolved.

As many of you are aware we have not been getting email notifications when comments are left on our blogs following the European GDPR changes.

In order to receive emails now there are a few simple steps to follow.

1. Go into your Dashboard.  Select your personal blog.

2. Click on Settings on the left hand side.

3. Click on Email and this screen will appear:

No automatic alt text available.

4. Delete your email address from the large box and click Save (orange box at the top right).

5. Retype your email address and click Save again.

6. You will shortly receive the following email:


7. Click Subscribe and wait for the emails to come pouring in!

8.  Repeat for every blog that you admin and want to receive email notifications.

I have heard there are issues with some hotmail addresses so maybe use your gmail address instead.  There may be unreported issues with Yahoo and aol too.  We shall see.

Please share widely so everyone knows we are back in business!


Comments have been turned off for this post as I will combine it with the previous one in the future.

Wednesday, June 20, 2018

Bearded Iris - Homework

Seminar is fast approaching (27 days and counting), so I thought it was about time I reveal what class I will be taking this year. As soon as I saw this piece at exhibition last year, it was all I wanted to stitch. It's a 2-day goldwork class though by Alison Cole called Bearded Iris. The class went to lottery, as all Alison's classes do, and my name was picked. Luckily, because I didn't really want to take any other class this year.


While I was away in Turkey, I got a package from Alison with the fabric and homework instructions. The fabric is a crinkle velvet in a lovely teal color (she has it in stock at her shop if anyone is interested).


In order to be ready for class, I need to setup the fabric on my slate frame and trace the design. I'll be using my RSN slate frames for this project.


It took about three hours to do this part. It's really hard to judge if the velvet is stretched properly because of the crinkle. I'm going to have to stitch the iris sideways. If I stitch it vertically, the frame would be too long for me to stitch comfortably.


Next step is tracing the design lines. The instructions say to use the tissue paper method for this.

I've tried this method before on a smaller design. I had used an acid free tissue paper I had bought for safely storing finished pieces. I didn't want to waste the tissue paper this time around and just used the stuff you find at the dollar store in the gift aisle. Not sure I'm happy with it as it kept wrinkling and tore easily.


I'm not sure if it's because of the paper or the design itself. I just hope all the wrinkles didn't distort the design and make it harder to stitch later.


Here it is with all the tissue paper removed. It's hard to photograph against that teal but the lines are there and ready to start stitching.


Update 2018/06/21: Shirlee asked if I did the transfer from the front or the back. It made me realize that with this crimped fabric, it would have been easier to do this from the back. 

Monday, June 18, 2018

June TUSAL


I'm terribly late for TUSAL this month. I made up for last month's missed stitching, my jar is very full with scraps from stretching my goldwork pieces for framing. Speaking of framing, I dropped all three pieces at my frame shop on Saturday. I was able to stretch two out of three myself.

Unfortunately, I had some trouble with Japanese Landscape. I tried several times but could never get it straight and centered. There is also a little bit of puckering on the inside. I didn't want to take any chances, so I'm leaving it in the hands of someone who has more experience than me. I know they won't lace it and will use glue but at least it will be done properly. Because in the end it's the final result that counts. On the plus side, they're not charging me for the stretching!


I know there hasn't been much stitching on the blog lately. I am working on something. Every year, the EAC board picks a theme for a challenge and the works are exhibited at Seminar. This year the theme is Celebrating Canada, as we celebrated Canada's 150th anniversary. I won't be sharing pictures until seminar but in the meantime I can tell you it's goldwork in green and gold. I'm almost done, it just needs a few things here and there, and then I can finish it for display.


Monday, June 11, 2018

Finally Getting Framed

On Saturday, I finally went to my frame shop with my three Goldwork pieces. Yes, Japanese Landscape is done, I just never took final pictures to share. I will do that soon. Just need a good sunny day and we have plenty of those now that it's summer.


The frame shop I used is called GEMST. There is an employee at the shop named Reg who used to work in the fashion industry and he has an excellent eye for selecting the perfect frame for embroidery pieces. My only requirement for these three pieces, is that they had to be framed using the same frame. They will be hanging side by side so they need to match.


The pieces will be protected with glass and because there are some raised elements, we ended up going with a double frame. Reg recommended not having a mat so it wouldn't distract from the work. We picked a gilded frame with a burnished(?) edge. It really brings out the copper in Japanese Landscape.


I decided I would stretch my own pieces on the foam core instead of letting the frame shop do it. This is because I can't guarantee that they don't use glue on the back of the pieces. I have two cross stitch pieces that I had framed there and they are both excellent but I didn't want to take any chances. So I came home on Saturday with all three Goldwork pieces and matching acid-free foam boards.


I need to get these stretched for this coming Saturday as I'll be going back to finalize the frame size, glass selection (museum quality of course) and pay. Really not looking forward to seeing how much this all costs. I managed to finish two of the three pieces over the weekend and I started on the third one today. So I'm on track to reach my goal.

Wednesday, June 6, 2018

Courtepointe Québec

Over the weekend, there was a show called the Courtepointe Québec. It's a quilt show and not exactly something I'm interested it, but Patricia asked me to help man the booth for her boutique L'Atelier de Pénélope. I was there Saturday and Sunday, so no progress was made on my bigger projects. I did bring my Sashiko piece with me and I would work on that between customers (more on that later).

The show had many quilts on display and there were many awards given out. I recognized some designs and even fabric from Instagramers that I follow. For example the quilt below, it was very popular last year.


There were also a few pieces that just attracted me because of texture, colors and shapes.


I loved the fabric in this piece. The shop, Meerkat Shweshwe, that sells the fabric had a booth at the show.


This piece is really beautiful, it's done using free-motion quilting and Trapunto, which is Italian for "to quilt". Here's a video showing the technique. It looks very time consuming and the quilt is huge.

This piece had cross stitch on it.


Here's another piece stitched using Meerkat Shweshwe fabric. The quilter who made this had already made one before, so this is her second.

This was impressive, getting the gradation right.


Lovely Geisha.


Even prettier peacock.

Here are my favorite quilts from the show.


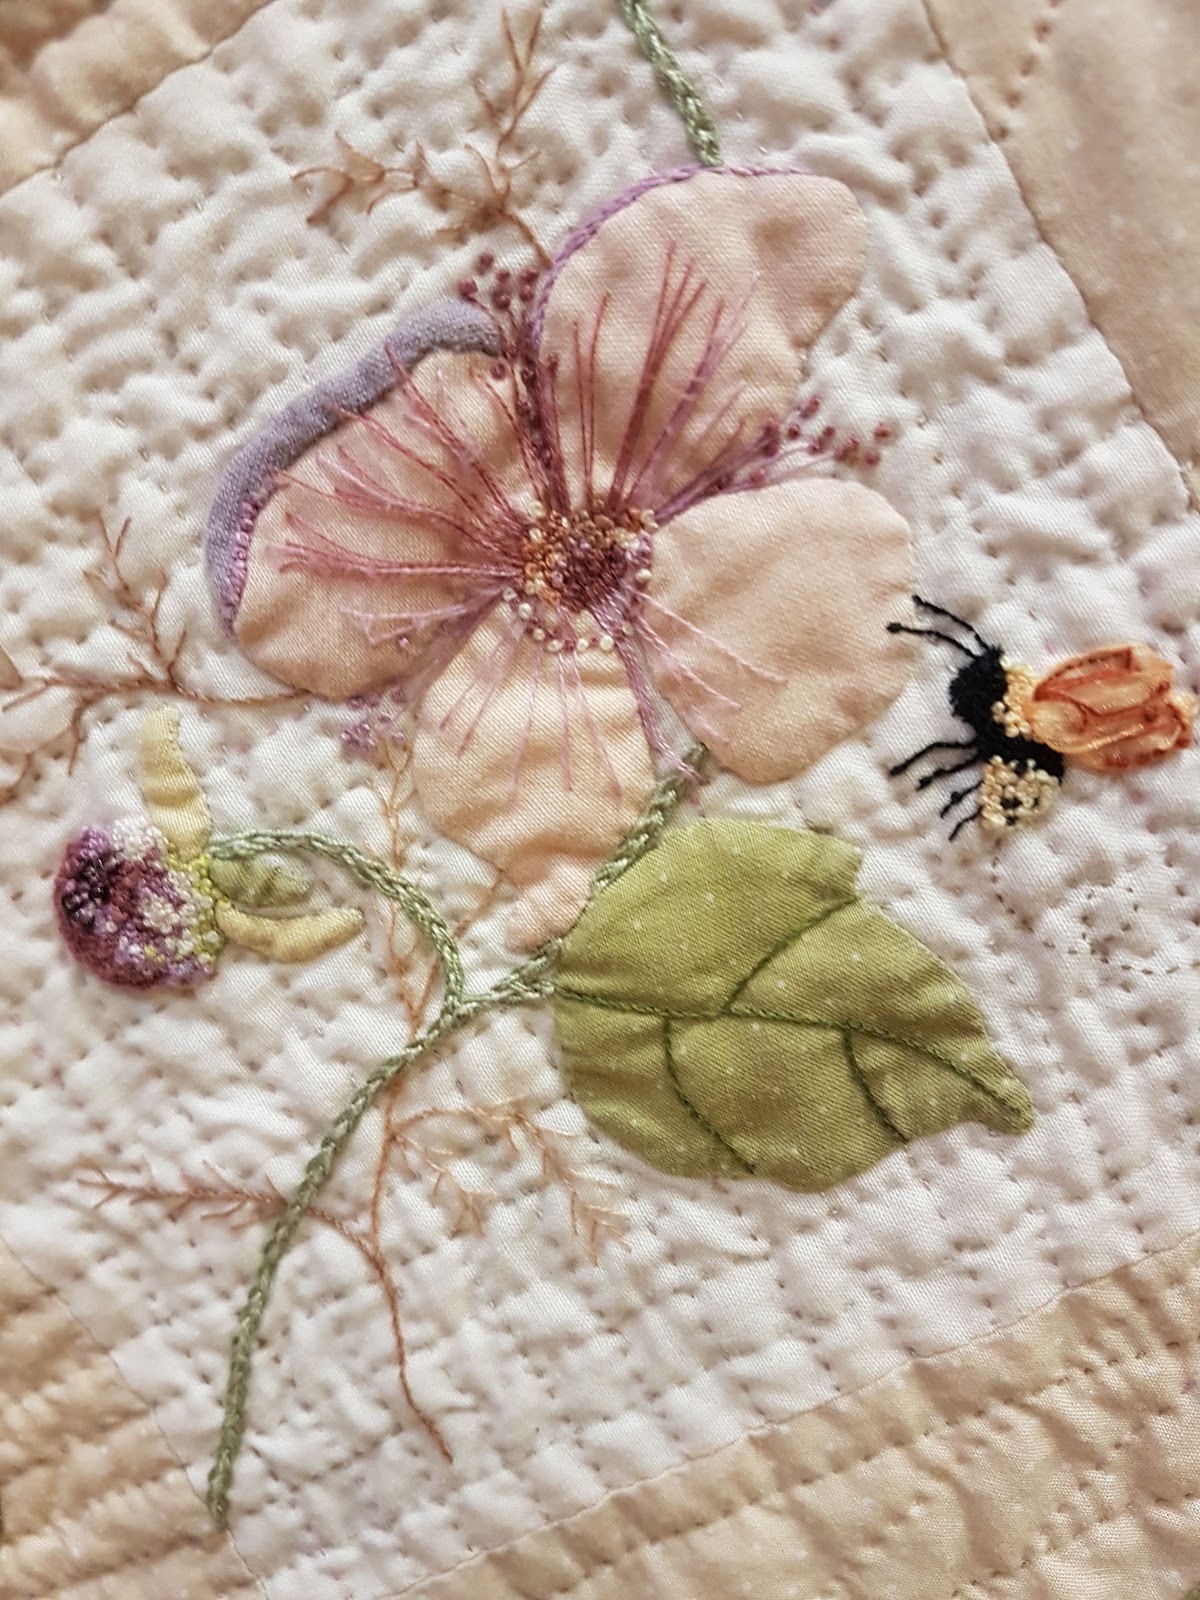
The quilter who made this hand dyed all her fabrics to get the colors just right. She even hand embroidered the details. I can't remember but she might have also hand quilted it. It's an amazing piece and reminds me of a fairy garden.

And look! There are little fairies.


... flowers and tiny insects.

The last two quilts were done by the same person. They reminded me of Martina Weber's (Chatelaine) mandala designs, bling and all.


The quilter used Swarovski crystals and beads.


Not as much bling went into this one but the amount of detail in it is amazing. There is even what looks like lacework. Wish I knew how she did that.

I did make some purchases while there, who wouldn't be tempted by all the beautiful fabrics on hand. But I was very good and only bought a few fat quarters. These are all from Meerkat Shweshwe and the fabrics come from South Africa. I loved their indigo fabrics, especially the Japanese inspired ones with the geometric patterns. I had a really hard time picking out of them though, so I decided on these floral and mandala styles. The long panel on the right is actually meant to be used to make a Makoti skirt, traditionally worn by newly married Xhosa women and married Sotho women. I bought these for beading and it will be a nice challenge to see what I can do with them.


I always make a list of things I need from L'Atelier de Pénélope. I wanted to get Tulip needles, as the boutique is now stocking a range of them. I got a pack of chenille and milliners as we as long beading needles. I really wanted the short beading needles but these will do until I can get the short ones. The ribbon is for my slate frames. I need to remove Japanese Landscape from it so I can start prepping for my seminar class. It starts mid July so I need to hop to it.


While I was helping with the shop on the first day, I finished my Sashiko panel (last seen here). The piece needs to be ironed and washed so I'll share pictures of it soon. In the meantime, I needed something else to work on for the next day and so picked another piece. This one has a bit more details than the last one and I will most likely add colors other than just the white. I already picked out the first color, pink for the cherry blossoms in the design.


This show kicked off the travelling season for the boutique. I will also be helping out at the Twist Fiber Festival in August and the CGNA Needle Arts Fair in September. Drop me a comment if you will be there so I can look out for you :)