Monday, November 28, 2016

Hana Scissor Case Finished

I did very little stitching all of last week. But I made up for it over the weekend :)

I did a little Friday night and Saturday night.


Sunday morning I got up, did the house cleaning, helped in the kitchen and then powered through all those seed stitches.


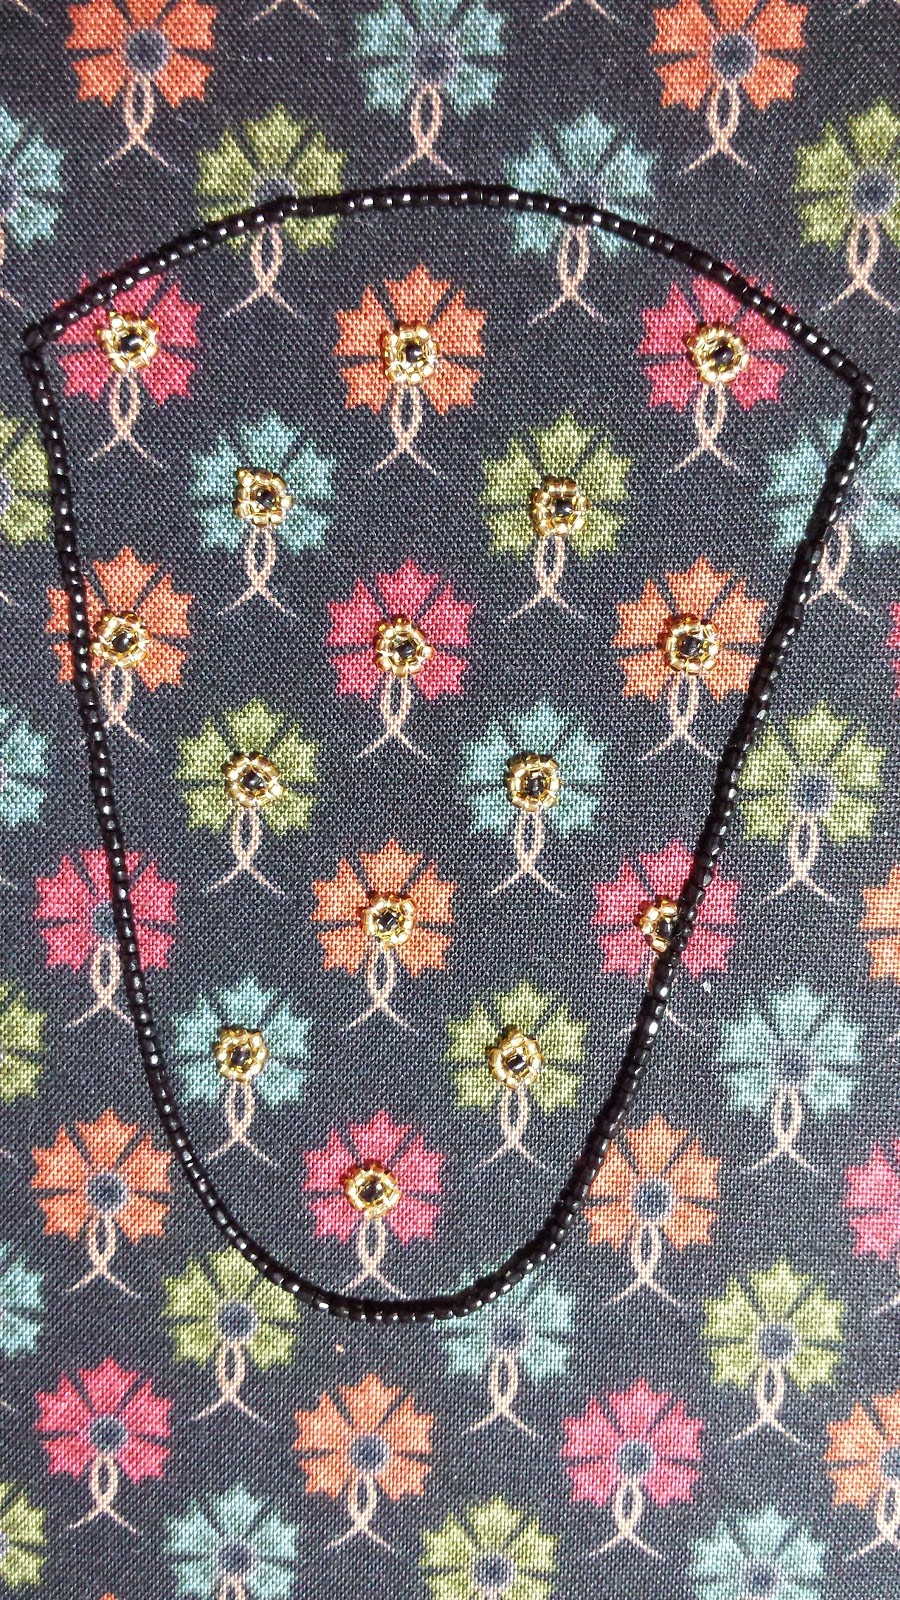
Looking at the pictures now, I might have squeezed in a little too many black beads in the background in comparison to the fob. We're supposed to leave some space in between but I love how shiny and bright it looks.


The next step will have to wait till I get the black silk, which I've placed an order for this afternoon. I'm crossing my finger this one turns out better.

What's the next? I have no idea. I guess I will have to decide when I get home :P I really want to do another beaded project though but I still have Annie Penin's Sakura piece to finish.

Monday, November 21, 2016

Hana Scissor Case Update

I love my new stand! I stitched on my Hana scissor case all of Sunday and I feel great. No neck pains or strain at all.


I managed to get all the flowers stitched. All that's left are the black seed beads in the background. While I was stitching the dreaded stems, I kept asking myself: why on earth are they stitched AFTER the petals? They're so hard to stitch in because they have to be squeezed in there and half the time they don't look consistent. Usually the embroidery rule is you stitch from back to front, so why isn't it true here. A question to ask the designer.


As I'm getting closer to a finish, it's more urgent than ever that I track down some good quality dupioni silk. I had ordered some online but I didn't like the quality of it. So I have to try again with another place. Anyone know of a good source?

Friday, November 18, 2016

A New Stitching Tool

So as you know I've been stitching more and more on WIPs that require two hands. They're small and the fabric needs to be really stretched. So I've been using a hoop and c-clamp.


Unfortunately, this isn't the most ideal setup. It is a pain in the neck, literally! I find myself bending really close to the hoop, hurting my neck and back.

One night I went to my stitching meeting and saw one of the ladies take out a stitching frame. I remembered seeing them at Nicolet back in June and a light bulb went on. It's the perfect solution for my problem. So I quickly called the man who made them last week. He is an artisan out of Shawinigan, Quebec named Pierre Dupont. M. Dupont was really quick. As soon as he received my check he shipped it out. Tuesday night when I got home it was waiting for me.


The frame is made of wood and has 11 pieces: base, 2 arms that can be moved, 2 clamps that can be adjusted with wing nuts and 4 wooden knobs.


The base has grooves in it allowing the arms to slide back and fourth depending on the size of your frame. Below I've attached an 8" inch q-snap to it.


The clamps can be used in two ways. The one on the left allows for thicker frames like the q-snaps. For things like hoops you just remove the wing nut, flip the top wooden piece and put back the wing nut.
Below is an 8" hoop. You can see that I've pushed the arms at their maximum and I've removed one clamp. Now although I do use the 8" hoop for one project, my current project Hana uses a 10" hoop and it would be better if I could use both clamps for better support.


The solution? Simply unscrew the knobs at the base of the arms and switch them around. Now there is more space for the hoop.


I haven't measured the minimum and maximum size allowance for this frame, since I would only be using it for hoops or small frames. For anything bigger I would be using my Hearthside lap stand. So for now I think I'm all set for all types of projects. I can't wait to start my weekend :)

Monday, November 14, 2016

WIPocalypse 2016 – November


This month's theme is: What pattern (or designer) is on your must-try-to-stitch bucket list? This question is very apropos for this month as I've been dithering and hesitating about buying a kit this month. Europeanxstitch is having a sale until the end of November and I've been trying to decide if I should buy the kit for Chatelaine's japanese Octagon Box. However it's looking like (for the third year), it's not the right time for it.

Other things on my bucket list:


Fandango is done! You can read more about it here.


I started working on my accompanying piece for Hana. I got a lot done on it over one day. Now that Fandango is finished I can put in more time on this.


I didn't get those olive green leaves done this month on Fleurs de Sakura. I will try again for next check-in.


No update on Fantasy Lace.

No Update
Satin Stitches - Donna's Fantasy Lace

No update on Bramble and the Rose.
No Update
Ink Circles - The Bramble and the Rose

Still hidden away poor dragons. But, putting stitches into this piece is the last goal I have for this year. So this means that by the last WIPocalypse post there will be some progress on it.

No Update
Teresa Wentzler - Tracery Dragons

I didn't touch Sfilati Fantasia.

No Update

The end of Fandango

We were scheduled to have some nice sun over the weekend, so I gave Fandango a bath.


While waiting for it to set, I started packing away what was left of the class kit. We were originally given two ball of #8 and #12 perle cotton. As you can see I have some leftover.


Bright and early, Sunday morning I got up excited to take pictures. I still can't believe it's finished. You can click on them to get a bigger view.


Barbara Kershaw gave us a lovely design to work on, filled with a variety of different stitches and techniques. The design is challenging for beginners and has a lot to keep the advanced stitcher interested.


I stitched the piece as designed except for these modifications:

  • Replaced picots in center square for beads.
  • Replaced picots in blanket stitch border for beads.
  • For the four big "flowers", the center bullions were stitched as follows: stitch two bullions starting and ending from the same fabric hole, come back out of fabric in between and insert a bead. This is finished with a bead at the center.
  • For the smaller flowers, they are more closely stitched than designed due to a misread of the pattern. So instead of the bullions that should have gone in that space, there is a single bead placed at the center.
  • The Palestrina knot swirls are stitched with a bead in between each knot. 

I'm so glad I put those beads in. They just pop against the white and with the darker wood underneath you can finally see all the work that went into those needlelace squares.


Now for the stats, I started this project on February 9 and it was finished November 9 (what a coincidence!). It took a total of 197.75 hours over 73 days to complete.


I hope you all enjoyed reading about my progress on Fandango as much as I enjoyed stitching it :) A special thanks to Virtual Thread for awarding me the grant for Seminar. I had such a great experience that I'm looking forward to my next Seminar class in May (crossing my fingers I get my first choice). I can't say enough on how amazing it is to go to a National Seminar be it with EAC or EGA for those living in the US. You get to meet so many people from all over the country who all share a common interest, not to mention the knowledge that all these stitchers bring. And as a bonus you get to visit a different part of the country. I always say in the stitching world there are no strangers ;) So even if you have no one to go with, just go anyways. You'll meet so many people you will never feel alone.

Thursday, November 10, 2016

Ta-Da!

Very short post today. Yes I'm done stitching :) Last night I put in the last bead and stitched the last buttonhole. Isn't it great when the edges meet.


The next step is cutting out the extra fabric and washing and ironing. I'm hoping to do that by Friday so I can take pictures on the weekend. Pray for good lighting :)

Monday, November 7, 2016

The Final Stretch

Last week I really persevered with those Palestrina knots. I was diligently doing my two curls a night, and then Thursday and Friday I managed to get 4 done each night so that now they're all finished :)


And now I'm at the last step, the blanket stitch border. Which means I have to go around the entire piece one last time. If you've been keeping count, that means by the time I am done I will have stitched around the border 7 times!

For this last border, a channel had to be created to ensure that the blanket stitches are all level. You do that by withdrawing a single fabric thread.


In the original design, there are picots stitched in every 20 blanket stitch. I've obviously replaced that with beads. So there is still more threading/unthreading going on, but it's almost over. The pins standing like little soldiers are where the beads will be going. This way I can make sure I won't forget one :P


I started Friday night and worked on it Saturday evening and all day Sunday. Progress went so well that I now only have one side left to stitch. It's the one on top. It won't be done in one night, as I have to go to work during the day :| But here's hoping that by the end of the week it will be finished.


Wednesday, November 2, 2016

Very Busy Weekend Part 2

Sunday morning I woke up with a huge desire for beads and zero desire to work on Fandango. I wanted to start a new project but I couldn't with good conscious do that when I had a perfectly good project to work on.

You remember Hana from Inspirations magazine issue 91. I had decided when I saw the fob that it wasn't enough and just had to make a scissor case to go with it.


So in a sense I'm starting a new project but continuing an old one. Which means zero guilt ;)


I followed the same instructions given for the fob but with the added bonus of having more experience with this technique.


I must say that my outline was much better this time around.


And on it went into the afternoon. Every time I got tired of the repetition, I took a break and dove back in.


This worked so well that I managed to get all the centers done and half the petals embroidered by the end of the night. The petals really are my favorite part. Stitching this case was a great idea as it allows me to learn how to stitch at the edges where the flowers are cut off.


A look from another angle.


This, I think, will be my carrot to get Fandango moving. From now, if there is time after I've stitched my two curls for the day then I can take Hana out and stitch on it. Chances are it won't happen but I can always dream ;)

Tuesday, November 1, 2016

November TUSAL


This month's TUSAL is very white except for that black thread. I can't remember where that's from. As promised here's what Fandango looks like overall.


Teacher will be proud, I did my homework yesterday =D


I have my guild stitching meeting tonight. I'm taking Fandango in the hope I can get my homework done tonight. I'm also bringing in my second contribution for the guild fundraiser. If you're interested in the pattern, it's from SharonB's website Pintangle. My version uses stem stitches, bullions and fly stitches. It's super small 3" by 1 1/2" and will be finished into a needle book by guild members.