Friday, November 30, 2018

Tansy Beetle - Textile Art Box

There are quite a lot of very talented embroiderers in Instagram and one of them is Kate Tume also known as Mother Eagle Embroidery. She makes beautiful bead embroidery pieces. Currently, she is working on projects around the disappearing natural world, and lost species. My favorite is her Extinct Icons series which you can check out here.

https://madebymothereagle.com/portfolio/saint-sultan/
Saint Sultan by Kate Tume
For the past year she has been producing a line of textile art boxes. The first one was of a beaded stag beetle. Now I'm a fan of beads but not bugs. The beetle was a little too hairy for me so sadly I had to pass. In September, she released two more beetle kits: Tansy beetle and Ghost beetle. Still not a fan of bugs but the colors on Tansy beetle were so pretty (Ghost beetle creeped me out). So after seeing it multiple times on Kate's Instagram feed, it grew on me and I decided to order it.


 The kit came in beautifully packaged. 100% plastic packaging free, and entirely vegan friendly.


If you want to have an idea of what comes in the box, check out the video below of my un-boxing.

(click on the post to see the video below)


I'm still trying to figure out how to merge videos, so for now here is part 2 of the un-boxing. All the beads came individually packaged in tiny envelopes with numbers on them to make them easy to identify while stitching.

(click on the post to see the video below)


The kit came with everything for me to start, except scissors and something to hold your hoop so you can use both hands to stitch. It's an excellent starter kit for those wanting to try beading.


The fabric that came in the kit is a twill fabric. It has a nice weight to it so I didn't feel the need to back my fabric.


I started this kit immediately after finishing Mr. Blue. In fact I put in the felt padding Saturday evening.

(click on the post to see the animation below)


Sunday morning, I woke up early eager to start putting in some beads. I'm in love with the colors of the cupped sequins. I'm happy to say I have a bunch left to play with.

The head of the beetle is partially covered with an iridescent vinyl. It's stitched down the exact same way you would in goldwork but so much easier to pierce than leather. I put in lines of holding stitches to keep it in place while I was couching.

I was really speeding through stitching the beetle, but this is where things started to go wrong. See, I had noticed that I didn't have the same number of sequins in the first row as the model in the picture. I put it down to my not crowding the sequins, because I did start exactly where I was instructed to. However, when I saw the amount of beads I was expected to use to cover the head, alarm bells started going off.

I contacted Kate (love social media!) and she pointed out exactly what I had noticed: I was one sequins short on my first line, which is why I have bigger head area to cover. I knew this but at the same time, I knew I didn't make a mistake when I transferred my center line. So I went back to the cutout and did a comparison between my beetle and the actual instructions, to discover the center line in the instructions is longer than the one in the cutout. Mystery solved!

Future kits will be corrected, but in the meantime Kate offered three solutions for my problem: she can send me more beads, I could unpick and restart, or I could unpick just the head replacing it with beads from my stash. I went with option one as I don't mind if my beetle's head didn't match the model exactly. So now Tansy has been set aside until the extra beads arrive. Pity, I was so close to finishing.

Wednesday, November 28, 2018

Japanese Embroidery Phase 1 - Which Green?

After completing my second valerian, I moved onto the Iris leaves.


I've been holding off on stitching these leaves for a while now as I was debating switching the light green on the iris leaves for a darker shade. I always though this piece should have a second green as there are four different types of leaves all stitched in the same color. Also, aren't iris leaves darker anyways?


I went back and fourth multiple times. Had a poll up on Instagram, a post on Facebook. Many preferred the dark green, but I received comments from Japanese embroiderers not to change colors while others (certified teachers!) thought a color change was acceptable. Lots of conflicting answers. Someone even mentioned that by changing colors, the JEC might not approve my phase 1 piece if I wish to pursue teacher certification. Hearing this, I contacted the JEC to see what they said. Their answer:

The color scheme can be arranged. Please talk to your teacher and decide the best color of your choice!

Unfortunately, I'm in between teachers right now which means I don't have a teacher I could ask. I mentioned this and they never replied back. It's moments like these when I'm happy that social media exists. Stitchers are so nice and are always happy to help. I had a long discussion over Facebook messenger over the pros and cons of switching greens on the blades and came to this conclusion:

  1. Iris leaves in Japan are not dark green, they're a greenish yellow. In fact, bush clover leaves are darker.
  2. The iris leaves are supposed to be at the back of the bouquet, by using a darker green it will bring them "forward" in the bouquet when the flowers are supposed to be the focal points.
  3. If I want to change the color of the iris leaves, I would have to change the color of the other leaves to coordinate and I wasn't prepared to redo all the leaves. No matter how much I enjoyed stitching them.


So in the end, I didn't make any changes in color. It wasn't a total loss thought, it was a good lesson in color choices and how one change can affect a whole piece. Also, if I plan on switching colors it's better to do it at the beginning and not when I'm nearing the end. Now that I had a firm plan I could go ahead and work on the leaves.


I'm not particularly happy with how the top leaf was stitched. I think I need to redo the portion where the leaf is under the clover leaf flowers. I'm going to leave it in for now to stew on it. I'm really happy with my second leaf though.


Monday, November 26, 2018

Mr. Blue the Heron

Yes, I decided to give him a name. From now on he will be called Mr. Blue.

Last Wednesday I finished his wing and got the chance to play with silk wrapped purl. Saturday morning I woke up early itching to stitch and finished his body.


Unfortunately, I had to leave him to go brave the malls. They are packed with Christmas shoppers. But I was back to work on him as soon as I got home, putting in the last few details. His crown is made up of shiny blue leather with small strands of silver wire check. I really love the color of that leather, I must see if I can find more.


Becky added in a detail in the heron that her other creatures didn't have, she included reeds in the background. They were a lovely touch and put Mr. Heron in his habitat.


With this, the stitching is complete. All that's left is to pop him into a hoop and hang him for display. I'm waiting on some felt for that, but will share a picture once he's hanging.

I have a few other things to share this week as I was very busy. I have an update on my phase 1 Japanese embroidery piece as well as a brand new kit that I got last week and couldn't wait to start. In fact I started it immediately after finishing Mr. Blue on Saturday night.

Wednesday, November 21, 2018

November TUSAL


Really late for TUSAL again this month. I normally have a post it on my desktop computer to remind me of the dates. But since my computer has been on the fritz I don't have my usual reminder. I think I need to reassess my participation in this SAL. What do you think? Should I keep going next year?

Tuesday, November 20, 2018

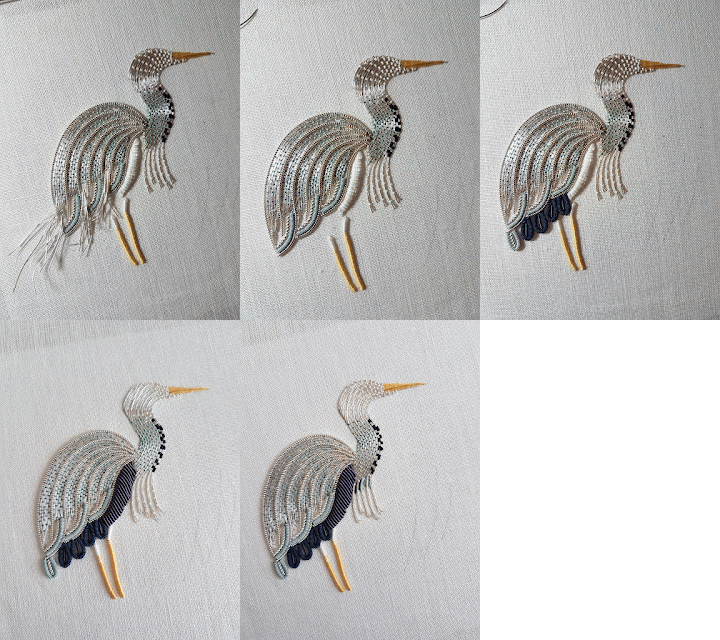
Giving the Heron Wings

This weekend, I gave my Heron wings.


This involved both couching (my favorite) and plunging (my least favorite). By the time I put in the second set of rows, it got really hairy and I needed to give him a trim. I know some stitchers will use scotch tape to tame the tangled mess but I preferred getting a jump start on the plunging. That way there is a little less to do later.

(click on the post to see the animation below)


As I was working with the silver passing, I noticed that every once in a while there would be a bend where the silver will be "worn". This is because Becky winds her passing on cardboard bobbins. It's great for packaging but not so great on the metal threads. I prefer it when it's wound on a koma or around itself to prevent damaging the thread. Always inspect your thread before using it as you don't want to find this in the middle of your stitching and have to unpick.


Here is my heron so far. I've looked at the next steps in the instructions and I've decided to leave the rest of the passing as it is for now. You'll understand why in the next post.


Monday, November 12, 2018

Japanese Embroidery Phase 1 - Knots

Saturday was my monthly Japanese embroidery meeting. I tried working on the cords to continue what I started at the October retreat, but things just weren't working.


Instead of keeping at it and getting frustrated, I switched gears and decided to work on Japanese knots. There are quite a few in the piece, but I started with the bush clover flowers since those were started. Can I say, I'm not a huge fan of French knots but I love Japanese knots. They come out so cute.


The bush clover flowers are made up Japanese knots and covered with flat silk floss.


Sunday morning, I was still in the mood for Japanese embroidery. I set up my frame and continued doing Japanese knots, this time on the Chrysanthemums.


The knots of the chrysanthemums have a thread of gold mixed in with the silk. This is done for the orange and purple flowers. It makes a super pretty thread.

3 + 1 #1 gold/1 S-twist

Here are my three chrysanthemums all finished.

After lunch, I moved onto the valerians which also had knots along the upper edge. I was hoping to get both done but I underestimated how much time they would take. The valerians are still my favorite in the bouquet. That yellow is so beautiful and it looks even better once you add in the knots with the gold thread.


I though I took a final picture of the overall piece but I guess I forgot. I will take one when I finish the second valerian. Hopefully this weekend.

If you're wondering about Hanabatake, yes I did get my beads. And yes it has been finished. Yesterday evening I started the finishing process. I'll share a post as soon as I complete it.


Tuesday, November 6, 2018

Thick Necks

After a week to give the group time to catch up, I went to work on the head and neck of the Heron. The head and neck is made up of couched passing using the Italian shading technique, which is similar to or nue.


I did take progress shots as I was working but lost all of them. Just a warning, if you don't want to lose your pictures, don't take them while using Instagram's direct messaging feature. I was working on my piece while chatting with Pam and sharing progress shots with her. By the time I realized it, I was finished putting in all the rows.


As I got closer to the body, I started realizing that I would need more rows of passing than mentioned in the instructions to cover the neck. Below you can see Becky's version from Instagram. I was very careful to follow the curve of the neck so I'm not sure what went wrong. The nice thing with Instagram is that I'm able to get feedback from the designer within hours. It seems that earlier patterns were done by hand, new ones are printed, so maybe I got a bird with a thicker neck. I've checked in with the other ladies from the group who all ordered kits at the same time and two of them are going to run into the same issue.


I originally planned to work on my Japanese embroidery after putting in all the passing, but figured since I made a hairy mess, I should clean it up. The instructions suggested using the lasso method for plunging, but I just used a crewel needle since there is no danger of ruining the fabric.


I moaned through the entire process but thankfully it didn't take that long to plunge all the passing and tie them down.


Here is a close up of the stitching. He came out okay, but I really wish he had a thinner neck that herons are known for. If I could have I would have shaved off a bit at the back of the neck on the bottom so we can get an exaggerated curve.


I didn't only work on the heron, but also did a bit of beading. I'm officially out of beads now. I have a small area in the upper left corner to do. Now to wait for the replacement beads. Last I checked the tracking number for my order, my package had arrived in Canada and was processed by the carrier. So hopefully I will get them before end of week.