Friday, July 15, 2022

Astrolabe - Lesson 1 & 2

It's finally that time! I'm finally stitching the goldwork piece I've been eyeing for over a year. I stitched the first piece in January 2021, I had to look it up because it feels like longer. Cynthia really worked hard to get us to this design ready for us. And believe me we nagged her the entire way lol.

An Astrolabe is made up of many parts: the Alidade, Mater, Latitude plates (plural as a user could have many), Rete and Rule. Cynthia's Astrolabe is made up of 3 pieces: the Alidade, the Rete, and the Mater and plate making up one layer. There is no Rule. I've always been fascinated by this tool and will look forward to learning more about it.


The materials came in two shipments due to manufacturing delays. And there are a lot of them. There are eight lessons total with one lesson dropped a week. Cynthia estimates each lesson requiring 10 hours of stitching. We'll see if that's true. Lessons 1, 2 and 3 cover the Rete.


In the past, the fabric comes with the design pre-printed on the cotton fabric. This time due to the size of the design, Cynthia couldn't print the design for us on her printer. I used a blue chalk pencil and a window to do the transfer. I was too lazy to pull out my light pad.


Lesson 1 involves the overlapping cross at the center of the Rete. It's made up of five rounds and it got really tight as we got to the last round.


It's okay if we went over the blue outline as long as the shape looks nice (the fabric is going to get cut out later) but I did have to go back and trim the first layer of purl pearl in order to put in the last layer of purl pearl.


A picture just because it's so pretty. Fun fact, Cynthia crimped that plate for us using her crimper. Here's a link for you to see what it looks like.


The last part of lesson 1 is filling this pretty tear drop with chipping.


In lesson 2 we stitch the circle that goes around the cross.


And it involved a lot of cutwork. A lot of it! I did it over a period of two days. Alternating between stitching and cutting. They all had to be a specific size in order to cover the string padding and stitched at an angle.


All I can say is it took a long time and thank God for my time spent doing Japanese embroidery. I found that it really helped me in putting in the purl without losing my angle. It's basically a stripped cord. The trick is you always want to come out farther away from the previous stitch than you expect and go in right next to where the previous stitch ends. This helps you keep your angle.


Another thing I'm thankful for is this Lowery stand. My sisters got this for me on my birthday with this project in mind. I love it! It made stitching this project both easier and less painful. Using the clamp, I could easily rotate my frame as I went around the circle and I could quickly spot if I lost my angle.


Another picture just because. That black purl looks like velvet, so pretty against the gold.


The final step is to couch purl pearl all around the circle of cutwork. This really completes it and hides the edge of the cutwork. So if you have one or two that were a little short, it's okay you won't be able to see it.


I'm half-way through lesson 3. I missed a weekend to go help out L'Atelier de Penelope. She had a booth at the Cercles de Fermières du Québec provincial seminar in Saint-Hyacinthe. You can read more about it on my Facebook page. So I'm spending today catching up and hopefully will be done in time for lesson 4 when it drops tomorrow.


Monday, July 4, 2022

Color Wheel Nearly There

Last time I posted about the color wheel, I had some frogging to do as I'd used the wrong green. I made quick work of the stitching. I really wanted to start playing with a new set of colors.


Aren't these colors pretty? These are the colors labeled tone.


The tones and another set of shaded colors are used to fill the pools at the center of each shape. I was excited to work on these as it means I was nearing the end of the blackwork and could start with the metal thread embroidery.


I say metal thread embroidery as the outlines are done in silver as opposed to the first color wheel which was outlined in gold.


The empty space in the center is filled with chipped silver over a padded layer. The instructions say to use a padding of three layers, but I found that wasn't enough to really cover the center. So I decided to add a fourth layer.


It looks much better with that last layer. Here it's seen with the first outline of purl pearl, but once the second outline is in all the empty space will be covered.


I just had time to outline the pastel areas before I had to set the piece aside to work on something else.


I had to eyeball the outline in as there was no guidelines given. It's not perfectly geometric but it will have to do. I'm looking forward to adding the rest of the silver threads. It's going to make the entire piece to just pop.

Sunday, July 3, 2022

June TUSAL


My TUSAL jar is filled with color again this month. I worked really hard on my color wheel. Sadly (or not), the next TUSAL report will not be so colorful. My goldwork class just kicked off over the weekend. I can't wait to share my progress with you here.

Thursday, June 23, 2022

Switching Things Around

The temporary holding stitches are back in Grace. The last time they were in, I jumped into short stitch holding. However, the correct next step would have been to put in the superimposed work. As I was redoing thigs, I figured I'd follow the correct process.


The instructions say to use shell powder for the transfer, but I went with the paper transfer method. It hasn't failed me yet.


For now, I only transferred the lines for the folds and the outlines for squares that decorate the bottom of the kimono. These outlines are held down with tiny couching stitches which will then be covered in either gold or silver colored thread with a metallic thread.


I've put in three silver squares so far and they're quite shiny. They're meant to emulate gold and silver leaf.


This Saturday is our monthly Japanese embroidery stitching day. I'm hoping to put in the remaining squares and cover the outline with a green twisted thread.


Saturday, June 11, 2022

Poppy Pouch - Finishing part 3

 It's now time to fill the inside and attach the strap. 


Making the lining:

For the lining, my teacher sent me a template.

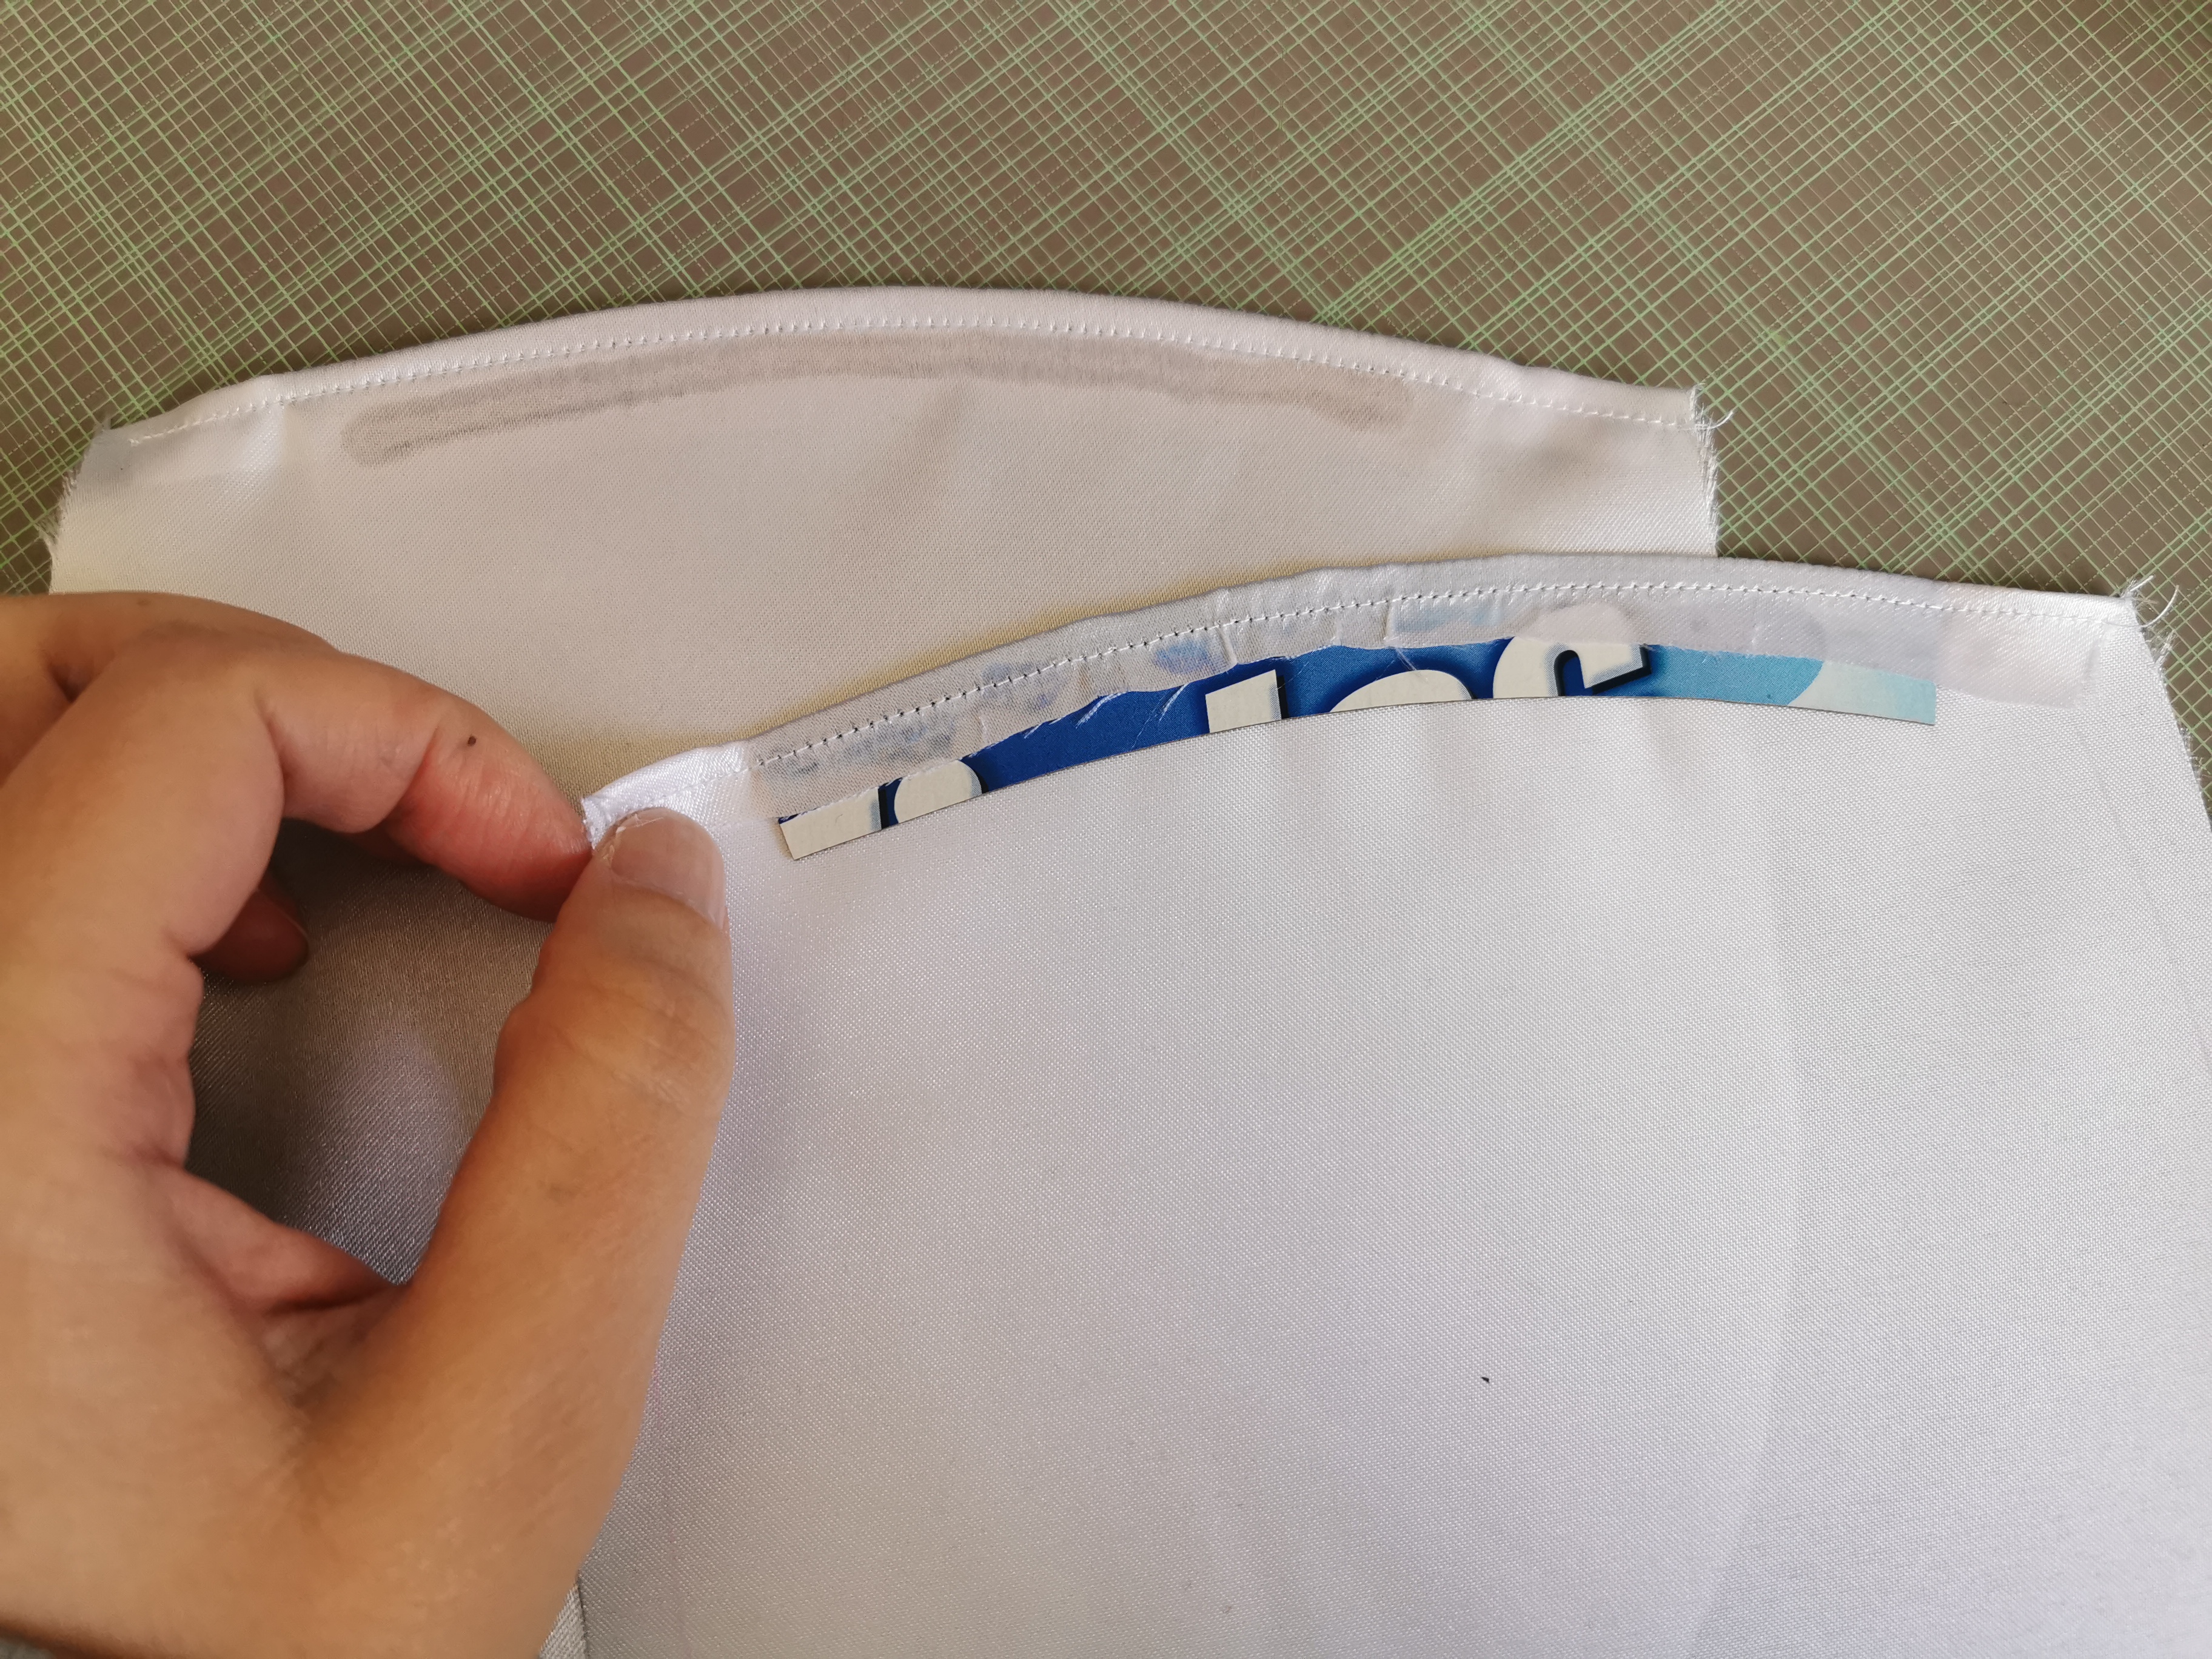
1. For this step, I needed some cardboard. I used an empty ziploc box, but if I could do it again I would use something a little thicker like a cereal box. Using the template, I traced the curve at the top but stopping 1 cm away from either side. I then drew a second curve 1.5 cm away from the first one. These two pieces of cardboard will help stabilize the edge where the magnetic clasp will be placed.


2. I used the template to trace the shape of the lining with darts. I trace a second outline around it to add a 1 cm seam allowance. This is done twice.


3. Once the fabric is cut out, glue is applied to the edge of the fabric and folded over the pieces of cardboard. Set aside to dry.

Note: If I had to do this again I would iron on a piece of interfacing on the fabric before gluing the cardboard piece. It will be clear why when you see the picture in the next step.


4. Once the glue is dry, I used a sewing machine to stitch the edge going thru both fabric and cardboard. As can be seen in the picture below, the fabric was so thin the glue is showing through to the front. Not ideal but I can get over it.


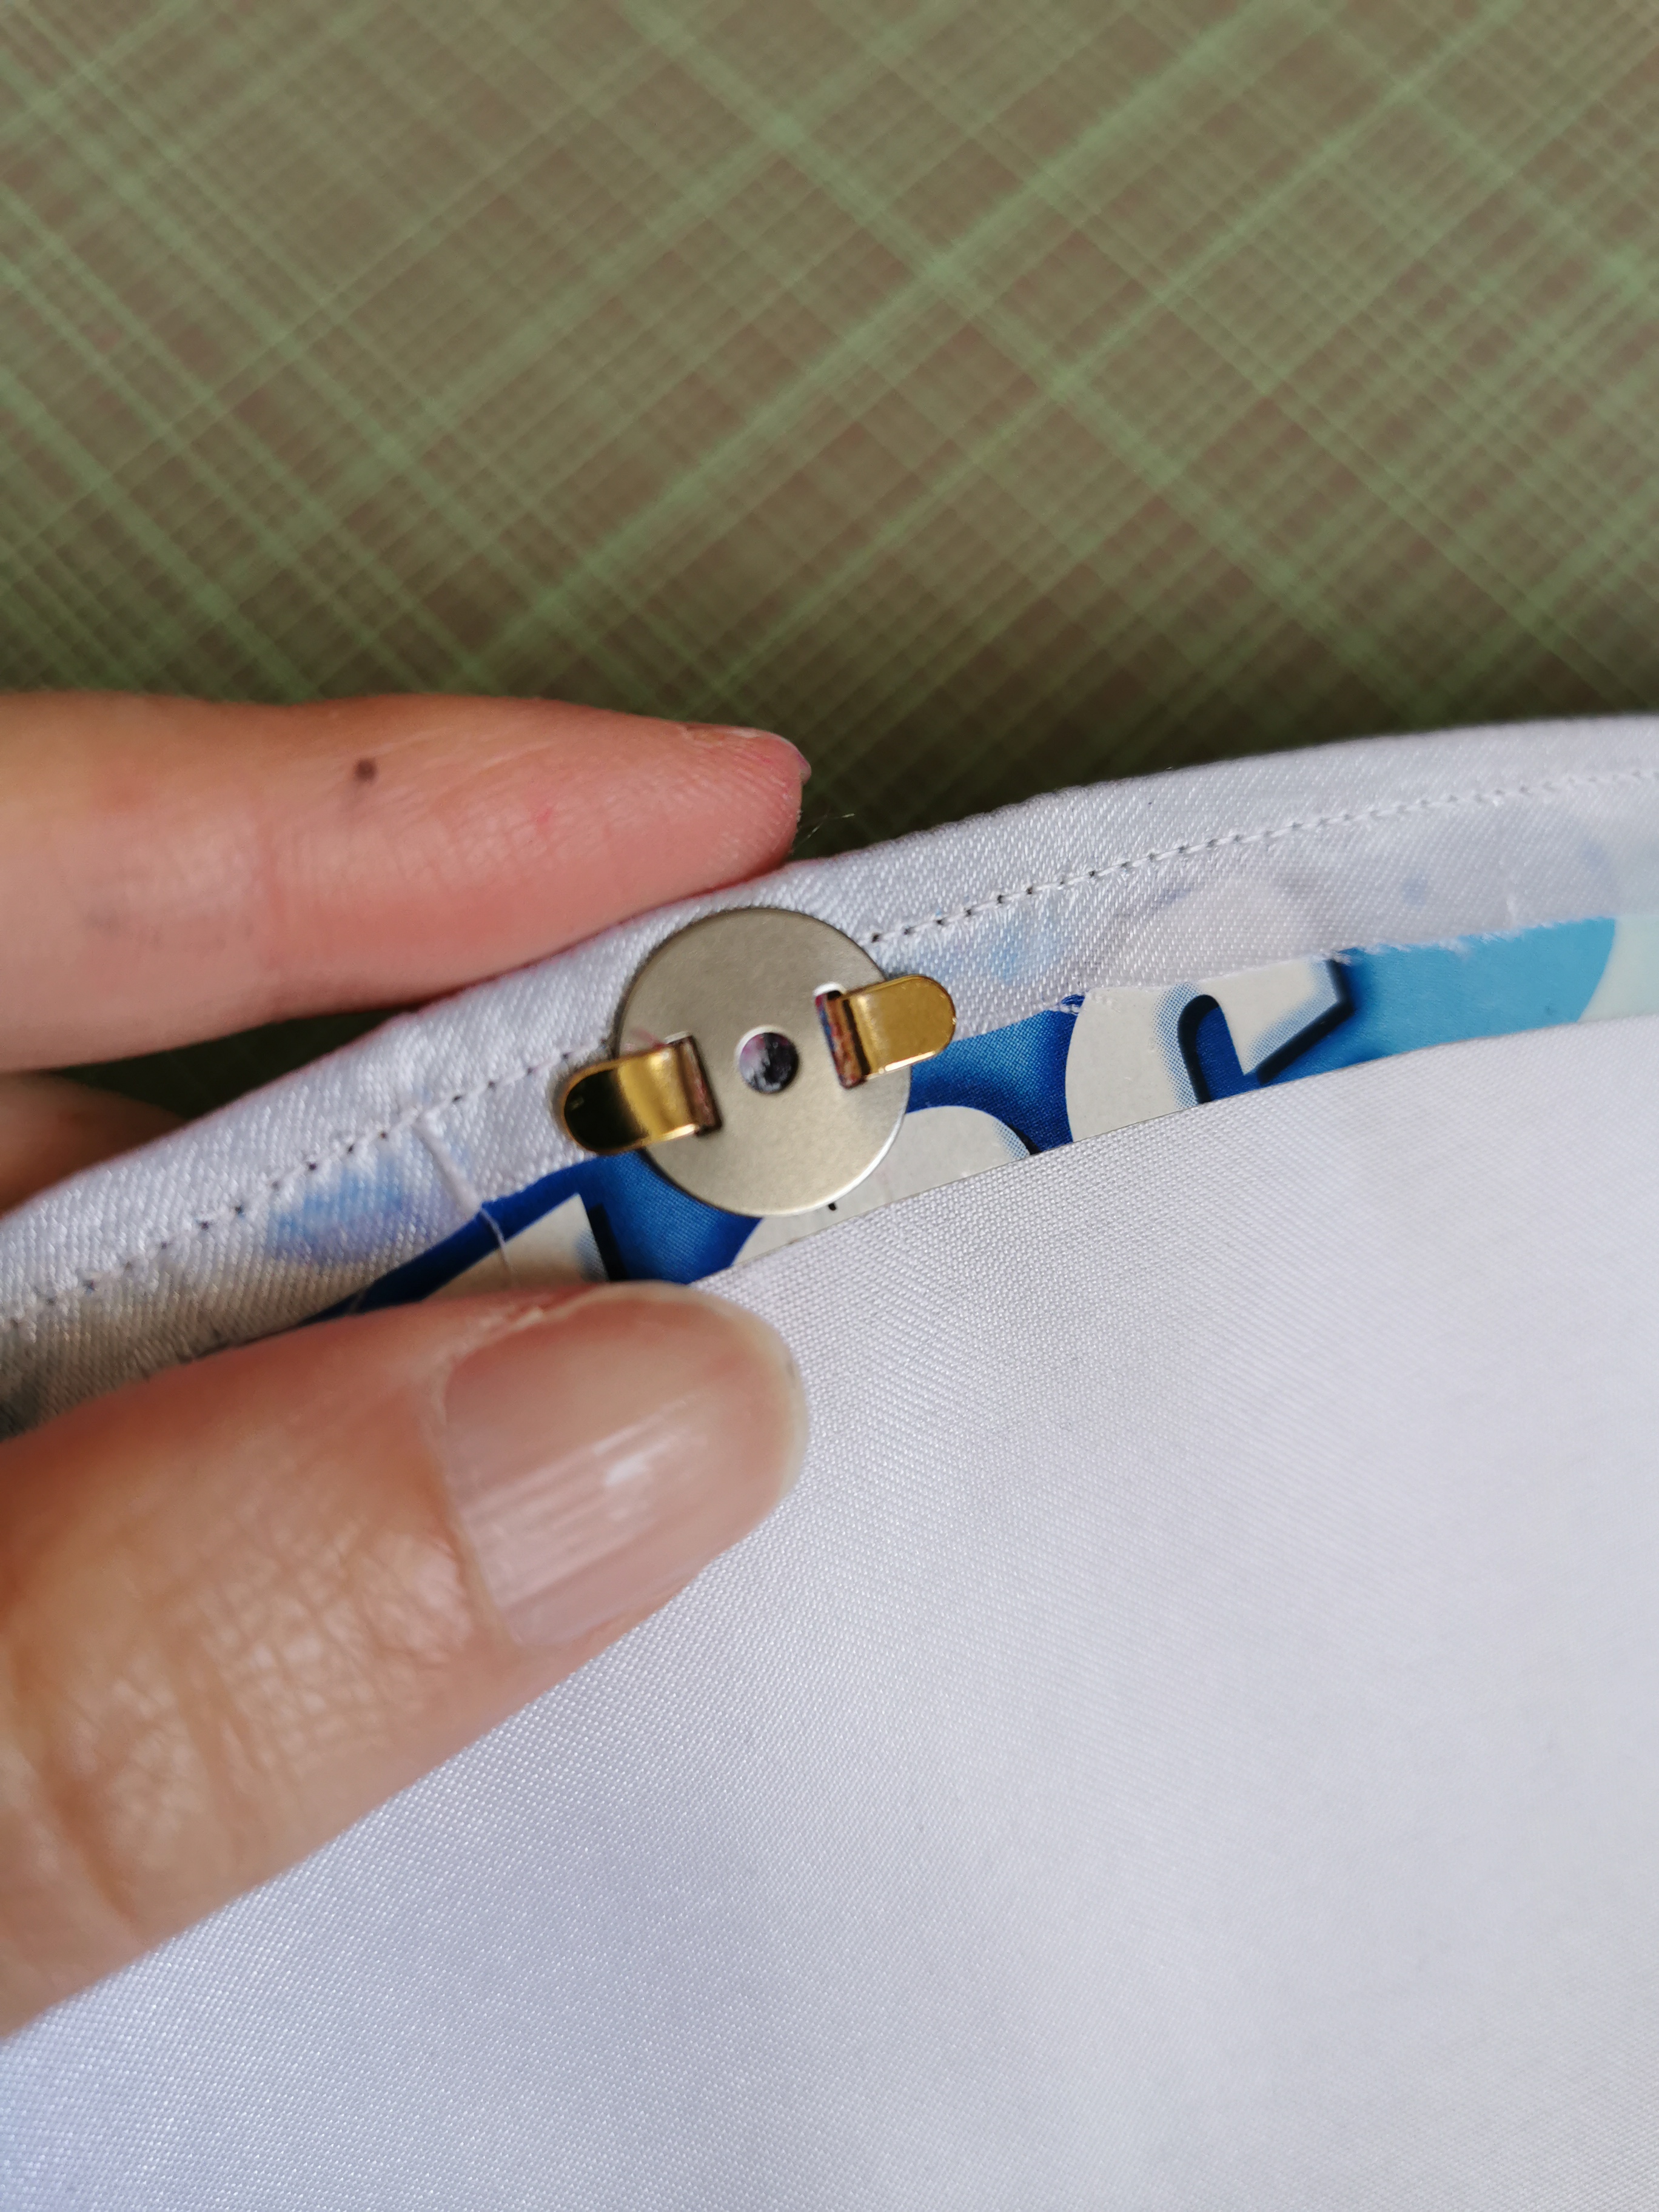
5. Now that the edge is stable, it's time to put in the magnetic clasp. The clasp is made up of 4 pieces: two make up the actual clasp and two washers that are used to keep them in place from the back. I used this tutorial to attach the clasp. First step is to find the center on the top of the opening.


I aligned the little circle of the washer to that marker and used a pen to draw in the rectangular lines. These will be the cutting lines.


Using an x-acto knife, I cut through those lines enough that I could push the prongs of the magnetic clasp through them.


Here's what the two pieces will look like when the clasps is in.


The final step was to place the washers and fold the prongs. I used a hammer to really flatten them.


6. Using the inner outline as a guide, I used my sewing machine to sew the two pieces of lining together with the outside facing in and leaving the top open.


7. The last step was to stitch the darts the same way they were done on the beaded piece.


At this point, you're going to want to check that your lining will fit in your pouch. This is also the point where you may or may not panic (like I did) when you realize that your lining might be too big for your pouch. But wait, don't panic! There's a reason that bulk is there and you don't realize it until this next part is done.


Attaching the strap:

My kit came with a white and gold cord that is used for the strap. I've seen some stitchers replace this cord with a beaded cord they made up themselves but I decided to go with what's in the kit as it's a learning piece.

1. The ends of the cord come taped to keep it from getting untwisted. Before removing it, I used a threaded needle to pierce through the cord and wrap around it. I did this a few times to keep it together. Don't end the thread yet! Once that's done, I removed the tape and untwisted the cord to flatten the ends.

2. Using the needle that is still attached to the cord, I sewed the cord to the inside of the beaded pouch. It's important to leave small stitches on the outside part of the pouch (in between the beads) so they would not be visible. Once the cord end is attached, end the thread.


3. I then glued down the end of the cords. I had some pieces of cotton laying around and I covered the glued edge with it for a clean finish. Repeat step 1-3 on the other side.


Last step, installing the lining:

I stuffed the lining into the pouch and ladder stitched it into place.


Here's what the inside looks like. Remember the extra bulk? It's just the right amount to curve over the cord.

With this ends my adventure of stitching and finishing the Poppy Pouch. I was never a fan of this design and was even adamant that I would never carry it. However, it came out beautiful and I'm especially proud of my finishing skills. So I decided that for one night I will carry this purse to a special guild event to show it off before it goes into storage. I may take it out again for a future EAC seminar, we'll see.


I have now officially completed phase 3 of Japanese bead embroidery and am already thinking of the next phase (two more to go). We're thinking fall dates, I'll have more information later. I already purchased a phase 4 kit, but I'm trying to get my hands on a different phase 4 design. I'll share a picture later if I am able to get the kit.