I spent much of last week prepping the canvas for the hemstitch bands. The bands in the sampler use a drawn thread technique which is different from pulled thread.
In a nutshell, drawn thread involves cutting fabric thread and withdrawing them from the fabric. Afterwards, the remaining fabric thread is either wrapped or grouped to create lacy designs. Pulled thread on the other hand involves no cutting. All the lace-like designs are created using tension by pulling on the working thread and creating gaps between fabric threads. Check out Nordic Needles post for more information.
The first step, figure out which threads are supposed to be cut. In this case, we're cutting 6 horizontal canvas threads (for the sake of simplicity I won't use weft and warp) in the middle of the band. Be careful to only cut the thread that's indicated. It's not the end of the world if the wrong thread is cut (I learned that pretty much anything could be fixed if you ask the right question), but why cause trouble if you can avoid it by counting and triple counting ;)

The next step, withdraw the canvas thread that should be removed completely. I removed these all the way to the edge of the canvas (I did it up to the masking tape).

In this case, we had to remove three and leave three.

The remaining horizontal threads are also going to be withdrawn, but up to a point. These threads are going to be woven in place of the ones that were taken out. I noticed that canvas threads have a tendency to fray, so I had to be careful when pulling out these threads as I didn't want to unwind them.

For this pattern, a diagram shows where we should stop withdrawing the thread, and that's where the weaving will start.

It's important to look at the canvas threads above and below the empty space. This will tell us how the weaving will begin, either above or below the vertical threads. In the band below, I had to go under the first vertical thread.

The thread is woven all the way till the edge of the canvas, making sure not to lose track of the over-under sequence.

I found that weaving was much easier from the back of the canvas. For some reason the thread twisted less when I did it this way and the end result looked more natural.

But if it's a little bumpy, that's okay. That area will get covered with the outer border. Weave the remaining threads the exact same way for a seamless finish. I did the same on the other end and for the second band.

Here you can see all the edges finished. From afar, once the outer boarder is stitched you can't even see the re-weaving that was done. I'm definitely adding this technique to my arsenal.

And here are my two stitched hemstitch bands. If you have eagle eyes, you'll notice that the second band's weaving has an extra vertical thread. That's to make sure we ended up with a pair number of groups so that we can twist them together.

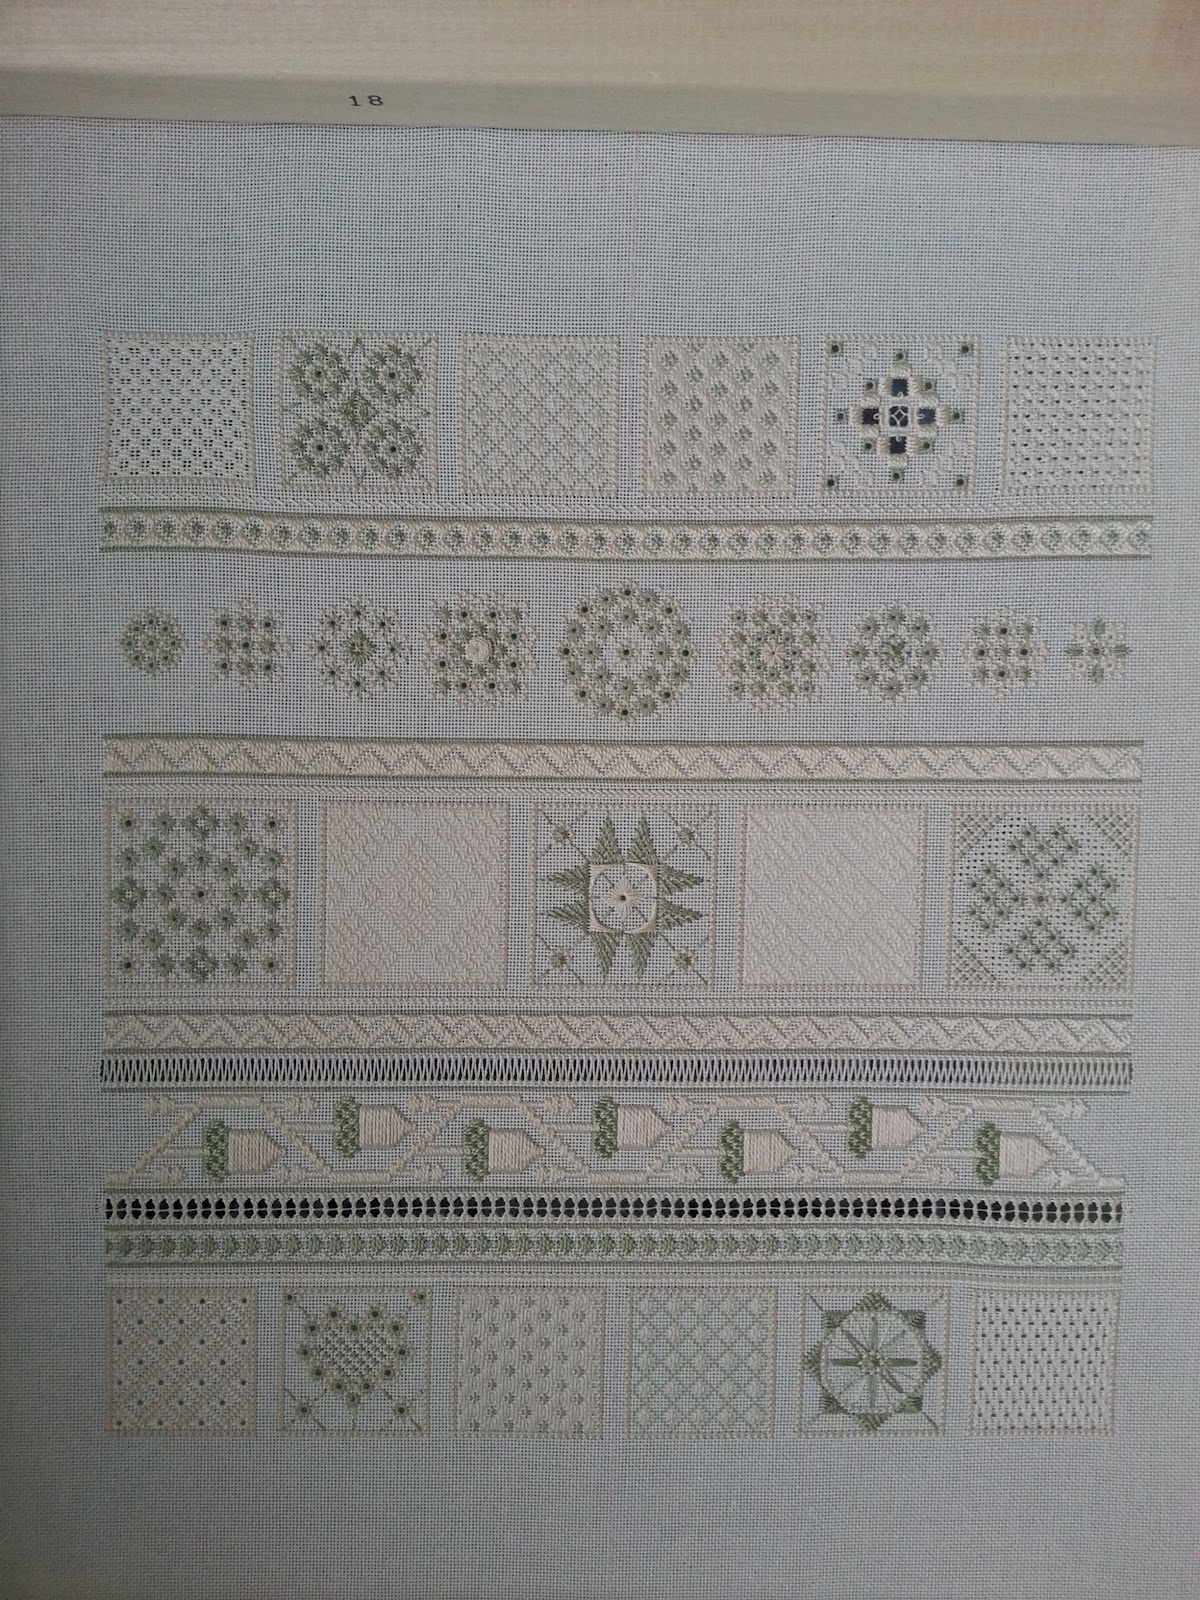
An overview of the piece. That acorn band is growing on me by the way. I don't think I will be unpicking it.

All that's left now is the outer border. I'm still trying to decide if I want to stitch it in green or ecru. I also have some cream beads that I could add to it. Ideas?
In a nutshell, drawn thread involves cutting fabric thread and withdrawing them from the fabric. Afterwards, the remaining fabric thread is either wrapped or grouped to create lacy designs. Pulled thread on the other hand involves no cutting. All the lace-like designs are created using tension by pulling on the working thread and creating gaps between fabric threads. Check out Nordic Needles post for more information.
The first step, figure out which threads are supposed to be cut. In this case, we're cutting 6 horizontal canvas threads (for the sake of simplicity I won't use weft and warp) in the middle of the band. Be careful to only cut the thread that's indicated. It's not the end of the world if the wrong thread is cut (I learned that pretty much anything could be fixed if you ask the right question), but why cause trouble if you can avoid it by counting and triple counting ;)

The next step, withdraw the canvas thread that should be removed completely. I removed these all the way to the edge of the canvas (I did it up to the masking tape).

In this case, we had to remove three and leave three.

The remaining horizontal threads are also going to be withdrawn, but up to a point. These threads are going to be woven in place of the ones that were taken out. I noticed that canvas threads have a tendency to fray, so I had to be careful when pulling out these threads as I didn't want to unwind them.

For this pattern, a diagram shows where we should stop withdrawing the thread, and that's where the weaving will start.

It's important to look at the canvas threads above and below the empty space. This will tell us how the weaving will begin, either above or below the vertical threads. In the band below, I had to go under the first vertical thread.

The thread is woven all the way till the edge of the canvas, making sure not to lose track of the over-under sequence.

I found that weaving was much easier from the back of the canvas. For some reason the thread twisted less when I did it this way and the end result looked more natural.

But if it's a little bumpy, that's okay. That area will get covered with the outer border. Weave the remaining threads the exact same way for a seamless finish. I did the same on the other end and for the second band.

Here you can see all the edges finished. From afar, once the outer boarder is stitched you can't even see the re-weaving that was done. I'm definitely adding this technique to my arsenal.


An overview of the piece. That acorn band is growing on me by the way. I don't think I will be unpicking it.
All that's left now is the outer border. I'm still trying to decide if I want to stitch it in green or ecru. I also have some cream beads that I could add to it. Ideas?
Beautiful!
ReplyDeleteI was not sure I understand what to do with my son cut ! Your explanations and more pictures are very clear and will be very useful to me. Thank you and congratulations for your embroidery, It is this beautiful!
ReplyDeleteThat was very easy to understand - than you. It looks stunning! If I were stitching, I'd do the outside border in green, just because I like the look of a "frame".
ReplyDeleteI was going to suggest the border in green, especially if you can use the cream beads to add some sparkle!
ReplyDeleteamazing work, love it
ReplyDelete