This weekend we had a 4-day Japanese embroidery class. We were 10 stitchers working on 5 different phases with 7 different designs. Our teacher has the patience of a saint, I don't know how she was able to keep up with all the different people and pieces.
I was working on Hiogi, learning the phase 3 portion of the piece. We did phase 2 last April.

Day 1, we worked on transferring the cherry blossoms back onto the the peach cloud. We did this with tissue paper, putting in little tacking stitches.

Once the tissue paper is removed, we are left with little flowers on the foundation layer. Stitching over a foundation is called superimposed technique. I attempted to stitch a cherry blossom but I got so frustrated with it. My padding string kept sinking into the foundation. I decided to leave it alone and work on something else.

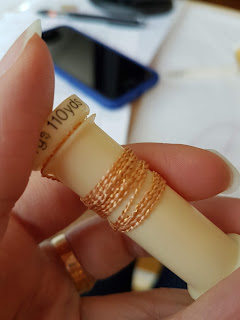
On day 2, I started working on the grommet (I had to learn that word). We realized too late that we should have had this completed before class so we can start stitching the cords. In Japanese embroidery, the rule is you always stitch from front to back. So here I am putting in string padding.

I only had time that day to put in all the padding and stitch over one part of my grommet.

On day 3, we started cords. This particular cord is called a single central braid. I was really nervous about starting cords as getting the angles just right are very hard to do. However, it went much better than I expected. Not to say I'm looking forward to stitching an entire piece of cords (phase 5 is a cord piece), but I'm not dreading it anymore.

On day 4, I continued stitching on the grommet. I needed it to be completed before we can start stitching the fan handle which is covered in goldwork. We really should have done all this before class.
I made one attempt...

...two attempts...

...before I figured out how to get them just right. It was just a matter of using a single strand of flat silk versus two. Once we figured it out, it all worked out on it's own.

I'm really happy with how my angles came out, especially on the left side. I didn't end up starting goldwork on the fan. The teacher did a demonstration in class with phase piece that was much further along. But for those of us still in the middle of our stitching, we decided to hold off starting until we have more done. In normal circumstances, the goldwork is only put in at the very end, which is a hard rule to follow if you are taking classes and need to at least do enough to show the teacher you understand the technique. I made the decision, to finish the cords before I start the goldwork.

On the last day, we also covered a new kind of twisted thread. This is called a katayori. It's kind of like a rickrack thread and very finicky to make. We need to learn to make them for our learning pieces, but apparently once we reach phase 10 they want us to buy the machine made threads which are more perfect. I wasn't particularly crazy about them but I could learn to like them as it means I can create my own color combinations. The one I made is a peach with #1 gold embedded in it.
So here is my piece after four days of stitching. It doesn't look like much, does it? After this class, I can confidently say I can finish this piece on my own. I plan on taking some time off around Christmas so I'll have lots of time to work on it then.

My ultimate goal is to get at least 80% done by April of 2020 for our next class, where I plan on starting the next phase. So here's my to do list, there is more but I think it's enough for now:
I was working on Hiogi, learning the phase 3 portion of the piece. We did phase 2 last April.

Day 1, we worked on transferring the cherry blossoms back onto the the peach cloud. We did this with tissue paper, putting in little tacking stitches.

Once the tissue paper is removed, we are left with little flowers on the foundation layer. Stitching over a foundation is called superimposed technique. I attempted to stitch a cherry blossom but I got so frustrated with it. My padding string kept sinking into the foundation. I decided to leave it alone and work on something else.

On day 2, I started working on the grommet (I had to learn that word). We realized too late that we should have had this completed before class so we can start stitching the cords. In Japanese embroidery, the rule is you always stitch from front to back. So here I am putting in string padding.

I only had time that day to put in all the padding and stitch over one part of my grommet.

On day 3, we started cords. This particular cord is called a single central braid. I was really nervous about starting cords as getting the angles just right are very hard to do. However, it went much better than I expected. Not to say I'm looking forward to stitching an entire piece of cords (phase 5 is a cord piece), but I'm not dreading it anymore.

On day 4, I continued stitching on the grommet. I needed it to be completed before we can start stitching the fan handle which is covered in goldwork. We really should have done all this before class.
I made one attempt...

...two attempts...

...before I figured out how to get them just right. It was just a matter of using a single strand of flat silk versus two. Once we figured it out, it all worked out on it's own.

I'm really happy with how my angles came out, especially on the left side. I didn't end up starting goldwork on the fan. The teacher did a demonstration in class with phase piece that was much further along. But for those of us still in the middle of our stitching, we decided to hold off starting until we have more done. In normal circumstances, the goldwork is only put in at the very end, which is a hard rule to follow if you are taking classes and need to at least do enough to show the teacher you understand the technique. I made the decision, to finish the cords before I start the goldwork.

On the last day, we also covered a new kind of twisted thread. This is called a katayori. It's kind of like a rickrack thread and very finicky to make. We need to learn to make them for our learning pieces, but apparently once we reach phase 10 they want us to buy the machine made threads which are more perfect. I wasn't particularly crazy about them but I could learn to like them as it means I can create my own color combinations. The one I made is a peach with #1 gold embedded in it.

So here is my piece after four days of stitching. It doesn't look like much, does it? After this class, I can confidently say I can finish this piece on my own. I plan on taking some time off around Christmas so I'll have lots of time to work on it then.

My ultimate goal is to get at least 80% done by April of 2020 for our next class, where I plan on starting the next phase. So here's my to do list, there is more but I think it's enough for now:
- finish the snow flake in the upper right corner (high priority)
- continue cords and finish them
- finish shippo cloud
- finish peach cloud
- start and finish the separated single layer paulownia (low priority)
You sound so much more assured about this piece now. That bodes well for the future work on it!
ReplyDeleteYour piece is coming along well and I am sure you will complete the items you want by next April. I love seeing your pieces develop. What have you chosen for phase 4?
ReplyDeleteOh my goodness, there is so much involved in creating these pieces! It does look beautiful.
ReplyDeleteI think I underappreciated how much thought must go into designing these learning pieces, so all the techniques can be taught in an order that makes sense. I think your cords look gorgeous and I'm really looking forward to seeing these cherry blossoms take shape eventually!
ReplyDelete