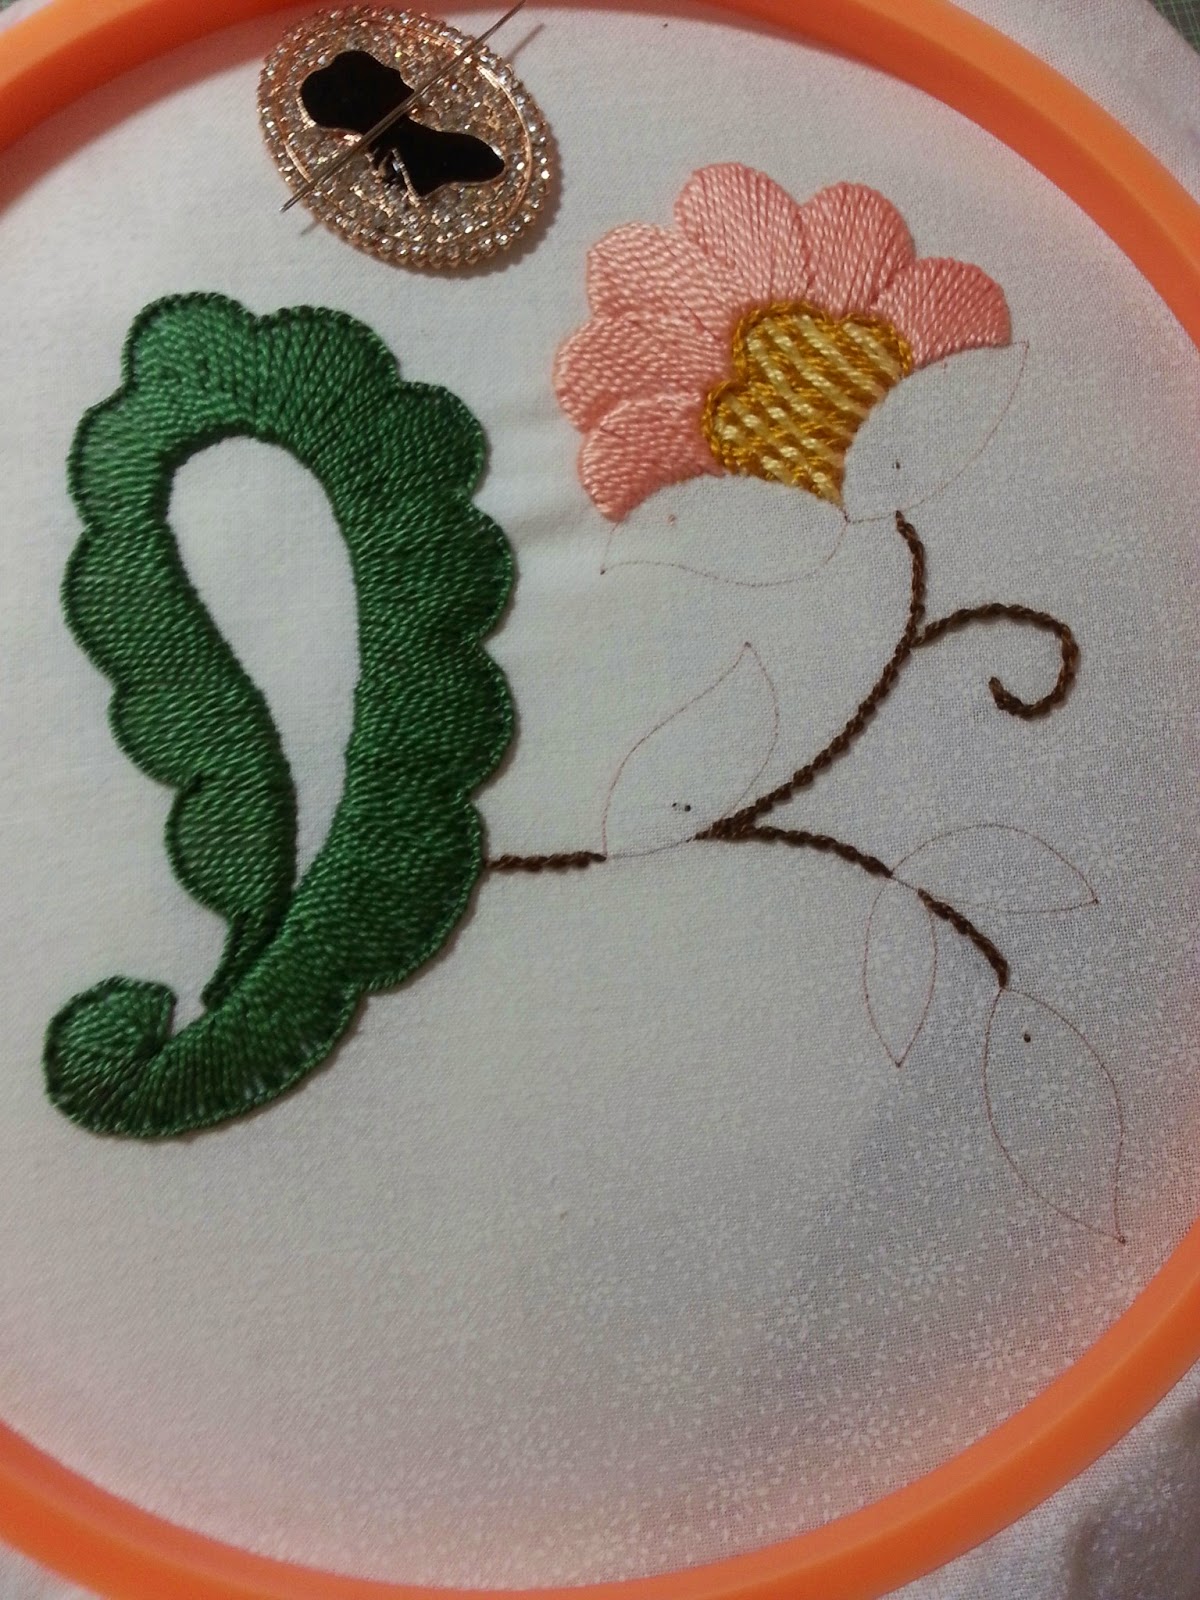
This week I neglected all my WIPs to finish my Crewel practice piece. Since I wasn't following any pattern for this, I decided to look for inspiration in Hazel's two books and on the Internet.
For the paisley leaf, I decided to use the Buttonhole stitch. My stitches started out a little crowded at the beginning until I got used to it. Once I got to the crest of the leaf, I realized there was no way I could keep the stitches together and still follow the curve.

Unfortunately it didn't really click until I was at the very end of the leaf. The trick is stitch the buttonholes together, but where there is a large curve, follow the curve and then just go back and fill the empty spaces with satin stitches.

And there is it all stitch up. Some of the stitches are crowded, but it looks great all in all.

For the inside of the paisley leaf, I decided on the seed stitch. This is definitely not a favorite of mine. I'm not a very spontaneous person, so wild and random stitches are not my forte.

This next part was my absolute favorite. I was having trouble deciding how to stitch these, until I found the Romanian stitch in Hazel's book.

It's the perfect stitch for leaves. It makes a nice center line and the thread is laid in a way that there is two "different" colors on each side of the leaf. The trick is to draw a line going down the center of the leaves as a guide.

For the last part, I decided on the padded satin stitch. I've seen this technique used in Japanese Embroidery as well as in Hazel's book. It starts by stitching evenly spaced horizontal stitches and satin stitching over them vertically.

Here it is all done :) I didn't take a picture of the back cause it's not very nice. I'm quite satisfied with it, except for the center of the flower. It was an unfortunate choice, but oh well.

Update on the Susan Bates plastic hoop. I've figured out a way to work with it. The trick is to stitch in the well. In other words, when putting the fabric onto the hoop, place it face down so that once it's framed it looks like the image above. This way the fabric is nice and taught and doesn't shift around.
For the paisley leaf, I decided to use the Buttonhole stitch. My stitches started out a little crowded at the beginning until I got used to it. Once I got to the crest of the leaf, I realized there was no way I could keep the stitches together and still follow the curve.

Unfortunately it didn't really click until I was at the very end of the leaf. The trick is stitch the buttonholes together, but where there is a large curve, follow the curve and then just go back and fill the empty spaces with satin stitches.

And there is it all stitch up. Some of the stitches are crowded, but it looks great all in all.
For the inside of the paisley leaf, I decided on the seed stitch. This is definitely not a favorite of mine. I'm not a very spontaneous person, so wild and random stitches are not my forte.

This next part was my absolute favorite. I was having trouble deciding how to stitch these, until I found the Romanian stitch in Hazel's book.

It's the perfect stitch for leaves. It makes a nice center line and the thread is laid in a way that there is two "different" colors on each side of the leaf. The trick is to draw a line going down the center of the leaves as a guide.


Here it is all done :) I didn't take a picture of the back cause it's not very nice. I'm quite satisfied with it, except for the center of the flower. It was an unfortunate choice, but oh well.

Update on the Susan Bates plastic hoop. I've figured out a way to work with it. The trick is to stitch in the well. In other words, when putting the fabric onto the hoop, place it face down so that once it's framed it looks like the image above. This way the fabric is nice and taught and doesn't shift around.
Wow, for a practice piece, it's very pretty!
ReplyDeleteYour crewel stitching looks fabulous! I particularly like the stitches you used for the leaves.... the Romanian stitch.... I am going to have to look that up and give it a try! :) x
ReplyDeleteI think it looks great. Even if you're not fully satisfied with all your choices, you have stitched beautifully. And the more you stitch, the more you'll know what does and does not work for you. Keep going!
ReplyDeleteVery nice! You've done a beautiful job on this.
ReplyDeletebeautiful work ♥
ReplyDeleteyour stitching is lovely, I'm sure you'll have no problem in the class. About the hoop - I'm wondering if you should bind the inner ring, or even both rings. Mary Corbert always says you should to stop the fabric slipping.
ReplyDeleteThat is just lovely!
ReplyDeleteLooks beautiful - good for you! I had the pleasure of taking a one day class from Hazel at Seminar and was absolutely thrilled to see so many of her pieces in person - gorgeous work!
ReplyDelete(Late to the party as you already know how I feel about this.....) LOVE!
ReplyDelete