Friday, October 27, 2017

Preparing and Packing for Class

It's finally time! As you read this I will be in class starting my first step into Japanese Embroidery. After five years of saying one day, that day is finally now.

If you remember my post from August, I was hesitating between stitching Hanazume and Bouquet from the Heart of Japan. After consulting my senpais (that's Japanese for those who have more experience than myself), I decided to go with Bouquet from the Heart of Japan.
This piece containing more elements will introduce me to many different techniques and help me prepare for the phases to come. In my excitement to start, I decided to get myself familiar with the design. To do that, I traced the design from my Japanese Embroidery book to color in my sketchbook.


Here is the design all transferred next to a photograph of the finished embroidery.


I colored the drawing using my color pencils, noting in color-coordinated markers what technique silk combination is used. Ignore the paper wrapping, I kind of ruined it there, and the cords are not colored either. Setting that aside, coloring it gives me a good understanding of where everything should be and also made me realize there is a lot of green in this piece. I kind of hope we won't be using a single green color.


Onto my packing. My frame and stand will be waiting for me in the class room, I will post pictures of those later. For now, here is what I'm bringing with me:

  • My copies of Japanese Embroidery through the millennium by Mireille Amar and Techniques of Japanese Embroidery by Shuji Tamura.
  • A clamp light from Ikea with extension cord.
  • Pillow case to cover my piece between classes
  • and my embroidery tools all nicely packed


I found this zipped case at Hobby Lobby when I went to visit my friend in the US. It's meant for planners, but I love all the different zip-pockets. It also has space (I hope) for the silks when I get them in class. I like having everything in one place.


Here is what's inside:

  • sticky notes, note pad with pencil, eraser and pen
  • tin container for ORTs
  • Embroidery scissors with tweezers attached
  • Awl
  • Tekobari
  • Komas
  • Felt with needles
  • Various rulers, including the very important triangle rulers (I'll show you why later)


I hope I didn't forget anything. If I did, it should be fine as I can bring it with me the next day.

Wednesday, October 25, 2017

October TUSAL


Back to old habits again, I'm terribly late for TUSAL. I have a good excuse this time, I caught a cold. Last week our office organized a team building exercise for the IT department. We spent most of the afternoon in a park in 11 degrees Celsius weather with wind and barely any sun. So it's no wonder I woke up feeling awful on Friday. I'm feeling a little better now, but the timing is really horrible. I'm having my first Japanese Embroidery class this Friday, and I really would like to spend it without having to constantly reach for a Kleenex. I think my classmates would also prefer it.

Stitching updates: I did pull out Hedebo Enchantment as planned and started on the needle woven border. Luckily, there is no need to think while stitching it. Just over and under, over and under,... it's enough to put you to sleep.


I'm actually much farther on than this picture shows. I've gone all the way down the left side so all that's left is half the bottom border to do. I'll try to get that done tonight as I won't be working on it for a while. I'll be too busy with my Japanese Embroidery class.


Plans for the rest of the week:

  • Tonight: finish the rest of that border
  • Tomorrow night: meet my teacher and classmates to stretch fabric on our Japanese embroidery frame with trestle
  • Friday, Saturday, Sunday, Monday: start my phase 1 Japanese embroidery piece =D

Wednesday, October 18, 2017

Craftsy Goldwork Class - Part 2.5

I wasn't planning on writing a post so soon on my goldwork flower, but I received a few questions from a few of you noreply-commenters so I figured I would answer them here. Also, I managed to finish my goal for this week on the piece.

The goal this week was to couch the fringes above the petals. It looks easy, but the tricky part is getting those curves right. I was originally going to do the entire fringe in one shot, but it looked much cleaner if I did it in two steps.


Brenda, you asked why I would plunge the thread after it's been couched and not before. First off, passing thread is made up of a fine wire tightly wrapped around a thread core (click here for more information on Tanja Berlin's website). It is prone to fraying as you can see below. I accidentally snagged the thread while I was stitching and pulled on the wire, unraveling it. Also, if I plunged it and then started couching, it would be in the way of my stitching. My sewing thread snags on the ends sometimes while I'm couching, but at least I can see it when it happens.


Now a little bit more about plunging. I keep saying I plunge the couched threads to the back, but I never showed you how I do it. Below is a piece of felt with all the needles I received in my goldwork kits that I've kept aside to use. I mainly use the first needle on the right, for couching with sewing thread, and the first needle on the left. That second needle is a chenille needle. Not sure what size it is, but the eye is big enough I can easily thread my metals without any effort.


First step, plunge the needle where you want to end your line of couched thread.


Thread the passing into the eye and then yank the chenille needle down to pass the entire thing to the back of the fabric. A good hard pull is always great as the thread will pass thru the fabric cleanly.


Repeat for the other thread. Some people are leery of this as they don't want big holes in their fabric. The fabric is actually not that affected by the plunging. For goldwork, you embroidery on fabrics like velvets and silks, nothing too delicate like organza. This is because goldwork embroidery is heavy and the fabric needs to be able to support the weight. When you plunge the metals, the fabric "heals" around the thread so a hole is not really that visible.


At the back, I use a curved needle to sew the metals down. The excess is then cut off. I have a small container full of bling from doing this. I love shaking it :)


Always be careful where you sew the metal threads down. Never end them in a place where you still have some stitching to do as it will make it harder later to pass your needle thru it later.


Here is what my piece looks like now.


A closeup of the finished fringe.


I hope that answers a few of your questions on plunging. If not don't hesitate to ask more in the comments below. Next step is the curved area right under the filaments. I will be taking out the gold pearl purl thread for this section. That will have to wait till this weekend or next week. I'll be putting this piece away and taking out my whitework.

Monday, October 16, 2017

Craftsy Goldwork Class - Part 2

Last week I started working on the filaments for my goldwork flower. This is done with more couching, but we're introducing another type of goldwork metal thread called passing. Two pairs of Japanese threads are couched around, followed by one pair of passing. This is repeated in a way that we would have two rows of passing and three rows of Japanese thread.


At the beginning, I decided to work both sides at the same time. I quickly found out that this wasn't that great of an idea. The filaments are so close to each other that my couching thread kept getting caught on it.

Another thing I noticed, I was quickly running out of space and I still had three rows left to couch.


I kept going anyways, but it did make it hard to ensure that that last row of metal thread abutted the previous row neatly.


I proceeded to do all the plunging before continuing onto the next filament. It took me two evenings to do one leg. I wasn't feeling up to doing this portion.


Luckily I felt more energized Saturday. I finished plunging the other leg and couching the other filament. The right leg is much neater than the left. I don't know if you can see in the picture, the Japanese thread unraveled a bit where it was plunged. But who's looking that closely anyways :P


By the time I finished plunging all the threads, I realized that I was getting much better at it. I found that it works better if I can get the entire thread thru in one yank. I'm kind of worried about the filament on the right, that last row is a little too close to the design line that's inside it.


Here's a look at my little slugs. At the beginning, I was couching a pair at a time. That got old very fast and I started doing two pairs at a time to speed things up. Now my only worry is: when this is framed will I have bumps?


Tonight, I will be doing more couching. I want to get those fringes right above the petals finished. It's just a simple line of couched passing.


Once that's done, I think I will put it aside to work on Hedebo Enchantment. I need to make some progress on that woven border.

Thursday, October 12, 2017

Back to my Regular Schedule

I'm back from my Thanksgiving trip. I had taken Bramble and the Rose as well as my Sashiko panel in case I had some time to stitch. I didn't take out my cross stitch WIP even once, but the Sashiko panel got a lot of stitching time. It was great because I could pick it up whenever I had 5 minutes to stitch and I never had to consult a pattern. I have a few leaves left and some French knots to do. After I will have to start thinking of what I want to do with the finished piece.


Except for my Japanese Embroidery class at the end of the month (2 weeks to go!!!), I have no more commitments until Christmas. This means I can get back to working on my WIPs. Tuesday I felt like beading, so out came my phase 1 Japanese Bead Embroidery piece.


I just opened the second packet of silver beads and I'm no where near the halfway point. This means I will probably have to order another packet from the JEC. My friend Carolyn also ran out and she had bought two of them same as me when we were in Atlanta. I should have ordered another when she mentioned it to me. Oh well!


Yesterday, I took out my goldwork flower and started working on the filaments. I will talk more about this in a later post once I finish this section.


For now, here's a close up pick with no light. I love the effect of the two metal threads together. Tonight, I will plunge all the threads on the left so I'm more comfortable to work on the right side.


All that's missing now is for some stitching to be done on Hedebo Enchantment, but I probably won't until this weekend (maybe). I'm having too much fun with the goldwork right now.

Saturday, October 7, 2017

Thanksgiving Weekend

By the time you read this, I should be in New Jersey for Canadian Thanksgiving. I'm visiting my friend who had moved there last year. We video call every once in a while but it will be great to see her in person. Actually, she has no idea I'm coming =D I arranged it all with her husband. It will be great to surprise her as she's been having a hard time.

I'm taking some stitching with me for the plane, but chances are really high that I will get no stitching done this weekend. So instead, I would like to share a little beaded something I made as a gift. My friend has been feeling very chilly recently and started wearing shawls. I had gotten her a brooch in Newfoundland that she used to keep them pinned, but she lost it on a walk one day. I told her I'd get her another one, but decided instead to make one. Looking around on Pinterest, I found this beaded flower. It's meant to be a pendant, but I finished it into a brooch instead.


The instructions are all in Russian, but with a little help from google and careful study of the pictures I figured out what to do.


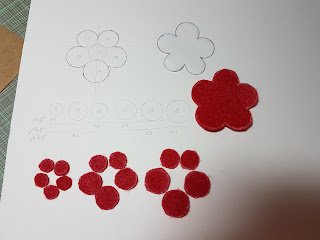
First step, figure out the size of each petal on paper. I used a circle ruler for that. This gave me the outline for the flower as well as the top layer of felt. For the bottom layers, I just picked smaller circles making sure the top felt layer would comfortably cover them.


Here's a little animation of the felt being applied (open the post if you are reading by email). I realized while typing this that I forgot to take a picture of the center felt piece being applied. If you watch the animation, you'll notice I punch a hole through the center. This is to make sure the Swarovski Rivoli crystal can comfortably sit on it.


My friend loves red, so I decided to convert the beads to a red colorway. There's a mixture of Miyuki and Toho beads in here as I selected my beads based on colors that were available that fit my palette. I also have some drop fringe beads that I've never tried before.


Second step, stitching down the Rivoli crystal. The crystal isn't sew on, so instead you surround it with beads to encase it using the peyote stitch. I've been itching to try this technique, so I'm happy to finally get the chance. It's not perfect as my first line of beads weren't stitched in a proper circle, it's more of an egg shape, but the crystal is stable and that's what's important. You don't want it to be loose as it could pop out.


Third step, start satin stitching with beads. This part is fun, just thread enough beads to get to the edge of the petal and stitch. I'm not a hundred percent sold on this. I think maybe the line of beads should be couched to make it a little more stable. The lines are a little loose so they shift around. Not a problem as the felt beneath it is red to match the beads but not exactly reassuring. If I do this again, I'm couching those down every 3-4 beads.


Fourth step, stitch the drop fringe beads. It's a very interesting bead shape. They did shift around a bit while I was applying them as they have a pointed end. The color is so pretty and has a slight purple shine to it. I will be keeping these in mind for embroidery accents, they would make excellent berries.


At this point, all stitching has been done for now. Time for some finishing.


The stabilizer is cut out.


You have to be very careful at this stage, I actually nicked a thread and had to do some panicky touch ups to make sure the beads don't fall out.


Luckily, we have a bit of gluing for this project. This will make sure my threads stays in place. I cut out a piece of rigid paper (I used a cue card) with the shape of my flower. It needs to be a few inches smaller, so I had to trim mine a bit.


This piece is glued down.


Once it's dry, you have to glue the final piece that backs the flower to cover everything. In my case it's a piece of black leather. I forgot to take a picture, but before I glued my leather to the back, I stitched down the pin.


Once it was dry, I trimmed the leather all around.


I think I went a little too glue crazy. There was a bit that seeped out. It's transparent when it dries, but it hardens. To finish there is one last bit of stitching. The edges are stitched together and a bead is inserted every stitch to hide the seam. I tried to evenly space my stitches but found it a little difficult in between the petals where there was a really thick layer of glue. I had to use a thimble to push my needle through. With a bit more practice (and less glue), I think I can do a better job next time.


And here it is all ready to go.


So I will be in the US till Monday night. Except for my Japanese Embroidery class at the end of the month I have no more weekend commitments and can finally get back to a regular stitching schedule. I really need to get move on if I want to meet my deadlines.