Normally, I would have stitched the superimposed cherry blossoms first and
then put in holding stitches on the leftover open areas. However, as I've been
having a hard time with the flowers I decided to do this step first. It will
help keep my foundation in place and prevent it from shifting while I stitch.
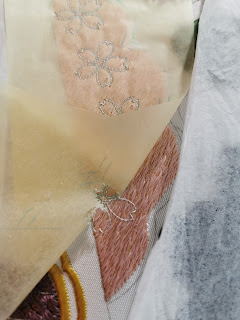
In the picture below, my finger points to where I stopped for the day. The
area on the left has been held down and you can see that it looks smoother
than the right.

The next step is putting back the outline of the cherry blossoms. There is a number of ways to do this, here I am using the tracing paper method.


So there will be three red flowers and two that will be silver. I originally wanted to do them in red and white silk, but the instructions ask they be done in silver and gold. Since I ditched the gold, I figured I will compromise and use the silver so I don't get in trouble if I submit my piece for review one day.


Here is a before and after picture.
 |
 |
The next step is putting back the outline of the cherry blossoms. There is a number of ways to do this, here I am using the tracing paper method.

The elements are drawn on a piece of tracing paper, which is then held in place and the lines are stitched. You can use Japanese back stitch but here I am using the line of held thread technique as it gives me a nicer curve.

Once all the elements are transferred, I removed the tracing paper.

Here you can see all 5 cherry blossoms.

Here is where I was back to struggling. No matter what I did I couldn't stitch a petal I was happy with. I'm so used to seeing images of beautifully stitched round petals and no matter what I did, I couldn't recreate that. This weekend, I had a nice chat with my mentor on superimposed stitches and we looked at examples together. It turns out I was looking at this all wrong, jagged edges ARE okay. The smooth lines will come when you look at the piece from a distance. We are so used to having our noses almost pressed up to our stitching that we forget to take a step back and really look at what we've done. Once I got that in my head, I was able to get one petal stitched.

That was one hell of a pep talk, because look, I managed to stitch one whole flower! I'm so proud (and relieved).

So there will be three red flowers and two that will be silver. I originally wanted to do them in red and white silk, but the instructions ask they be done in silver and gold. Since I ditched the gold, I figured I will compromise and use the silver so I don't get in trouble if I submit my piece for review one day.
By the way, ignore that silver petal. I was thinking about my progress the day after and was puzzled about the color of that petal. Why was it yellowish? Shouldn't it be closer to white? I took another look at the pictures I took and quickly realized that I used the wrong #1 silver. I used the twisted metal thread instead of the regular one. No harm done as it's only one petal, but I'm glad I caught it.

Yes, it's very disconcerting to realise that the view you are getting as you work isn't actually the one intended. I mean, you knew it all along, but you sit back and look properly, and it's such a surprise!
ReplyDeletefrom another person struggling with this cloud, did you pad each petal before stitching?
ReplyDeleteI have all my padding in, but can't get the metal threads to lie the way I want them to. I think doing the short stitch holding before the blossoms is brilliant! I have moved on to the cords and tassels while I think about it.....love having your blog for advice, thank you, Anne
Somehow my first attempt at commenting disappeared. :( Anyway, this post has been so helpful to me! I’m trying to learn JE on my own, so I love reading other people’s blogs as they figure things out because the tips they give are always so useful. I think your piece is beautiful! You are doing a great job! My life’s ambition is to embroider a Japanese fan. I have two questions for you, though. 1. What brand of tracing paper do you use? 2. What is the held thread technique you used to outline the flowers?
ReplyDeleteThis is a very demanding piece! That red is stunning.
ReplyDeleteOh wow, those holding stitches really make a difference - those long stitches look so much smoother! And your first cherry blossom turned out great.
ReplyDeleteSuperimposed element are tricky because the foundation threads have a mind of their own. Doing the short stitch holding before the superimposed work is an interesting idea. It certainly gets the threads under control. My teacher always says that you should stand up from your work every 20 minutes to see how it looks from a distance. It's a good idea to stop getting stiff. Although it's difficult to remember when you are caught in the stitching flow. The line of held thread gives a better line but back stitching provides a stronger outline to stitch over, which might help. It's looking lovely so far.
ReplyDelete