By the time you read this, I should be in New Jersey for Canadian Thanksgiving. I'm visiting my friend who had moved there last year. We video call every once in a while but it will be great to see her in person. Actually, she has no idea I'm coming =D I arranged it all with her husband. It will be great to surprise her as she's been having a hard time.
I'm taking some stitching with me for the plane, but chances are really high that I will get no stitching done this weekend. So instead, I would like to share a little beaded something I made as a gift. My friend has been feeling very chilly recently and started wearing shawls. I had gotten her a brooch in Newfoundland that she used to keep them pinned, but she lost it on a walk one day. I told her I'd get her another one, but decided instead to make one. Looking around on Pinterest, I found this beaded flower. It's meant to be a pendant, but I finished it into a brooch instead.
The instructions are all in Russian, but with a little help from google and careful study of the pictures I figured out what to do.

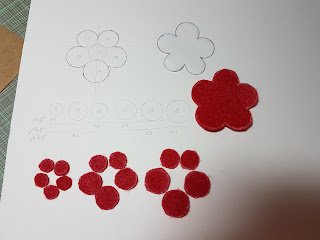
First step, figure out the size of each petal on paper. I used a circle ruler for that. This gave me the outline for the flower as well as the top layer of felt. For the bottom layers, I just picked smaller circles making sure the top felt layer would comfortably cover them.
Here's a little animation of the felt being applied (open the post if you are reading by email). I realized while typing this that I forgot to take a picture of the center felt piece being applied. If you watch the animation, you'll notice I punch a hole through the center. This is to make sure the Swarovski Rivoli crystal can comfortably sit on it.

My friend loves red, so I decided to convert the beads to a red colorway. There's a mixture of Miyuki and Toho beads in here as I selected my beads based on colors that were available that fit my palette. I also have some drop fringe beads that I've never tried before.

Second step, stitching down the Rivoli crystal. The crystal isn't sew on, so instead you surround it with beads to encase it using the peyote stitch. I've been itching to try this technique, so I'm happy to finally get the chance. It's not perfect as my first line of beads weren't stitched in a proper circle, it's more of an egg shape, but the crystal is stable and that's what's important. You don't want it to be loose as it could pop out.

Third step, start satin stitching with beads. This part is fun, just thread enough beads to get to the edge of the petal and stitch. I'm not a hundred percent sold on this. I think maybe the line of beads should be couched to make it a little more stable. The lines are a little loose so they shift around. Not a problem as the felt beneath it is red to match the beads but not exactly reassuring. If I do this again, I'm couching those down every 3-4 beads.

Fourth step, stitch the drop fringe beads. It's a very interesting bead shape. They did shift around a bit while I was applying them as they have a pointed end. The color is so pretty and has a slight purple shine to it. I will be keeping these in mind for embroidery accents, they would make excellent berries.

At this point, all stitching has been done for now. Time for some finishing.

The stabilizer is cut out.

You have to be very careful at this stage, I actually nicked a thread and had to do some panicky touch ups to make sure the beads don't fall out.

Luckily, we have a bit of gluing for this project. This will make sure my threads stays in place. I cut out a piece of rigid paper (I used a cue card) with the shape of my flower. It needs to be a few inches smaller, so I had to trim mine a bit.

This piece is glued down.

Once it's dry, you have to glue the final piece that backs the flower to cover everything. In my case it's a piece of black leather. I forgot to take a picture, but before I glued my leather to the back, I stitched down the pin.

Once it was dry, I trimmed the leather all around.

I think I went a little too glue crazy. There was a bit that seeped out. It's transparent when it dries, but it hardens. To finish there is one last bit of stitching. The edges are stitched together and a bead is inserted every stitch to hide the seam. I tried to evenly space my stitches but found it a little difficult in between the petals where there was a really thick layer of glue. I had to use a thimble to push my needle through. With a bit more practice (and less glue), I think I can do a better job next time.

And here it is all ready to go.

So I will be in the US till Monday night. Except for my Japanese Embroidery class at the end of the month I have no more weekend commitments and can finally get back to a regular stitching schedule. I really need to get move on if I want to meet my deadlines.
I'm taking some stitching with me for the plane, but chances are really high that I will get no stitching done this weekend. So instead, I would like to share a little beaded something I made as a gift. My friend has been feeling very chilly recently and started wearing shawls. I had gotten her a brooch in Newfoundland that she used to keep them pinned, but she lost it on a walk one day. I told her I'd get her another one, but decided instead to make one. Looking around on Pinterest, I found this beaded flower. It's meant to be a pendant, but I finished it into a brooch instead.
The instructions are all in Russian, but with a little help from google and careful study of the pictures I figured out what to do.

First step, figure out the size of each petal on paper. I used a circle ruler for that. This gave me the outline for the flower as well as the top layer of felt. For the bottom layers, I just picked smaller circles making sure the top felt layer would comfortably cover them.

Here's a little animation of the felt being applied (open the post if you are reading by email). I realized while typing this that I forgot to take a picture of the center felt piece being applied. If you watch the animation, you'll notice I punch a hole through the center. This is to make sure the Swarovski Rivoli crystal can comfortably sit on it.

My friend loves red, so I decided to convert the beads to a red colorway. There's a mixture of Miyuki and Toho beads in here as I selected my beads based on colors that were available that fit my palette. I also have some drop fringe beads that I've never tried before.

Second step, stitching down the Rivoli crystal. The crystal isn't sew on, so instead you surround it with beads to encase it using the peyote stitch. I've been itching to try this technique, so I'm happy to finally get the chance. It's not perfect as my first line of beads weren't stitched in a proper circle, it's more of an egg shape, but the crystal is stable and that's what's important. You don't want it to be loose as it could pop out.

Third step, start satin stitching with beads. This part is fun, just thread enough beads to get to the edge of the petal and stitch. I'm not a hundred percent sold on this. I think maybe the line of beads should be couched to make it a little more stable. The lines are a little loose so they shift around. Not a problem as the felt beneath it is red to match the beads but not exactly reassuring. If I do this again, I'm couching those down every 3-4 beads.

Fourth step, stitch the drop fringe beads. It's a very interesting bead shape. They did shift around a bit while I was applying them as they have a pointed end. The color is so pretty and has a slight purple shine to it. I will be keeping these in mind for embroidery accents, they would make excellent berries.

At this point, all stitching has been done for now. Time for some finishing.

The stabilizer is cut out.

You have to be very careful at this stage, I actually nicked a thread and had to do some panicky touch ups to make sure the beads don't fall out.

Luckily, we have a bit of gluing for this project. This will make sure my threads stays in place. I cut out a piece of rigid paper (I used a cue card) with the shape of my flower. It needs to be a few inches smaller, so I had to trim mine a bit.

This piece is glued down.

Once it's dry, you have to glue the final piece that backs the flower to cover everything. In my case it's a piece of black leather. I forgot to take a picture, but before I glued my leather to the back, I stitched down the pin.

Once it was dry, I trimmed the leather all around.


And here it is all ready to go.

So I will be in the US till Monday night. Except for my Japanese Embroidery class at the end of the month I have no more weekend commitments and can finally get back to a regular stitching schedule. I really need to get move on if I want to meet my deadlines.
Wow! That is amazing! I love the step by step instructions. I am sure that your friend will treasure this brooch, especially when she sees how much work went into it.
ReplyDeleteThank you for sharing. I think I will try this.
ReplyDeleteIt's charming, and I'm sure your friend will love it!
ReplyDeleteWhat a lovely beaded flower! My fingers itch to try something like that too :). Alas, other stitching commitments need to take priority!
ReplyDeleteYou, my dear, are absolutely amazing! I love the beading project. Have fun on your visit.
ReplyDeletexxx
WOW! I love the brooch! Great job!
ReplyDeleteThat's a great project and you did very well explaining it step by step! I might try this myself some time, I do enjoy working with beads.
ReplyDeleteThat is so stunning, fantastic job putting it together! I bet your friend loved it!
ReplyDelete