I did promise you all a finish this week and I'm here to deliver. Last week when I showed you pictures, I only had the chipping (or chip work) left to do. This technique is my favorite as it's very similar to beading. Your beads in this case is small pieces of bright check.

I like to keep this technique for last or at least after all the cutwork is completed. This way, whatever pieces didn't fit right during the cutwork I can then cut into smaller pieces and use in the chipping. This will help make sure you have enough in your kit to finish. In this case, it worked out just right. All I had left at the end was this tiny piece of bright check.

The very last technique on this piece are spangles. It helps a lot to separate them by size, below I have large, medium and small. I had a hard time differentiating between the medium and the small as there isn't much difference in the size.

The spangles are applied using a single thread with a couching stitch. One thing I realized when I got to this point, I wish I hadn't marked off the dots for the spangles like they had in the design outline. If I hadn't, I would have been able to put more or less spangles and move them around. Since mine were marked with ink, I had to hide them with the spangles.

And here it is, all done! I was lucky enough to finish it in the morning while there was still light outside.

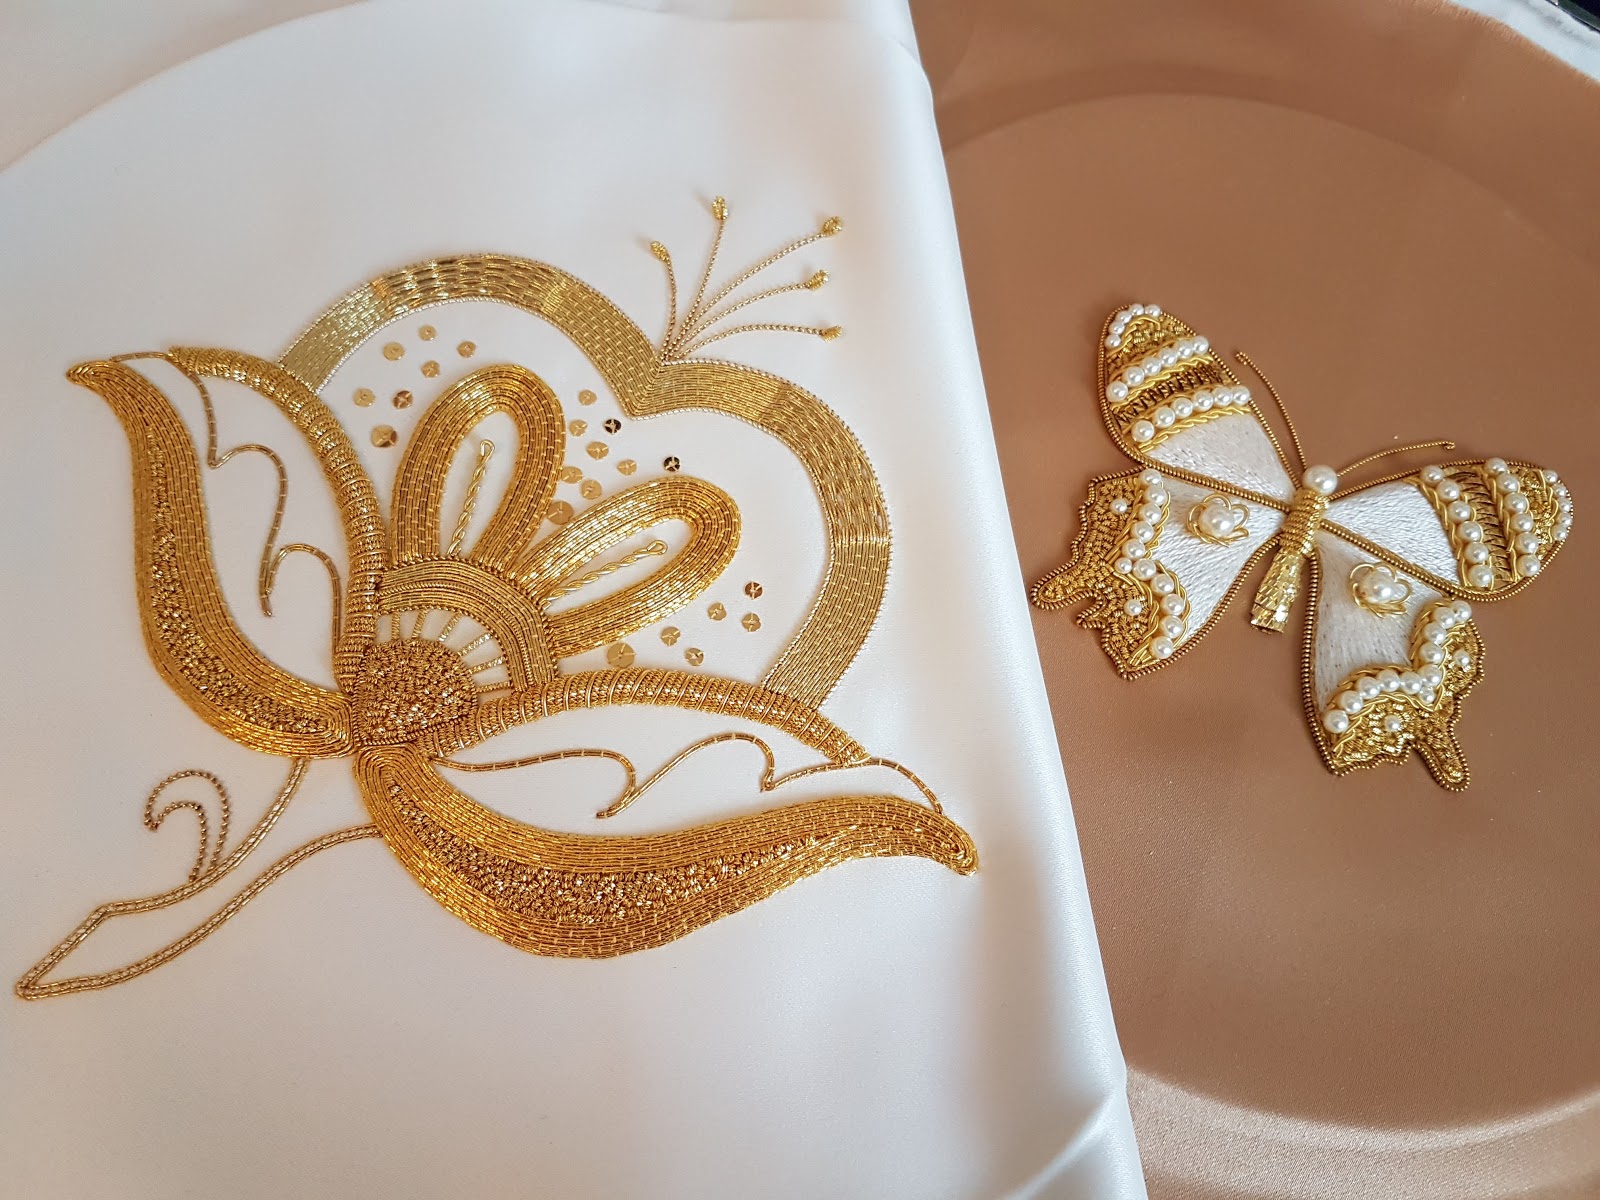
A few close up photos. I love the mixture of the different couched threads and the cutwork.


A few comments on the class, design and kit:

With this, I've just finished my second goldwork piece in my planned trio. I will be starting the last one sometimes at the end of December. So while all of you will be doing some last minute shopping and celebrating the holidays, I will be setting up my piece and stitching away :)


I like to keep this technique for last or at least after all the cutwork is completed. This way, whatever pieces didn't fit right during the cutwork I can then cut into smaller pieces and use in the chipping. This will help make sure you have enough in your kit to finish. In this case, it worked out just right. All I had left at the end was this tiny piece of bright check.

The very last technique on this piece are spangles. It helps a lot to separate them by size, below I have large, medium and small. I had a hard time differentiating between the medium and the small as there isn't much difference in the size.

The spangles are applied using a single thread with a couching stitch. One thing I realized when I got to this point, I wish I hadn't marked off the dots for the spangles like they had in the design outline. If I hadn't, I would have been able to put more or less spangles and move them around. Since mine were marked with ink, I had to hide them with the spangles.

And here it is, all done! I was lucky enough to finish it in the morning while there was still light outside.

A few close up photos. I love the mixture of the different couched threads and the cutwork.


A few comments on the class, design and kit:
- the class is excellent if your just starting out or even if you've already done some goldwork. Sometimes just reading about a technique isn't enough and you need a demonstration. Not all of us are lucky enough to be able to take a class with a teacher and this is a great way to have access to one remotely.
- the design is lovely, it has a combination of the major goldwork technique (padding in felt, soft string and hard string, couching and plunging, basketweave, cutwork, s-ing, chipping, spangles). It's a great way for beginners to dip their toe in. The design itself is not very complicated, but the combination of the different metal threads used together gives an intriguing effect. This piece is a great sampler for me to go back to and study in the future when I will want to design my own pattern.
- the kit I have somewhat of an issue with. I guess at this point you can consider me an intermediate embroiderer in goldwork. I didn't do any unpicking and I was very careful when I was stitching not to be wasteful. However, I still ran out of the passing thread and have what amounts to nothing left of the bright check and Japanese thread. The rest of the smooth purl, pearl purl and spangles I can re-use in another project. When I ran out of the passing thread, I chalked it up to a mistake when my kit was put together, but after having so little left of the bright check it worries me. If I was an absolute beginner, I don't think this kit would have had enough for me to finish if I had made mistakes, in the cutwork for example which is the hardest technique.

It looks fab and you've got some terrific shots of the finish too. :) You've motivated me to get on and do mine this next year as well, although I may change some bits and I'll be working from stash not the kit.
ReplyDeleteInterested to see your 3rd piece, but no last minute shopping or holiday celebrations for me either. :) ♡
This is beautiful!!! Thank you for sharing.
ReplyDeleteLooking forward to your next project.
This is gorgeous!
ReplyDeleteWell done. It's a fine piece, now, and you can be very pleased with it. Have you sent feedback to whoever produced the kit - both good and bad, if possible, so they don't become too depressed!
ReplyDeleteLovely piece! I am sure it is quite bright in person. I like the different techniques that were used.
ReplyDeleteFantastic work. These pieces really do look beautiful. I am glad that you had enough of the gold but really they should make sure there is plenty of everything.
ReplyDeleteAbsolutely gorgeous!
ReplyDeleteYou did a really lovely job Dima! Regarding the kit; since Craftsy is so cheap, I suspect this is one of the downsides. Normally, you would add 1.5-2-times the amount of material needed to stitch the design. This allows for unpicking and the like.
ReplyDeleteWhat a photo finish with the check! I'm glad you could finish with what you had, and the design looks stunning. Ar those materials very expensive to buy, to explain why they were a bit stingy in the kit?
ReplyDeleteit's beautiful! Your stitching is exquisite. I can't believe how fast you stitched this, it would take me years!
ReplyDeleteBeautiful work.
ReplyDelete