Tuesday, June 25, 2019

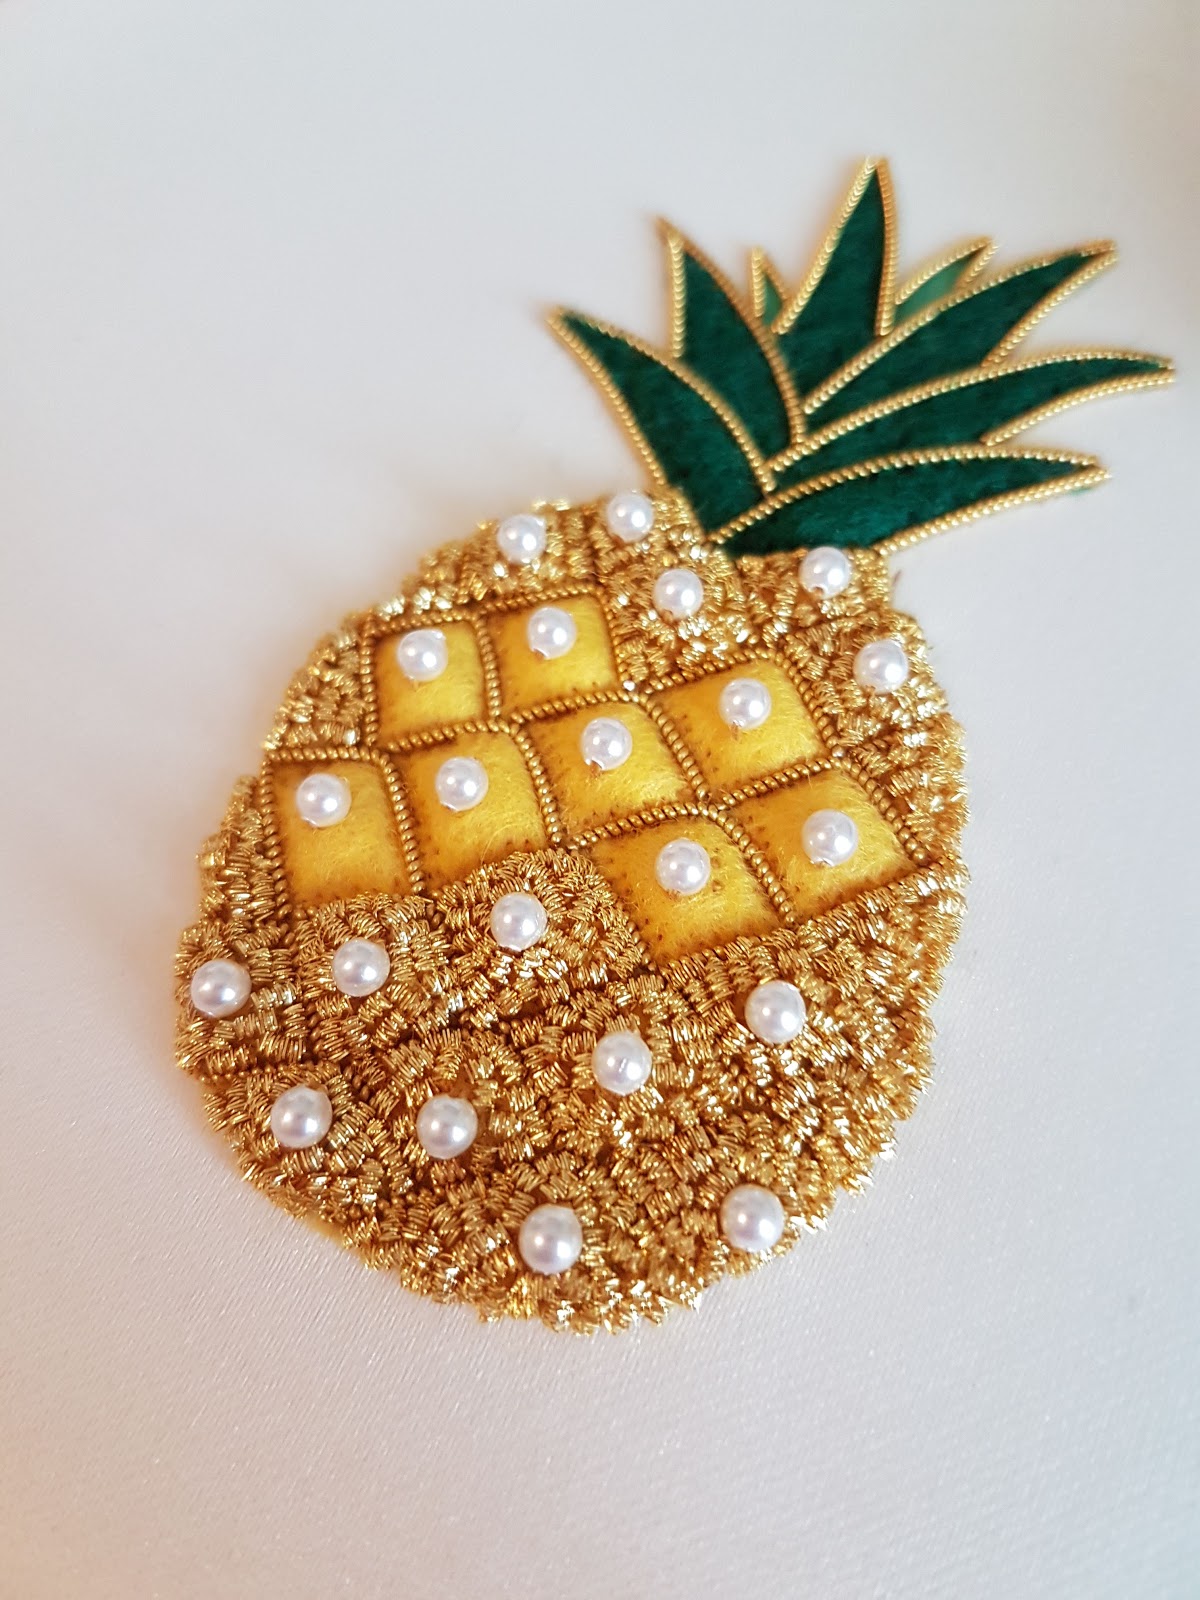
Goldwork Pineapple

Sorry for being so absent, I do have an excellent reason for it this time. I've been working very diligently on a piece but I couldn't share anything until it had been gifted. See, my friend's daughter really liked the golden snitch I made for her mother's birthday and asked if I would make something with the same gold thread for her birthday, which was coming up. Not a brooch but something she could hang in her room. After thinking about it, I asked if she'd like a pineapple as I noticed she always wore a necklace with a small pineapple charm. It's a great subject to stitch in goldwork and I've never made one, so I figured it would also make an interesting challenge.

I looked around for a stock image of a pineapple that appealed to me and used that as my design outline.


To give you an idea of how small it is, here is a picture with my hand next to it. I'd already put in the felt padding for the leaves.


I wanted the pineapple to have some dimension and had to really think of how I wanted to do the felt padding. I didn't want it to come out flat, so using a single piece of felt wouldn't have worked even if I put in padding underneath.


So I decided to do it the hard way and individually pad every little cell. The cells in the middle had three layers of padding while others had two or even one if they were along the edge.

(click on the post to see the animation below)


I didn't want to pad the little leaves at the back, but I couldn't leave it white as it would look strange. After a quick color test on the edge of the fabric, I filled it in using a green marker.


I really like this picture as it shows the true color of the felt. For the leaves I went with a simple outline in pearl purl.


I did the same for the cells of the pineapple. 


To fill in the cell of the pineapple, I went through my stash of goldwork materials. I narrowed it down to a few things and created an intricate design.


Unfortunately, once I stitched it I really hated it. It was too fussy and not representative of my tastes at all. I prefer much simpler designs.


I scrapped that idea and decided to change direction. The birthday girl is born in June, which means her birthstone is pearls. Luckily, there is a bead shop near me that stocks Swarovski crystal pearls in the right size and color I'd need.


I've seen how beautiful bright check looks against pearls when I stitched Pearl Butterfly. Luckily I had a stash of it leftover from kits. By the way, all materials I used in this project, except for the pearls, are recycled from other project kits. So look through your stash of leftovers! You probably have enough to stitch a small piece.


After making this decision, I was very happy with how it came out.


I originally planned on putting in cutwork on the leaves with some green rough purl I bought from Turkey, but I decided to pass as I really loved how the leaves looked as they were.


This piece was a very quick stitch. From start to finish it took about 25 odd hours over 9 days. Even less if I don't include the time I spent dithering over what to do. In the next post, I will show you how I finished and framed the piece into a shadow box.

Thursday, June 6, 2019

May TUSAL


I haven't been very good at keeping my blog updated all of May. Same thing for Instagram. I've tried putting in time for stitching but I've been fasting all month so by the time end of day arrives, I have very little energy. I spent many evenings curled up in bed catching up on reading while waiting for the sun to come down. The days I did feel like stitching, I limited it to simple cross stitch or whitework. This meant, my mermaids grew by leaps and bounds. I'm half way up the body of the second mermaid. Chances are high it won't be finished by my sister's b-day at the end of June but it will be done before the year ends.


I do have an update on the framing for my bouquet. I'm so happy with how it came out, especially with our choice of mat. We picked an outer mat to match the fabric as closely as we could get it. For the inner mat I wanted the same blue as the orchid as there just wasn't enough of it in the piece. The frame is an old gold, nothing too thick so as to distract from the piece. It's not up yet as no one has had any energy but hopefully this month it will be up on the wall.


Funny story, they had to frame it 3 times. The first night I took it home I found debris under the glass. I took it back the next weekend to open up and remove the debris. We confirmed all was good and they closed it up, but when it was presented to me I found another one. It seems like the glasses got "magnetized" and was picking up bits of fluff. So they had to undo it a second time. They got smarter and brought it out for me to do a final check before they closed it off. Lesson learned always closely inspect your piece before taking it home.


Tuesday, May 21, 2019

Japanese Embroidery Phase 2-3 - Flax-Leaf Effect

I've had a very slow two weeks, so I was very happy to wake up early yesterday morning with the urge to stitch. I think it had something to do with the sun shining brightly and that I didn't have to be at work on account of it being a national holiday.

I decided to take out Hiogi and tackle the flax-leaf effect paulownia leaf. I figured it should be a cinch since it was one I was already familiar with.


What I didn't plan on were my hands being so cold I couldn't twist my thread. It kept slipping, instead of twisting. I've tried washing them in hot water, clapping and rubbing them together. It would work with one strand before my hands became too cold again. I guess I have poor circulation right now.


Luckily the following steps didn't require twisted thread, so I was able to move along.


I wasn't a hundred percent sold on the colors initially when I saw them side by side, but stitched they look great. I'm really happy I don't have a stash of silks as I would have been tempted to change the color.


One more off my list.
  • finish sayagata cloud
  • finish shippo cloud
  • finish the snow flake in the upper right corner
  • finish the woven effect paulownia
  • finish the tie dye effect paulownia
  • start and finish the flax leaf effect paulownia
  • start and finish the separated single layer paulownia (low priority)


Next Sunday is my monthly Japanese embroidery meeting, so I'll have to decide what my goal will be. I'm not sure I want to start the last paulownia leaf, so it'll have to be either the shippos or the snow flake. I have the week to decide.

Thursday, May 9, 2019

Not Much Progress

As much as I was hoping to get some stitching done over the weekend, very little happened. I did finish stretching my Japanese embroidery piece. I thought the framer would be waiting after me, but it turns out that I'm the one who will be waiting after THEM. It's fine though, I'm in no real rush.


I've tried to pick up a few of my projects over the past few days but I'm just not into it. I decided to stick to simpler pieces for now, like this hedebo piece. This is Hedebo Starbust by Jette Roy Finlay-Heath, a kit I bought at seminar in Newfoundland. There is a lot of pre-work to do in this piece so not much to show for now. I pull it out every now and then, and so far put in about 30 hours. It's a great piece to work on when I want to keep my hands busy but not think too much. Plus, not having to worry about changing colors is great. So it suits my current mood perfectly.

Wednesday, May 1, 2019

April TUSAL


I did mainly Japanese embroidery in April so there wasn't much in my jar this month until this weekend. All the white thread is from a Japanese embroidery piece but not from stitching. It's the lacing thread on my bouquet.


Last Friday, I cut the lacing and removed my piece from the frame and started the long process of stretching the fabric over foam core. I worked on it all of Sunday and am still going at it. So sadly no stitching update from me this week. I'm hoping to get this done before the end of the week so I can do some stitching this weekend.


Monday, April 22, 2019

Japanese Embroidery Phase 2-3 - Woven effect, Tie Dye & Sayagata

Hope everyone had a lovely Easter weekend! I had a very productive long weekend. I took out Hiogi and worked on completing a few of the elements we had started in class.

The first element is the woven effect. Towards the end I noticed there was something wrong but it's not very noticeable from afar. I think I might have made a mistake in the third step when we had to tie down the gold thread. Something to improve on for next time.


The second element I finished is the tie dye effect. Once I got going, I did this by eye. I'm surprised at how nice this came out. I've seen this technique done in books with different color combinations and they look lovely. Now I can say I can stitch it.


The last element I completed is the sayagata cloud, which was very near the end. It was only missing some of the lightning. After that it was a matter of removing my temporary holding stitches and couching everything down.


All of them need to be outlined, but that's being done in the next class I think. Still that's three elements to strike off my to-do list:
  • finish sayagata cloud
  • finish shippo cloud
  • finish the snow flake in the upper right corner
  • finish the woven effect paulownia
  • finish the tie dye effect paulownia
  • start and finish the flax leaf effect paulownia
  • start and finish the separated single layer paulownia (low priority)

I'm going to try and work on some of my other projects for a bit though. Otherwise, I will have nothing to work on during my monthly Japanese embroidery meetings.

Last week I received a comment from someone who was a noreply-comment. Nicole M. asked: i noticed on your fabric the leaves have the veins drawn in. But when you are doing your stitches, they don't seem to be used for anything. It that right? Is there a reason that those type of details are on your ground fabric when you don't seem to be using them for anything?

Here is an answer but don't take my word for it as I'm still learning. Often in Japanese embroidery designs are created by cutting up pieces and putting them together in a way that is pleasing for them. I have a few design books at home that have multiple pages of how chrysanthemums are drawn for example. You pick the shape you like (rounded or pointed petals), drawn from the side or on top,.. and combine it together with other elements to create a whole new design to stitch. The leaves you see in my piece are called paulownia leaves and that's how they draw them in Japan. You can stitch these in green to look like the leaf and put in veins (one of them will be), but it just so happens that they decided to embroider the others using different effects.

Tuesday, April 16, 2019

Japanese Embroidery Phase 1 - Finished!

In my last post, I mentioned I was going to try and join the phase 1 group on Saturday and/or Sunday to stitch on my own piece. I'm happy to say I was able to join both days.


I spent all of Saturday hunched down over my piece doing stitching stems and veins. Taking occasional breaks to watch a demonstration.


On Sunday morning, one of the ladies asked the teacher if she will cover the finishing process in the class. Normally, this is done in a purely verbal fashion as no one has a finished piece available for a demonstration. However, seeing as I was so close to the end, someone jokingly said something along the lines of "well if Dima finishes her piece today, we can have a demo".


As I only had the upper two branches, the valerian stems and some veins left to do, I was game to try and finish it. So I put blinders on and got to it. I was actually quite happy to offer it up for demonstration purposes as I was dreading this part a tiny bit.


The finishing process has many steps like doing a final inspection of the piece to make sure nothing was forgotten and cleaning it of all dusts (it has been on the frame for almost two years). These are normal steps to be expected. What's not is using paste at the back. Below you see wheat paste that our teacher cooked in the microwave.


With a pinkie finger, this paste is applied to the back of the embroidery.


The piece is then wiped at the back with a damp cloth. Now comes the fun (and scary part). You get a very hot iron, place a wet cloth on it and use it to steam the piece from below. It was cool to see the steam rising from the piece.

(click on the post to see the video below)


I had to leave my piece at my friend's to dry overnight and went to pick it up yesterday. I'm hoping to go to the framer this weekend to pick out a frame. It will be a while before I can share final pictures as I'll need to stretch it on foam core and bring it back to the shop for the final framing.

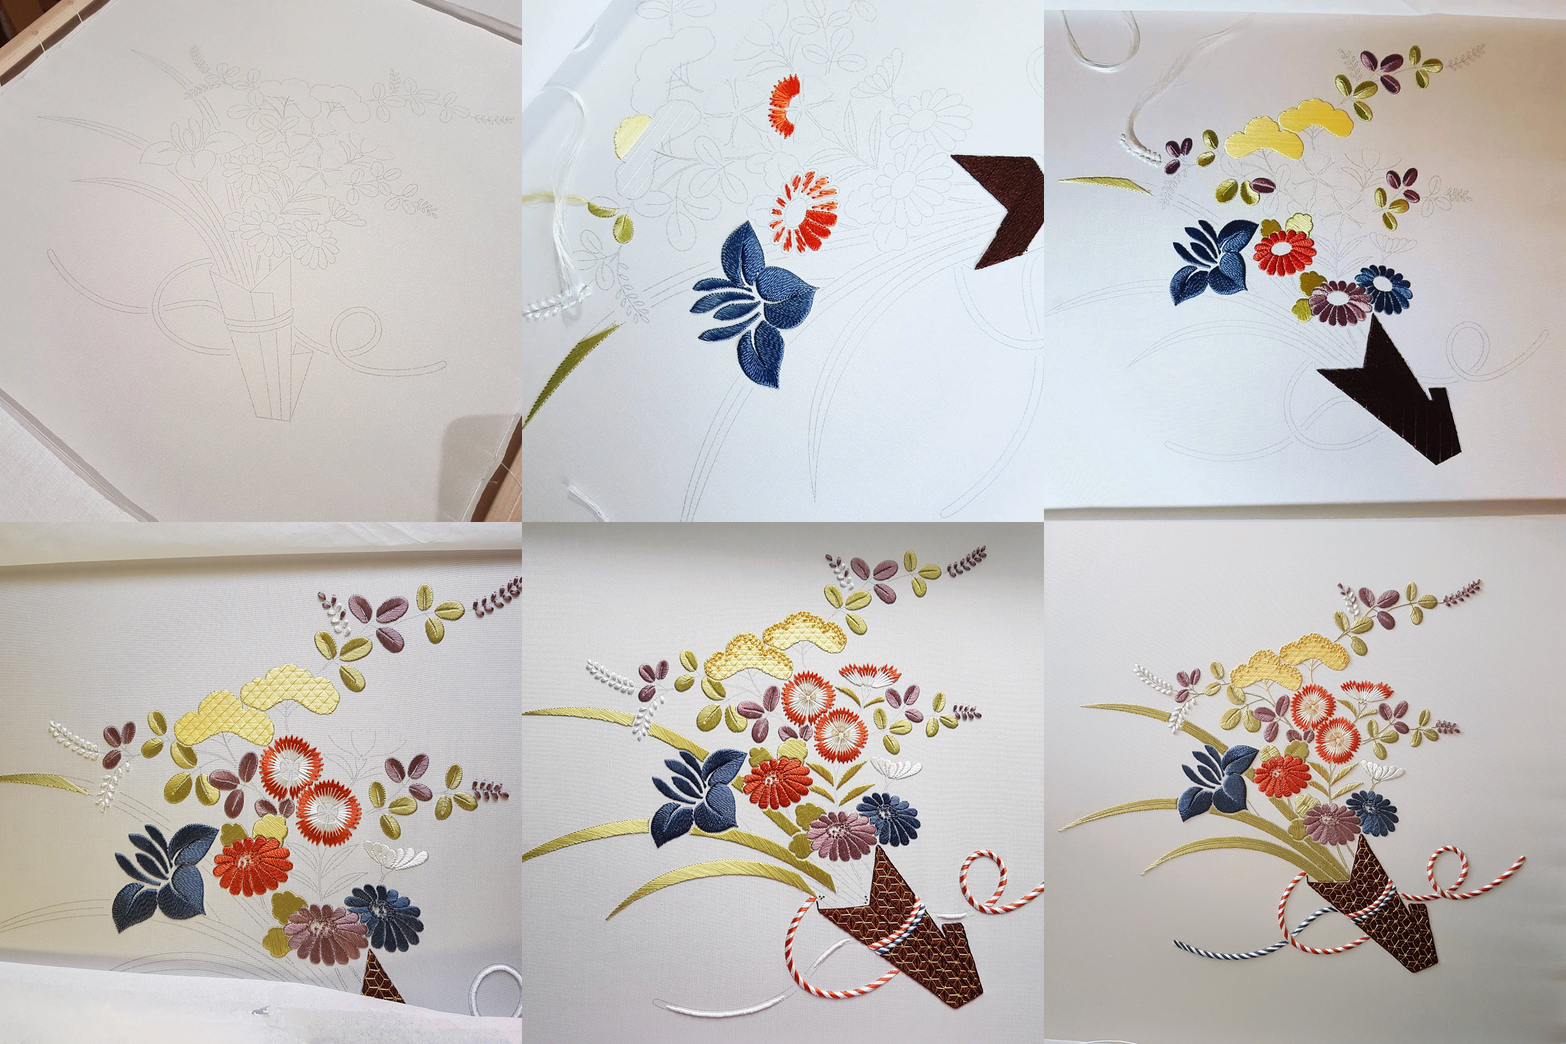
I made an animation of the piece as it progressed. If you're interested in statistics, here is some data: I started on October 26, 2017 and finished April 14, 2019. It took 176.25 hours over a period of 43 days to stitch. This includes unpicking and redoing a few elements like the cords.

(click on the post to see the animation below)