Wednesday, April 25, 2018

Gone Fishing in Turkey

Istanbul by Thea Gouverneur
I mentioned at the beginning of the year that we were thinking of going to Turkey in May. Well, not only are we going, but by the time you all read this post I should already be on my way. I will be away until May 14.


In the first week, we will be visiting Cappadocia in central Turkey and Kuşadası on the Aegean coast. The schedule in the first week will be pretty packed as we're taking a tour. The second week will be spent in Istanbul doing our own thing.

I was able to get recommendations for embroidery shops and even invitations to pass by embroidery schools from a few stitchers/teachers on Instagram who are based in Istanbul. So there will be some embroidery stops in Istanbul and I already have a list of things I will be looking out for.

However, the major focus of the trip will not be embroidery and stash enhancement (I will try very hard). We will be visiting many museums, mosques and palaces. I love Islamic illuminations and geometric art, so I will be spending a lot of time studying those. I will be taking lots of pictures. My goal is also to find some good reference books (books don't count as stash!), one of our stops is the old book bazaar.

We'll have quite a few flight changes, so I'll need something to pass the time. I will be taking Bramble and the Rose. This piece has been to quite a few places; Western and Eastern Canada, South Korea, France and now Turkey. Soon, it's going to need it's own passport. The sewing kit on top is a lovely gift from Deborah of Sweetfallenangels. It will be coming with me to help keep track of all my tools. Still trying to decide between taking a hoop or q-snaps. I'm leaning more towards a hoop this time as the q-snaps take up more space and are awkward to set up in the small space on the plane.


We will have access to Internet at the hotel and we're looking into getting roaming data, so I won't be going off grid completely. I will to try to post on my Instagram account but most likely not interact much past that. I don't want to spend my time glued to my phone ;)

Monday, April 23, 2018

The Wooly Lamb

No stitching to share with you today (I'm still waiting on the wire check), instead here is my second baby gift of the year. This is LUPO the lamb another Lalylala design.


I've always wanted to make him as the pattern for the body looked interesting. Instead of single crochet stitches, it's made up of the bobble stitch. I must admit it did take me much longer to make him than other Lalylala designs. After a while, I was over the fascination of the bobble stitch. Still, he looks adorable.


Especially those droopy ears. I was also very lucky to have found a very close match to the wool used in the model. This is from Caron Simply Soft Tweeds collection. I ended up needing two balls of the creme and one of the taupe.


I tried my hand at making pompoms for the first time. I got a Clover pompom maker to make it much easier. Don't you love Clover products? I haven't tried one yet I haven't liked.

As I mentioned already, still no sign of the wire check. Crossing my fingers it will be here either today or tomorrow. Not sure how much stitching I'll be doing as I'm getting ready for my upcoming trip, but I'm sure I would make an exception if the metals do come in :)

Friday, April 20, 2018

Japanese Landscape - Part S and T

The last two sections go around the outline of overstretched pearl purl.


First, there is a 3 ply twist of gold and copper. This thread is actually very interesting. It looks like passing threads that had been twisted together to form a cord. This one has two ply gilt and one ply copper.


You stitch it down the same way as you would a cord, by couching between the ply. This makes sure your stitching is invisible. Since I was couching with yellow thread, I also tried to make sure to stitch between the gilt ply.

Once I've couched all around, the twist is plunged the same way you would passing thread. It's a little trickier as there were three threads instead of just the one. I managed get all three plies in my large chenille needle, but the lasso method might have been the better option.


Finally, a border of #4 pearl purl is couched all around to finish it. I really liked the weight of this purl after using the smaller purls for so long. It was very refreshing.


Unlike the previous two borders that were started in the lower right corner, this one is started in the middle to make sure all the corners are nice and rounded.


I'm so happy this last border is there. It not only looks fabulous, but it also hides a multitude of sins. My line of overstretched purl was crooked in a few places but now you can't even tell.


I was on such a high after putting in that last border, I just wish I could declare this piece finished. There is still the chipwork in the lower left corner to finish. As I write this (it's Tuesday), my order is still being processed. So final pictures probably won't be posted till mid-May. That will give me time to figure out the best way to photograph it. I want to show you how glittery it is.

Thursday, April 19, 2018

Japanese Landscape - Part Q and R

The next two sections are the hills in the horizon.


The hills on the left are just three lines of couched pearl purl.


The right side has a little bit more work in it, with some couching and chipwork.


This is where I wish my felt was better applied. You can see that the lines are not nice and even. Maybe I should have trimmed the felt a little at the top?

(click on the post to see the animation below)


Still looks pretty. I love the combination of copper and gold.


At this point, except for the missing wire check, the area within the border has been completed. All that's left is the frame which I will share with you tomorrow.


Wednesday, April 18, 2018

April TUSAL


Late as always. This month my jar is a mishmash of different things, some you've seen on the blog others you haven't. The yellow thread and white sewing thread is from my goldwork project. while the brown wool is from a baby gift I'm in the process of making. It's due this Sunday so I better hop to it. The white batting we'll leave as a mystery for now :)

Tuesday, April 17, 2018

Japanese Landscape - Part O (almost) and P

So I finally got those beads I was missing. I really should have ordered them online as they would have been less expensive (I didn't realize how much) but I was too impatient to get on with things.


Beads are priced by their finishing and galvanized gold is a little pricier than most seed beads. They're so pretty though, so I will eventually use them in other projects.


The silver hillocks (small hill or mound, I had to look that up) are covered in silver wire check chipping. Interspersed among the chipping, are the gold beads surrounded by silver wire check. The effect is really quite pretty, I will have to remember this combination. To help with placements, I marked where I wanted there to be gold beads with a black marker.

(click on the post to see the animation below)


All in all, I didn't actually need such a big packet of beads. What I really needed was more of the silver wire check :( I was so close to finishing too as you'll find out in a later post. I've already placed an order for more, but it is unlikely I'll get it before next week by which time I will be traveling.


I didn't want this to stop me, so I just kept going onto the next section. More hillocks, this time in copper.


This is not the end of the updates this week, there is more to come. I had a very productive weekend.


Saturday, April 14, 2018

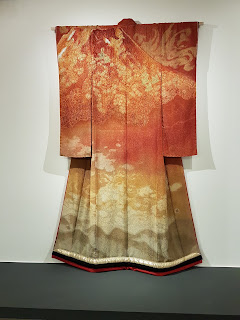
The Kimono of Itchiku Kubota

Today is another post full of pictures. At my last Japanese embroidery meeting, Nancy mentioned an exhibit being held at the Toronto Textile Museum displaying silk kimonos by a Japanese artist named Itchiku Kubota. A group of them will be going to the exhibit at the end of April. I unfortunately couldn't go as I will be travelling, so I made sure to pass by while I was in Toronto over the weekend.


I did some research on Google, hoping to find a video demonstrating the technique used by Kubota and stumbled on this lecture that explained the history of the technique much better than I could ever have (I recommend watching the video first). There is also this video here that I couldn't link in the post.

(click on the post to see the video below)


If you plan on visiting the exhibit and want to be surprised, I would stop reading here :) The rest of the post is all pictures of the different kimonos. Most of the kimonos are from his Symphony of Lights collection of which there are 40. He planned on making 80 but died before he was able to complete the series. His son and daughter have taken up his work at his studio in Tokyo.

The Universe (from left to right): Ha, Uzu, En, Chuu, Zu, Shu
A close up shot of Ha (A curling wave of Magma). Many of the pieces have floral and leaf motifs drawn on them after the fabric had been dyed and some were also embroidered in silk.


He was fascinated with Mount Fuji. It was possible he was influenced by French Impressionists and hads made many kimonos depicting Mount Fuji at different times of the day and in different seasons trying to capture it's moods. When he finally built a museum to hold his art, he made sure to select a site from which Mount Fuji could be seen.

Fuji standing in burning clouds
Red Fuji at dawn
A tender, cool dawn
Fuji standing against golden layers at clouds
They had some pieces that were individual work and not part of any series. I really love the colors he used in his work. Especially the purples, reds and oranges.

Aoi
Kasanenichrin

The next kimonos are all part of the Symphony of Lights: Seasons collection. Some of the names do repeat themselves, so those are not a mistake. I'm not super crazy about the pale colors, but when you look at the kimonos up close the work that went into them is amazing.

Seasons (from left to right): Shoujoutou, Rurikon, Kougaki, Benigara, Kamimurasaki, Jo

Seasons (from left to right): Ryou, Kou, Hin

Seasons (from left to right): Hou, Kou, Ei, Sei


Seasons: Shou, Ai
Seasons: Byou, Bou

Seasons (from left to right): Kyoku, Ryou, Chou, Kan, Jo
I really like the next three kimonos. Looking at them is like looking at a Japanese ink painting.


Here is an animation of close up shots of the various kimonos just to give you an idea of the detail that went into them.

(click on the post to see the animation below)


There was a catalog available to purchase as part of the exhibition. It is available to purchase online from the textile museum here. It contains pictures of all of Kubota's works, with some close up pictures and a section on his creative process.


A plus, I also found a Japanese embroidery issue that's published in Japan by Kurenai-Kai in the used books section at the museum gift shop. It was a little expensive, but the pictures are lovely and it also includes a booklet with English translations.